June/July, 2016 - Vol. 30, No. 1.
April/May, 2016 - Vol. 29, No. 6.

|
In This Issue
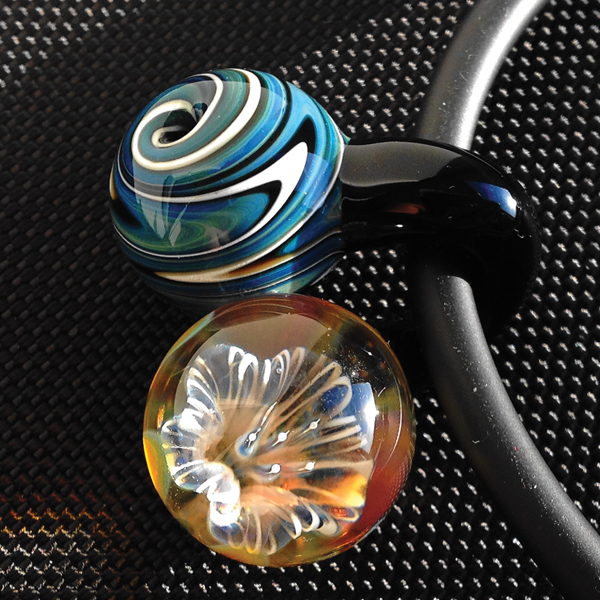
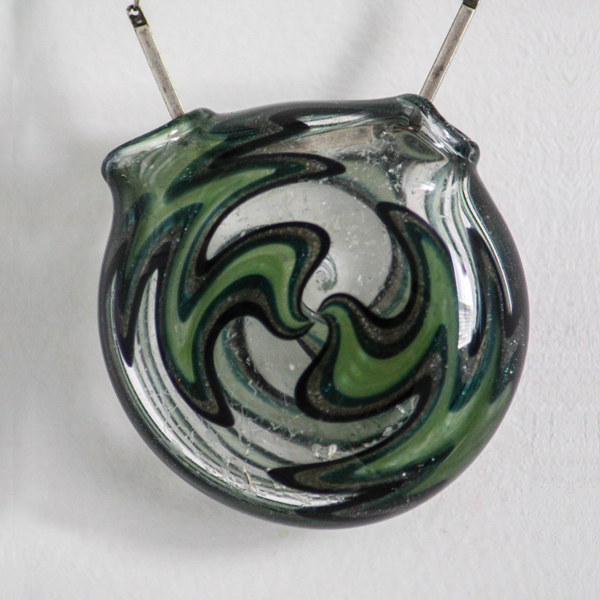
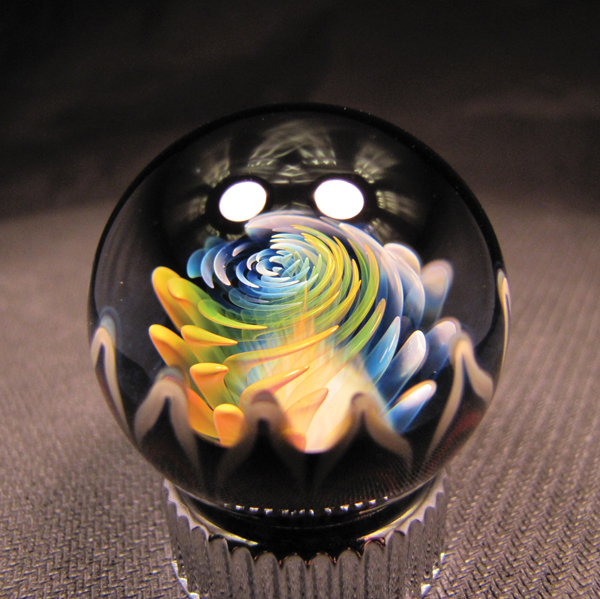
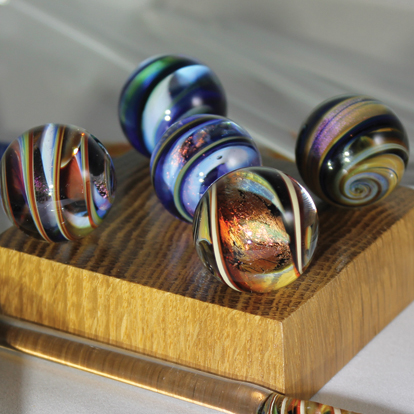
Classic vortex with a fume implosion by Derek Beaumont
I’ve always been fascinated with glass and fire, and have been pretty artistic since I was a kid. After high school in Florida, I got my bachelor’s degree in IT from Purdue University and had a “normal” job for a while. After my first daughter was born, I became a stay-at-home dad and began reading about glass. I enjoyed watching and learning about how marbles were made. I admired artists such as Freddy Faerron and Richard Hollingshead and was captivated by their marbles—compact, 360 degree paintings that will last forever
...
From the beginning, all I ever wanted to make were marbles with beautifully executed fume. My favorite style of marble is the pure and simple vortex that has something a little bit different about it. This tutorial shows how I create a vortex with an implosion rising from its center—a fun way to add a little depth to your vortexes
...

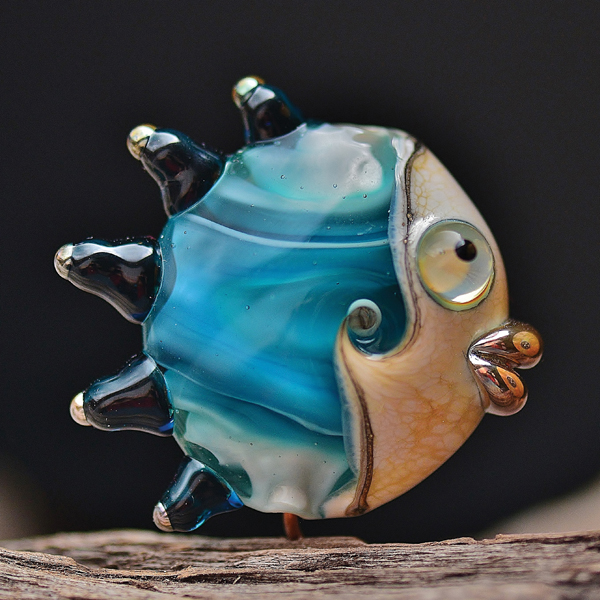
I am a Czech lampworker. I was born in South Moravia, a lovely part of the Czech Republic. After graduating from college, I moved to Cesky Brod, a small town near Prague. I work as a teacher in elementary music school. Lampworking is one of the ways I relax
...
The act of creation gives me extraordinary relaxation. I ignite the torch mostly at night, when my family is sleeping and the only ones watching me are two tomcats and a dog. I have developed my style from simple beads through intricate flower motifs. I like simple shapes decorated with complicated patterns. I like working with dark ivory. I love an “organic” style.
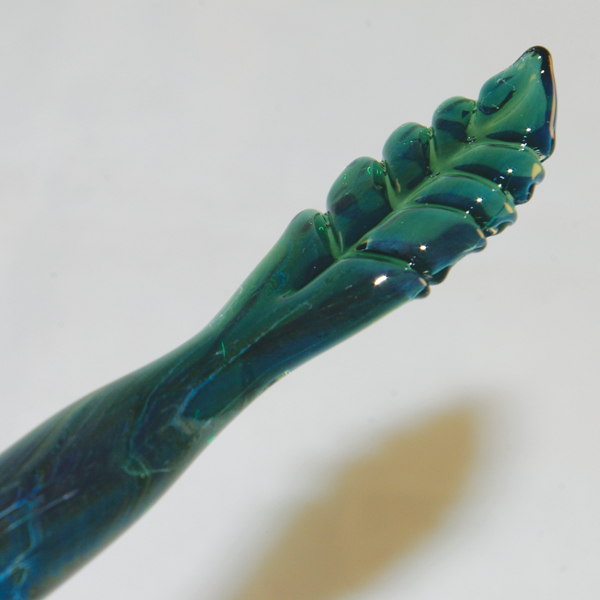
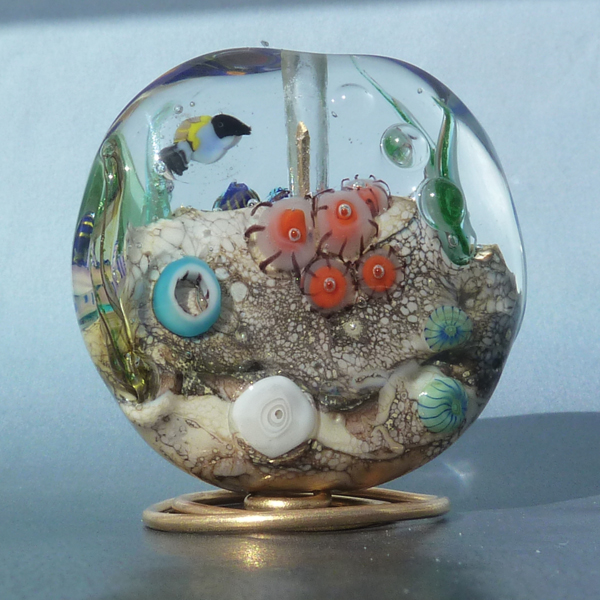
I love the fish in this tutorial. She lets me play with the colors of glass and vary simple decorations toward the more complex
...

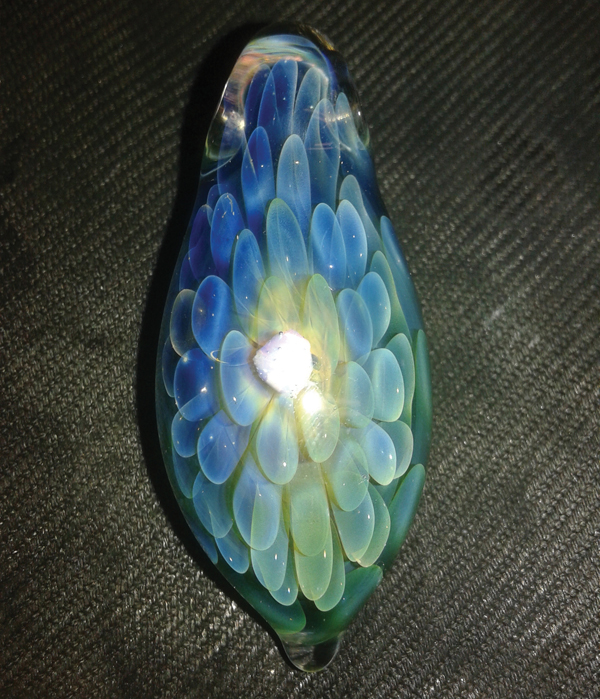
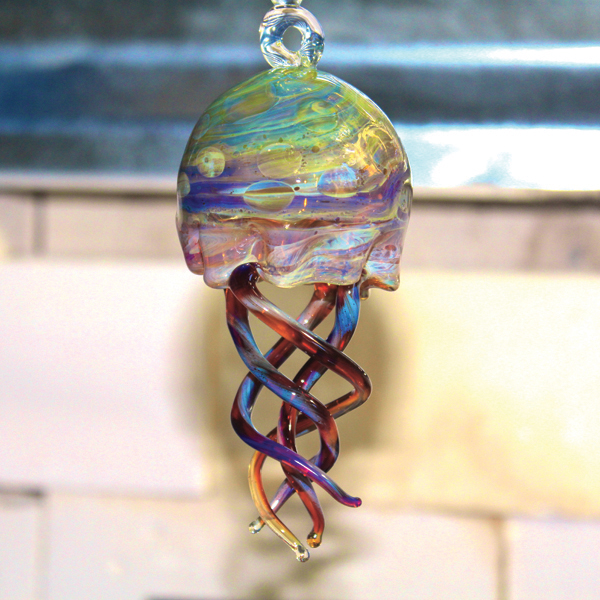
For as long as I can remember, I have been fascinated with glass. I remember watching videos and TV shows of furnace workers making amazing glass pieces and always thought that I really wanted to try doing that. When I was about 18 years old, my family took a trip to the Big Island of Hawaii, where I saw my first hot shop furnace glass studio. I remember being amazed at all of the glasswork on display in that gallery—large platters, vessels, and sculptures—but what really caught my eye were the big jellyfish art pieces
...
I now spend most of my torch time making wine stoppers, marbles, and pendants. I do some hollow work as well, but something keeps drawing me back to the solid work. Maybe it is the fun of watching the design/flower grow into the clear—who knows? Every time I bring new creations in from the kiln, my five-year-old daughter tells me how pretty they are and asks, “Dad, can I have this one?” She loves them no matter what, even if they didn’t come out as I planned. You have to love a young child’s enthusiasm and excitement over a simple glass marble
...

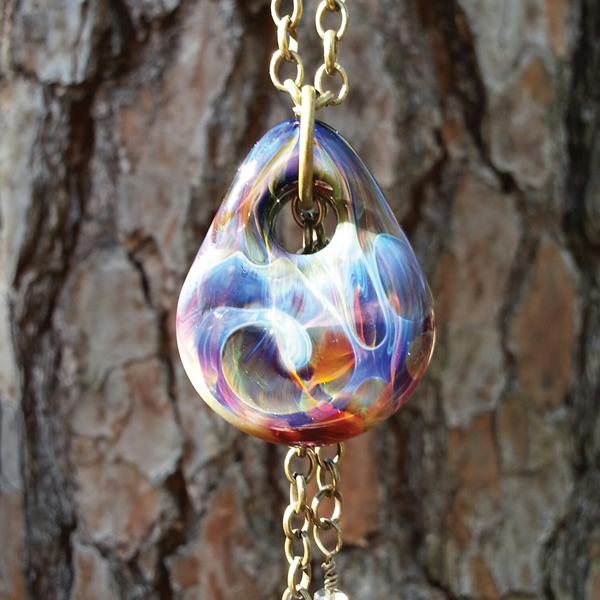
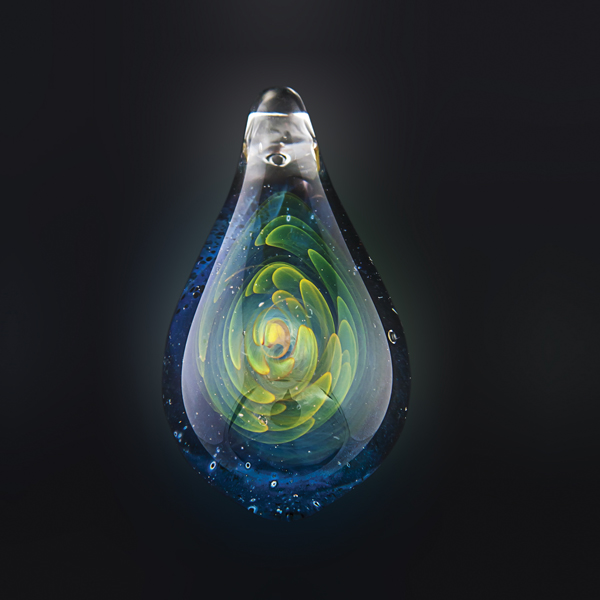
When I started out, I was working mostly on pendants and marbles, but I always knew I wanted to apply that to functional pieces. Fume work has always called to me. People like Kenan Tiemeyer and Freddy Faerron. who incorporate massive fuming into their work. are big inspirations. There are a lot of artists out there who can really control that color spectrum, and I’ll always chase my understanding of that process.
Recently, I have been accomplishing some nice rainbow fades in my implosions thanks to a few tips from Tyler Massoth, and I’ve been trying to work on some inside-out and sleeving techniques.
This article covers one of my favorite pendant styles to make: an opal-accented fume implosion drop
...

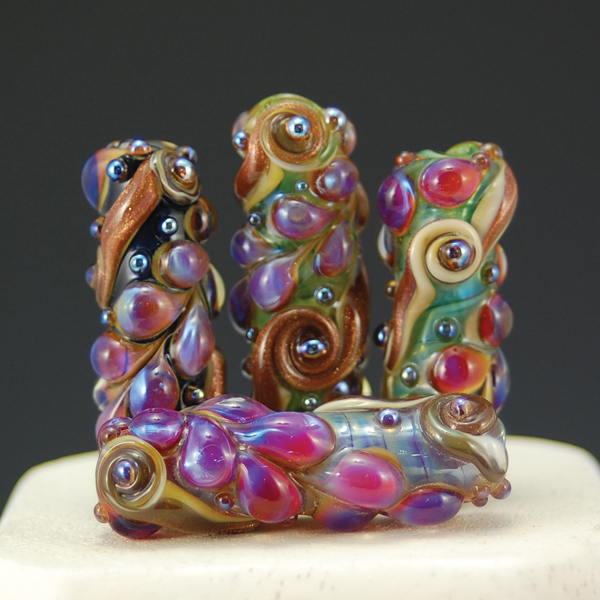
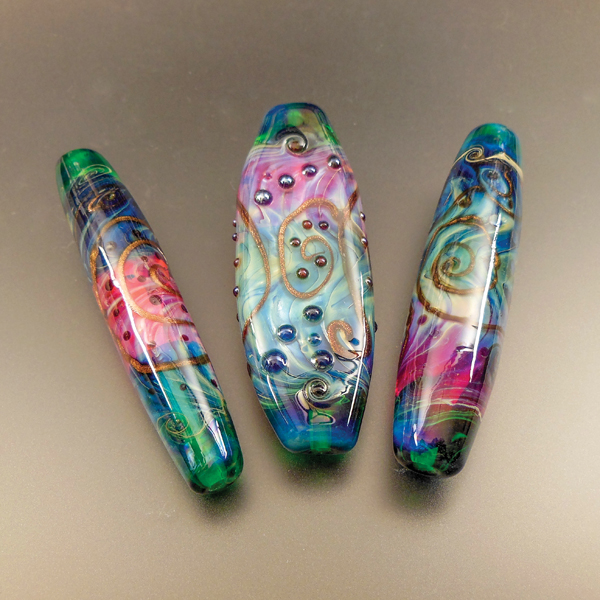
These Carousel beads are among my favorites to make because they incorporate different skills (reducing, encasing, raking, twisting) to practice and I can also test different silver glasses in making them. They are called Carousel beads because a customer said they reminded her of the carvings and decoration on vintage carousels, and the name stuck.
The materials I used for this bead will work with any glass, not just silver glasses. I work only in 104COE glass, but I’m sure this would work with any COE as well. It is fun coming up with new color combinations and variances
...

I have been working with soft glass since 2001 and teaching others to make beads since 2003. For many years now, I have been drawn to raking and masking techniques. I like the way you can make a pattern and manipulate it into something entirely different and unexpected. I am always experimenting with new patterns – I get bored with too much repetition.
One of the patterns that students ask to be shown most often is squares, which involve raking and masking.
There are many different colors of glass to choose from; many are suitable for raking and masking. I like a glass that will keep strong, defined edges after many heatings. You will need contrasting colors of glass. I often choose Dark Ivory glass for the lighter color. Ivory can be tricky to work with since it does not like too much heat. Transparent colors often get fuzzy edges, and white can be tricky because it goes clear when hot. Turquoise and sky blue with browns are a nice combination. Black and ivory is my all-time favorite combo. Experiment and have fun
...

There are many different schools of thought and formulae for pricing work. That’s a discussion for another day, but even if you triple the cost of those materials, you still probably won’t equal the perceived value of the finished work. My idea is nothing revolutionary; it’s just something I don’t see often, and it helped me pay for glass and tools when I was otherwise broke.
I hope you enjoy this contribution, and I hope it helps keep your novice time on the torch from being a complete money pit!
...

Finding inspiration for my sculptural soft-glass bead designs has never been a problem. I see something and think, “I wonder if I can interpret that in glass?” Each time I make something new in glass, it’s like a tiny puzzle. I sketch ideas out on paper, print out online reference photos, or even refer to a physical object when lampworking.
Sculptural 104 glass seems to provide such a variety of opportunities to continuously try new concepts. It can be making a minor change to an existing design; adding another technique to what I’m already doing; or exploring a new type of glass, technique, or tool.
I teach nationally, and this concept carries over into my classes as well. I like finding new ideas or alternate ways of working, so my workshops can include anything from learning how to incorporate photos of a pet into a bead, how to make snow globes, or even the ins and outs of bobblehead sculptures.
Watercolor painting was what drew me to art after a career in the business world. I loved the light coming through the luminous colors and thought that glass might provide a similar, but different, experience. It just took a few torch sessions and I was hooked. So many of us have that same experience.
Glass art has provided some fun experiences as well. Through Beads of Courage, I’ve had my beads go up on two NASA space shuttles and carried in a few of the Iditarod sled races. More soul-satisfying has been working directly with kids with cancer to make the Dream Beads that they have designed themselves become reality.
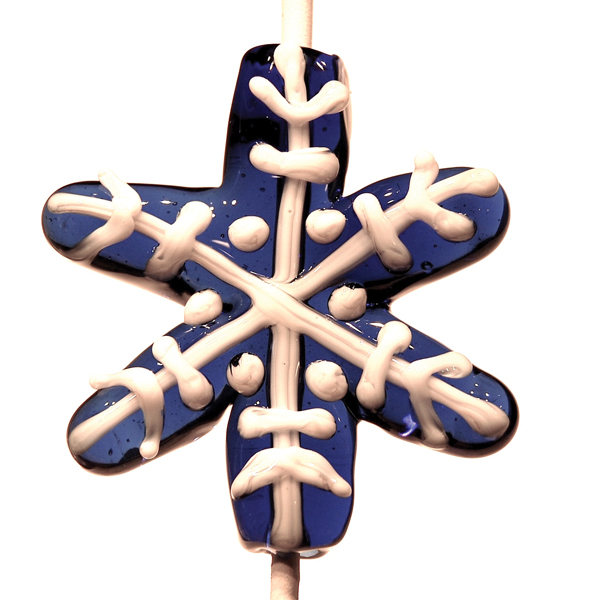
This snowflake bead tutorial features one of my favorite techniques, which seems to be less prevalent in soft glass. I love snipping away hot glass with my shears. I was lucky to pick some up in Murano years ago, and they have been a delight ever since. Have a string of glass sticking to mandrel? Just a little snip takes care of that problem. A little too much glass in one place? Why not give it a little heat and easily cut it away?
I designed this snowflake bead tutorial to help you practice with scissors. Kitchen scissors work fine. Just be sure they are sharp and your glass is hot enough to cut
...
- Glassified Ads - April/May, 2016
- Vol. 29 No. 6.
- Workshop Calendar
|
February/March, 2016 - Vol. 29, No. 5.
 |
In This Issue
Making a Three-color Compression Flower by Matt Kelley
As a glassblower, it is a great advantage to have grown up in a place like Humboldt County that is so supportive of the arts. I get to see the work of Banjo, Matt Robertson, Tristan Hodges, and the guys at Lost Coast Art Gallery in person. Inspiration is everywhere around here. From another perspective, 10 years on the local volunteer fire department has reminded me to appreciate life
...
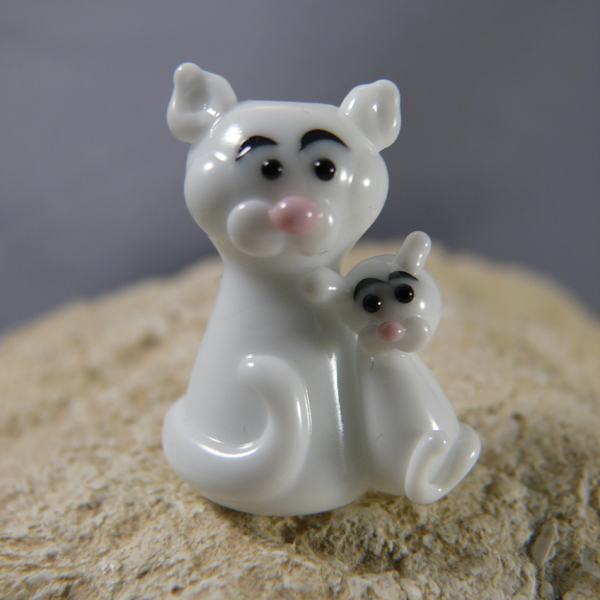
Cat Bead by Malene Damgaard
In October 2015, I decided to start my own company and work full-time as a lampworker. This is the best decision I have ever made. I love the reactions that my beads give rise to. I make beads at almost every hour of every day; when this is not possible, I crochet, make clay figures, or paint. The 24 hours in a day are just not nearly enough
...

I’ve practiced glass art since 2007, using traditional techniques (Murano, Italy) mixed with new techniques from Europe, America, and Japan. I use many techniques and skills, along with both solid glass and tubes. My favorites are “Off Mandrel Hollows” (blowpipe) and “making marbles wearable.”
There are so many fascinating techniques in the “marble-madness-universe,” but few options to wear those round beauties. That led me to the idea of the “Signature—Cherry-Pendant/Cherry-Eye-Pendant.” Mother Nature helps in this case. Fuming, opals, dichroic, air-trap, and more are all skills and techniques that you can use. If you like, you can mix them together. The best thing is that this works in both soft and hard glass
...
As my hobby grew into making small blown vessels, beads, jewelry, marbles, and other pieces of glass art, I found more and more outlets and sold my work to friends and at local art shows and various shops around Oklahoma that carried similar glasswork. Over the last few years, I have found ways to sell most of my glass art online. On a good day on the Internet, I reach more prospective glass buyers in a few hours than I do at a good weekend art show, and the interactions can be managed better.
My glass art lately has been all about marbles. Trying to use all of the techniques I have learned over the years and pouring them into different styles of marbles has been a real joy. I am fascinated with marbles and the desire to make them round is my final goal with every piece.
The phrase “don’t lose your marbles” has stuck with me since childhood. I often heard it repeated around the house, growing up, since my dad collected marbles, and I heard it even more when I started making marbles of my own, so naturally I had to “lose” them. Although I began hiding and leaving glass art in places I have been early on in my glass career, my “art abandonment” activity has now taken on a life of its own.
Here is how I make one of my favorite pieces: a Step-by-step Ribbon Core Marble
...

I love working with glass and playing around behind the torch. I am working on a few different series of pendants that pay homage to objects in the natural world that captivate my imagination, such as fungi, plants, and sea turtles, which I have loved since I was a boy growing up in Kauai.
In addition to paying homage to what I love, my work is also dedicated to showcasing the beauty of each glass color in each piece I create by encasing the color rod in clear glass, which protects the integrity of the color while being worked, resulting in more stable glass for sculpting. Encasing color protects the color from hazing or clouding while working, especially with cobalts and more-fumed colors. It eliminates the need for a crucible and other specialized tools for pulling cane, so artists who do not have hotshop access can create their own encased color cane in smaller batches
...

It’s been two years since I started my glass journey. This past year, I have been working with boro glass after scoring a box of boro glass scraps from the Glass Scraps Facebook group. I started, once again, learning the fundamentals; this time for making functional glass with my new torch and boro glass, with the help of Revere Glass and other YouTube videos. I kept going back to watch Eusheen, John Kobuki, and Rob Duggar make their pretty marbles. I then upgraded my torch to a Nortel Redmax with pre-mix as I was quickly outgrowing my Mega-Minor. I haven’t yet made anything functional on my torch, but my marbles get better with each session.
Here is how I made a dichroic and cremation ash vortex marble, in honor of an American hero—Tommy G.
...

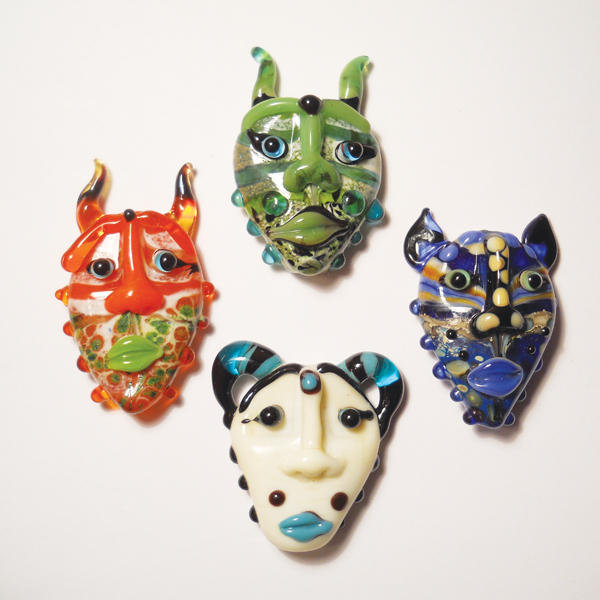
There is a grand history of ancient and traditional masks to draw on for inspiration from every culture around the world. For me, the first inspiration was most likely the Mardi Gras parades of my youth. Who wouldn’t be inspired when surrounded by so much color and downright crazy masking folks all around!
Many of my masks have pointy ears rather than horns, but folks love those crazy horns. They are a bit fragile and harder to execute than ears, so I have added a pair of horns to this example to show how it’s done. The great thing about faces is that you can make them look pretty well any way you’d like—and, if things end up just a wee bit wonky, it’s all part of the appeal!
Because you will be adding a lot of surface decoration, such as eyes and a mouth, to this bead, a simple background will work well. The background in this bead could certainly be simpler, which would probably make the features pop out better.
Remember to give this bead a little insurance heat now and then as you work
...

Moldavite is extremely rare; more rare than diamonds, rubies, or emeralds. Currently, we only know of about 275 tons to exist, which has spawned an immense amount of folklore and mythology around the importance and suggested use of the stone. A common tale is that of the Holy Grail, which many historians now believe could have been made of moldavite if it did, in fact, exist. In the Spiritual and New Age communities, it is believed to have undeniable power, is used as an opener of the Heart Chakra, and can assist in attaining enlightenment.
Regardless of your beliefs, it is hard to deny the raw beauty and allure of this mysterious stone if you have spent any time handling it. I look forward to continuing to expand and share my knowledge of the use of moldavite and the fascinating pairing of this incredible stone with the better-known, but equally exciting, medium of glass
...

I live in Cleveland, Ohio, and have a beautiful family—Kristen, my partner, and Addy, my daughter. I have been working with borosilicate glass for about 20 years. Most of my time with boro has been spent in producing functional pieces. I have dabbled in the hot shop with soft glass occasionally. Working with glass has been one of the most uplifting and rewarding things I have had the pleasure of encountering. The beauty of shaping glass is that it’s a never-ending journey in exploration of self-ability. I was first exposed to it by chance when meeting a friend who made glass pipes. I learned for about a month, watching fundamentals and techniques of glass shape, and then continued on my own, learning through experience.
This journey I’ve been on with glass has been interesting, to say the least. I have been all around the country, learning bits and pieces all along the way. The last few years, I have been taking it a bit more seriously. Now that I have a family, I’ve had a new outlook on life and all parts of it. The patience and balance attained from working with glass is priceless.
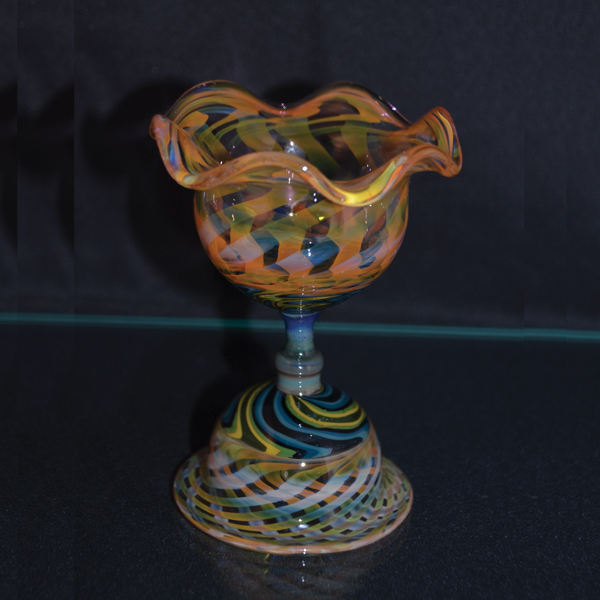
This glass art tutorial is about a piece that I have been making for a long time. I refer to it as a fancy accent dish with foot or, more simply, a coin dish. It is one of my favorite pieces to make! The dish and foot feature fumed reticellos and lined-tubing spiral flairs that mirror each other, with a ruffled top.
...
- Glassified Ads - February/March, 2016
- Vol. 29 No. 5.
- Workshop Calendar
|
December/January, 2014/15 - Vol. 29, No. 4.

|
In This Issue
Making a Dichroic Galaxy Petal Paperweight by Brian Messer
This tutorial demonstrates how to lampwork a fairly large dichroic galaxy petal paperweight with borosilicate glass. I have used these techniques in various forms and applications throughout my body of work. Essentially, this project is using the same techniques as building a marble, but flattening and stretching the object instead of making it round. The sizes and proportions for each step can be modified to fit different specifications for different applications. You can use any variety of dichroic coatings and/or color rod to produce the desired effect in your finished piece
...

I work in mainly soft glass, making pendants and small sculptures, but on occasion cross over to borosilicate. Over the last several years, I have been experimenting with adding PMC silver to my designs, either in settings or findings, and have been creating a great collection of one-of-a-kinds.
I continue to develop and grow in my creative journey to define and refine my visions in glass while at work in my studio in the Pacific Northwest.
Out on a hike to the Sol Duc a couple of weekends ago, a little group of mushrooms caught my husband’s eye and he called me over. I couldn’t believe how bright and colorful they were against the landscape. That little group of mushrooms inspired this particular piece
...
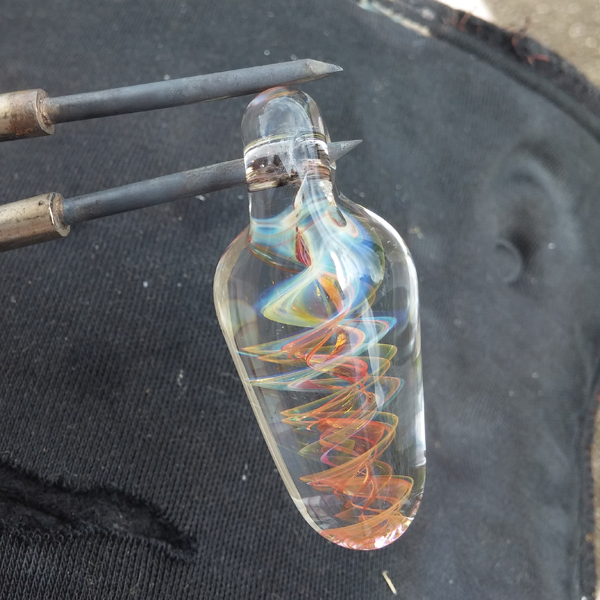
Creating a Fume Spiral by Will Waugh
This tutorial demonstrates how to make a fume spiral (some people call these DNA spirals, fume twist, or fume cane)
...

I’m generally quite bold with colour choices, but kept the palette simple in my initial experiments, using only white and shades of grey. Birds seem to be a recurring theme in my work, and my first enamelled beads featured birds sitting on tree branches, silhouetted in black. There was something about the softness of the enamels that compelled me to tumble these beads to give them a softer matte finish. The beads, I realized, had been influenced by Japanese prints I’d seen online. I named them “Serenity Beads” because they had a tranquil, peaceful aura to them.
It wasn’t long before I started to introduce more color and realized how encasing enamels can give a soft, subtle effect. My “Kimono Beads” were, again, influenced by Japanese prints but feature Love Birds sitting within blossoms. I soon realized that the color palette of the enamels, combined with various glasses, gave me unlimited options and combinations. I have certainly made many mistakes in my experimentation, but I’m having a lot of fun doing so!
The “painterly” nature of enamels meant that it wasn’t long before I started to experiment with landscapes. My inspiration for these comes from the beautiful east coast of England where I live—with some artistic license, of course! These beads have a depth to them that is difficult to capture in photographs. In looking for subject matter, I have found an even deeper appreciation of the landscapes in my local area. I am eagerly anticipating the changing of the seasons to see what effect they will have on the nature of my work.
This tutorial is written for competent lampworkers who will be aware of all safety requirements when working with hot glass and have appropriate ventilation when working with enamels
...

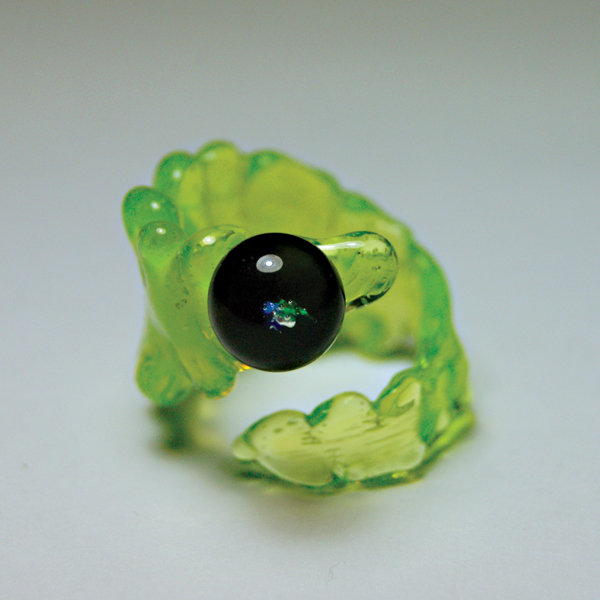
My studio, Orange Glow Glass, is the amalgamation of these two passions. I now spend my days in various degrees doing both: teaching and creating. I invite anyone ever in my neck of the woods to stop by and do the same.
This opal-encasement feather ring tutorial is good for beginners to learn and can easily be adapted using different styles and color techniques for more advanced flameworkers
...

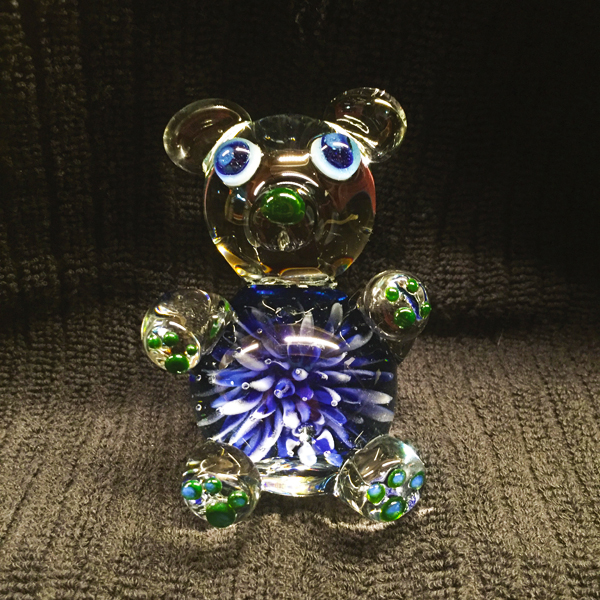
When I was a kid, I’d go to the mall with my girlfriends, and I’d stop and stare at big orbs of glass with complex designs and perfectly placed air bubbles inside them. I couldn’t understand how something like this was even possible—such beauty and perfection inside solid glass. I could understand a canvas and paints or a piece of wood being made into an oar, but this was glass. How did the artists get their hands inside solid glass? When I learned the basic concepts of marble-making, I finally understood what I had seen all those years ago.
I’ve worked with soft glass for nine years and loved every minute of it. Boro and I didn’t get along at first; we fought a lot and he made me cry, but now we’re madly in love. October 2015 was my one-year borosilicate anniversary. I’m having a love affair with borosilicate glass and I don’t feel bad about it.
Here is how to make a Marble Belly Teddy Bear
...

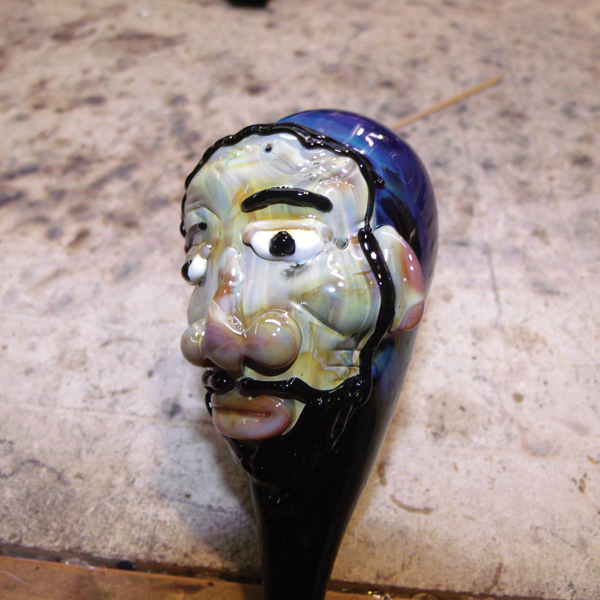
This tutorial goes over the basic layout of a face to help you get started on making your unique characters
...
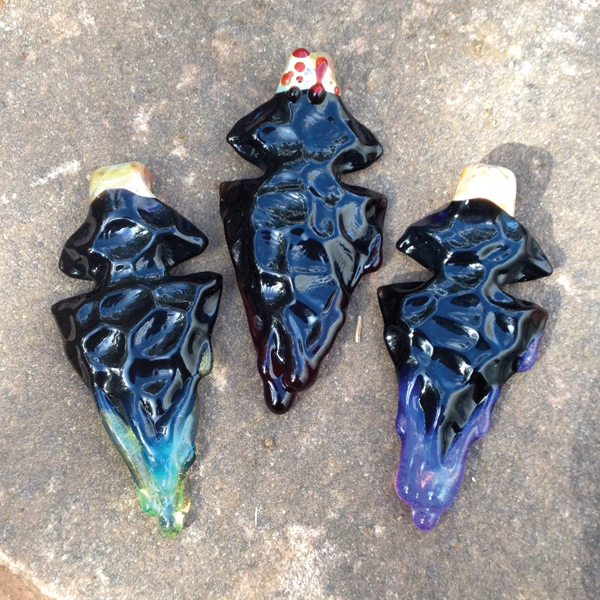
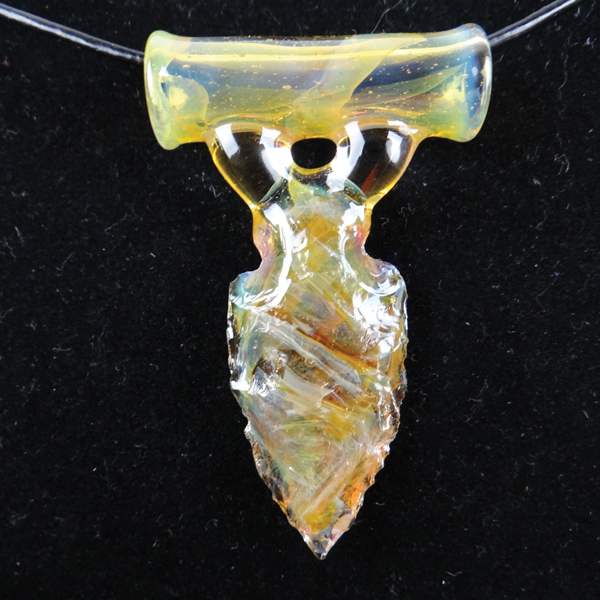
A Poison Arrowhead Guide by Trenton Nuzum
It was in my sophomore year of high school that I had my first hands-on experience with glass art. My art class rode a bus from Tillamook down to the Edge Gallery, just south of Newport, Oregon. There, I was able to make my own off-hand glass float. The instructors guided each of us as we rolled hollow balls of clear glass in colored frit that was laid out on a steel bench. I expressed such a strong interest that the guy let me use a tool to twist the colors around. I was instantly hooked.
I now live in Colorado and enjoy an awesome community of glassblowers and art enthusiasts. I am inspired by everything, from outer space to the metaphysical, to organisms here on earth. I strive to create a wide variety of glass art that continues to evolve.
A Poison Arrowhead Guide
...

Whenever I see new shapes, I want to try them. For me, it is not really important if the presses or marvers are made of graphite or brass—I like them both—but sometimes I recognize that it is much easier to create the shape free-hand without pressing, checking, pressing, heating, and so on.
From the first time I made a bead, I had to have every critter sitting on a base bead. My first goal was making frogs. I still love the green guys hanging around on a bead. It is always an experience to apply the small black dots for the eyes. The froggie is now alive and each one gets his name before I sell it. All my critters get names ... the dragons and fairies and ... and ... and
...

I never thought I’d have the opportunity to really explore glassblowing, but after dropping out of college, I moved home to find a glass studio in my basement that my brother had built! From then on, glassblowing was all I could think about and my brother was patient enough to help me learn. It’s been a long and slow road over the past two-and-a-half years, and I still feel like a beginner at times, but it’s definitely been worth the struggle. Glass is a finicky medium, but it lets you know when you’re doing something right, as well as when things just aren’t going your way. This gives me a greater feeling of satisfaction when everything comes together in the way I intended.
I like to make wig-wag pendants when somebody wants a pendant to match a pipe. It is a relatively short process and the end result is an interesting design.
This tutorial explains how to make a hollow wig-wag disc pendant
...
- Glassified Ads - December/January, 2014/15
- Vol. 29, No. 4.
- Workshop Calendar
|
October/November, 2015 - Vol. 29, No. 3.

|
In This Issue
About Glass Flowers and the Unpredictability of Life by Elena Hernburg
My students often ask me, “What if I find and equip a studio, learn how to make beads, and then realize that this is just not my world?” I don’t know what to say. I have never had any doubts. I have found the love of my life. How there can be any doubts?
I love to do floral decorations. I like to grow glass flowers. I have mastered a lot of different techniques and have invented some myself. I offer one of them in this tutorial
...

Here is a technique I’ve come up with for making clear, encased color flat cane using a vacuum as opposed to the arbor press. At the shop where I work, we started calling this a “flatstack” and the name stayed. I use it primarily to add matching attachments to my linework pieces, but it also works great to chip up into squares for basketweave/chipstack techs.
The reason a flatstack works is that, when suction is applied to a flat shape, it wants to stay flat, because there is more surface area on the broad sides. This means there is more force sucking them together than on the narrow sides. I prefer the flatstack method more than using an arbor press because the color remains untouched by the flame atmosphere—no boiling or reduction issues occur in the color.
It does have a few other advantages, such as being able to use dichroic and stringer components more easily in your flat cane, because they can be done in multiple layers on both sides of the core color rods. Also, there seems to be less time and gas use involved when compared to the arbor press method. It is a variation to a vac stack and, just like a vac stack, different-sized tubes will get you different numbers of lines, as well as different widths and thicknesses. Unlike a vac stack, there is no clear in the core at all. I usually use 50 mm x 5 mm tubing because that’s a very manageable size, but still gives you a lot of flat cane. This size tube comes out to be a good thickness in the end result as well
...

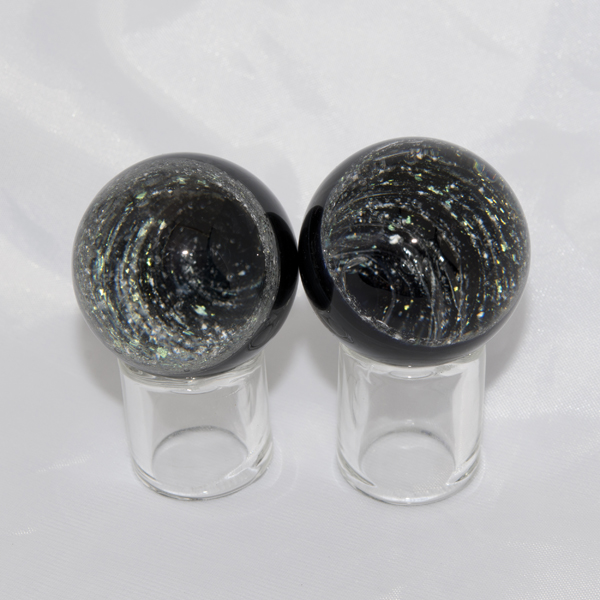
The “Redbeard Show” taught me how to make my favorite piece: the chaos/energy fume marble (images a)
...

I have been fascinated with flint-knapping and its history for as long as I can remember. As a pipemaker, I can appreciate how something so beautiful and individually unique can be used as a tool and serve a purpose. As an archer and archery hunter, it was a natural progression to start using flint-knapping in my glass work, and it has proven to be an addicting journey.
I encourage anyone to learn flint-knapping—it can test your patience, but be very rewarding. I suggest reading any books you can get your hands on, and YouTube has a lot of helpful videos for beginners.
Keep in mind that you must be more aware of thermal shock after a piece is knapped. The fracturing from the flint-knapping makes it very sensitive to heating and cooling. Never put a cold piece of knapped glass in a hot kiln—it will crack
...

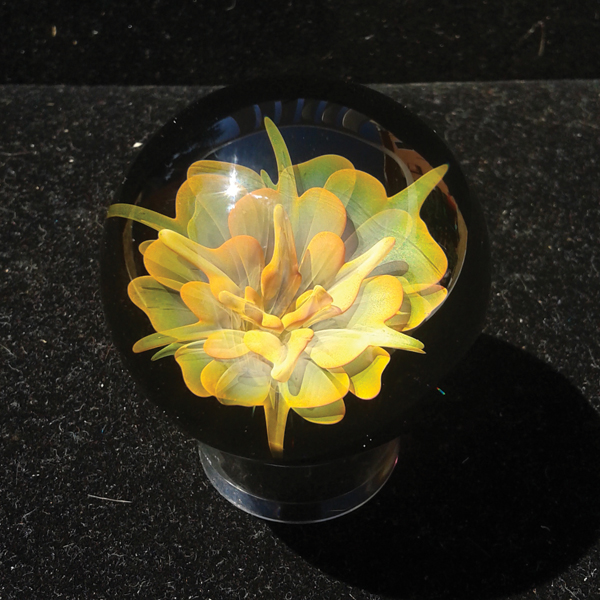
In 2013, I became infatuated with art marbles. I was spending a whole lot of time online in the glass groups on Facebook, mainly on the Marble Collectors Page. I started to notice that any time I posted something to Marble Collectors Page, within 15 to 20 minutes, my posts were so buried that it was hard to find them on a computer and almost impossible to find if you were using a mobile phone. I got together with Stephen Harrison and we started our own Facebook group, Mibs For Less, as a place not only where people could find art marbles that they could afford without having to dig through posts for hours on end, but also where newer artists could come to showcase their work.
Now I focus mostly on making marbles using compression techniques to bring beautiful flowers and amazing galaxies into bloom in the glass. I love to learn new styles and have started to play with sculpted work as well, focusing on nostalgic cartoons and characters.
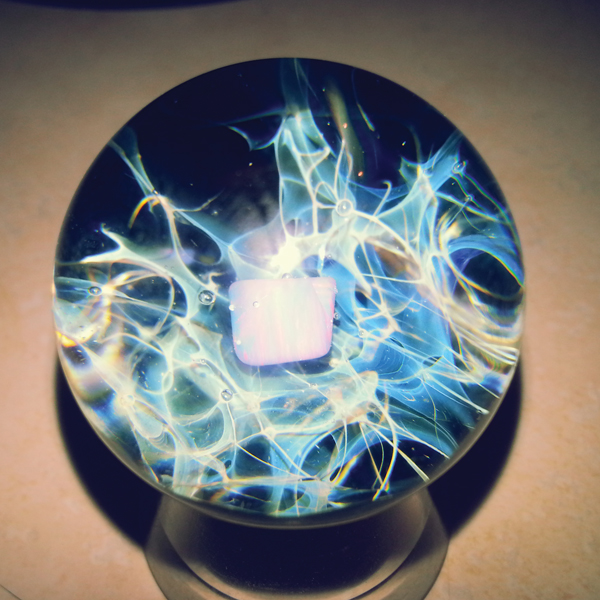
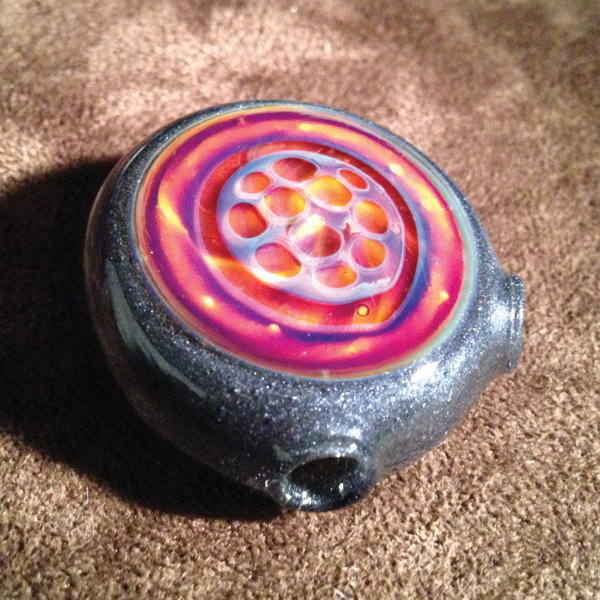
I have always been kind of in awe of space in general, but the idea of a super-massive black hole taking in so much matter so quickly that it erupts into jets shooting out either side has to be one of my favorite space events. That’s the inspiration for this quasar marble
...

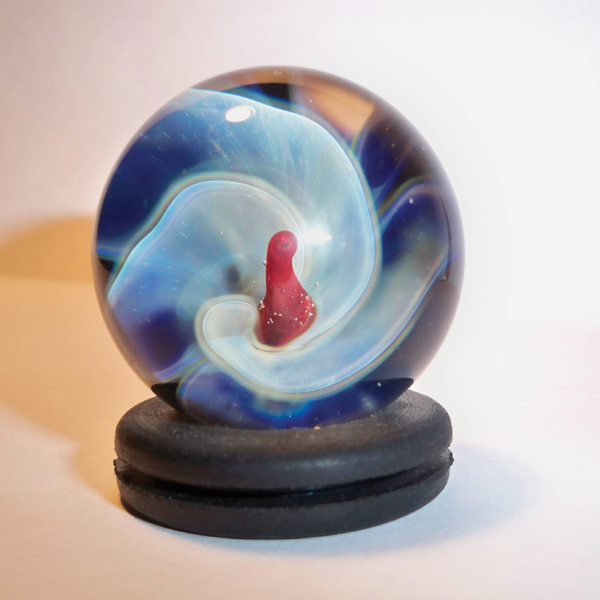
Before I started melting glass in 2007, I have been fascinated with boro marbles. Once I was able to make them, I developed even more of an addiction. There is something special to me about making a big marble on a hot day.
I attended AGI 2014 and was lucky enough to work next to Mike Close. Not only did he share a tremendous amount of knowledge with me, I was also able to make a few marbles on one of his handmade marble molds. That totally changed everything for me. Making a marble round is very important and this tool makes a world of a difference. As shown in this tutorial, I use it to make a fumed flower-implosion marble
...
Stitch Beads by Naoko Ishida
I named them “Stitch Beads” because the patterns look like hand-stitches. I feel thrilled when I see the parts which I masked with the base bead color reveal the unmasked parts like hand-stitches as I melt in the masking glass.
All the glass used here are Satake
...
Working Between the Lines by Zariel Shore
Zariel Shore is a 22-year-old glass artist living with his wife, Kya, in the mountains of West Virginia. He discovered the art of flameworking when he was 16. He spent the next years building his studio and practicing as much as he could. After several intensive classes and countless hours of practice, he continues to explore, learn, grow, and discover various techniques. He works every day and is always eager to expand upon his craft.
Here are some tips on creating a marble using retticello to work “between the lines.”
...
Mesh Beads Made with Twisted Canes by Masafumi Uchida
Making this bead can be good exercises to learn how glass behaves. If you force the glass to move when it is in a disk shape you would break the bead release, so be careful.
All the glass used here are Satake
...
- Glassified Ads - October/November, 2015
- Vol. 29, No. 3.
- Workshop Calendar
|
August/September, 2015 - Vol. 29, No. 2.

|
In This Issue

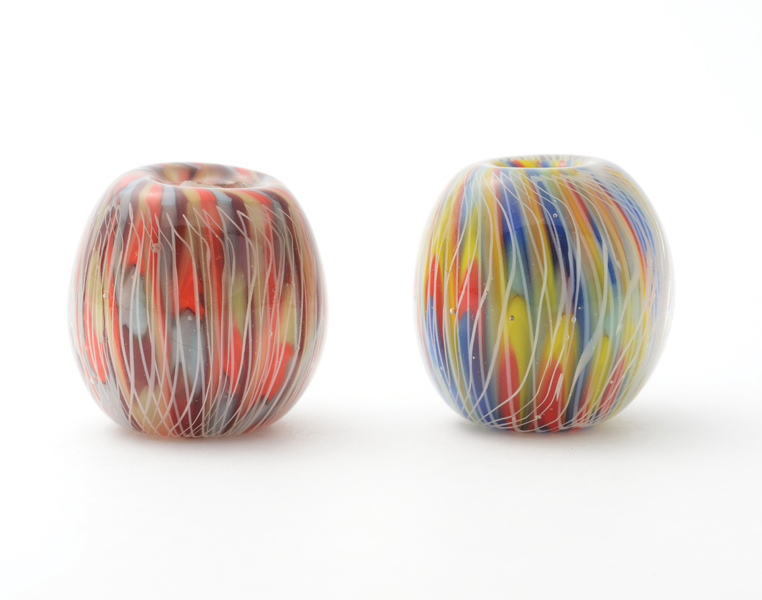
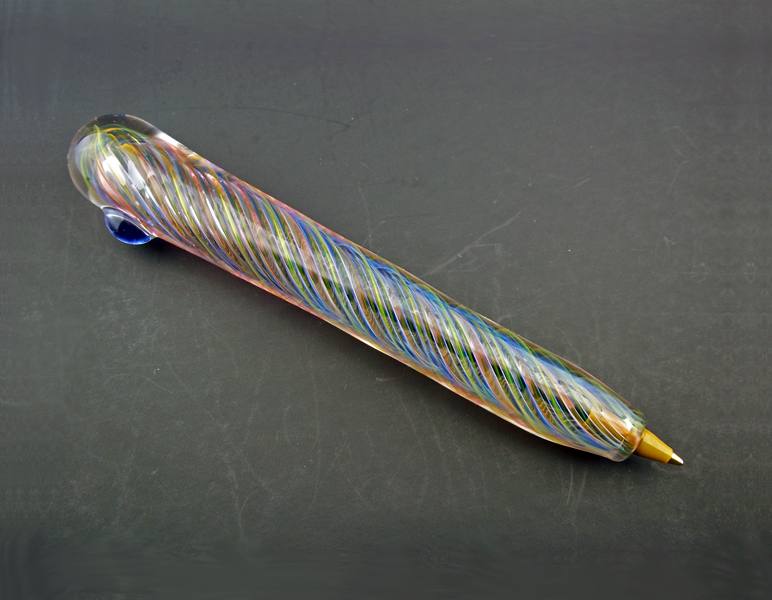
Fume has always been the main inspiration and focus in my work. There are so many ways to apply fume techniques. This tutorial involves making a glass pen with the inside-out fume technique. It is a very basic application that can always be experimented with. There are many ways and approaches to inside-out, whether it be with just color or just fume and clear, or even fumey striking colors.
This project uses a little color, but the focus is mostly on fuming. Thin silver layers create a bright blue, and thin gold layers make a hot-pink color. Thick layers of silver will turn white or even yellow, and thick layers of gold will become bronze or tan. By mixing fumes and applying clear at different layers, you can create a rainbow of colors in a piece with no colored glass at all!
A great tip for taking those colors to the next level is drawing with light, transparent colors rather than clear. This will add a very slight tint behind the fume and make even more unique colors.
This project involves fuming different layers to create a vibrant green hue. Glass pens are always a crowd pleaser and interest a wide range of people, from young to old, artistic to professional; you name it, they want one. Good luck, and remember to take the basics from these lessons and apply them to your own work. The nature of being a successful artist is to constantly take your own personal style and artistic vision one step further
...

I was lucky to have some wonderful help early on with Kenyan Coon and Roger Child, two of the good guys in Salt Lake City, but you really do have to just keep trying, keep pushing yourself. As long as you don’t know you can’t do something, you just might be able to do it.
These octopi started out as a way for me to test and compare how the different glasses acted around each other; glass isn’t like any other media, where two different colors might either fight horribly or make each other even better by being close. Now, more than 400 octopi later, I still don’t have a full understanding of it all, but that is half the fun.
...

I have largely settled on the marble as my preferred expression in glass. Marbles had been the main selling point in much of my early work and I’ve always had an affinity for them. I am still constantly trying to learn new techniques and to improve execution of the techniques I’ve been doing for years. It seems that there are too many aspects of the art to be able to explore them all, but I’m doing my best.
I’m just old-school, I guess, but I’ve always had a love for wrap and rakes. The first piece of glass I had was a wrap-and-rake spoon in cobalt and silver fume, and my first production work centered around wrap-and-rake, too. It seems fitting that one of my first intentional marble designs would be based on the wrap-and-rake technique: a Reel Star Marble is basically a wrap-and-rake tube implosion with a dotstack backing
...

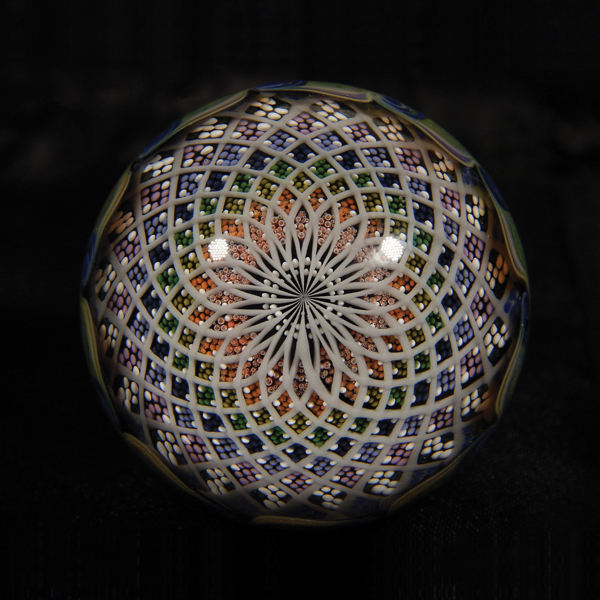
I am drawn to symmetry; sacred geometry; patterns; and bold, vibrant colors. I am able to lose myself in admiring the patterns of rugs, textiles, wallpapers, and Mother Nature. I let my mind go and become part of the pattern. My current points of focus are intricate, patterned dot implosions; they have become a form of meditation for me, almost akin to creating a mandala. The possibilities with these dot implosions are endless and only limited by creativity. Typically, I choose my colors first and let my pattern emerge the way it wishes to be created
...

I have been doing professional glassblowing/lamp working for 15 years, starting as a beginner doing simple techniques and moving toward more advanced work for the last seven years. Sculpting is where I feel most comfortable.
Sculpting comes easier to me than following procedure with certain techniques. Doing designs like a filachello or an implosion, or even a basic wigwag, is based on following a step-by-step directions to get the effect that you want with the glass. Sculpting comes from the mind and allows for more creativity without worrying about specific technique to get what you want. For me, that is more enjoyable because it is also unique. Everything comes out differently
...

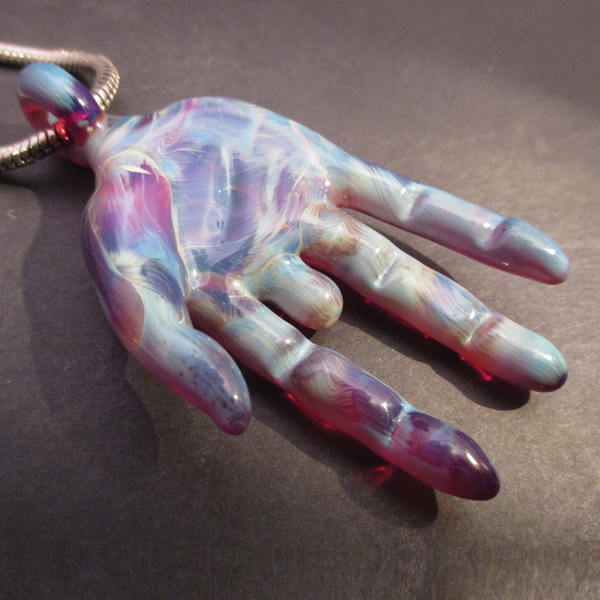
I pull of lot of my inspiration from music and it often shows in my work. This tutorial shows how to make a sculpted glass pendant of the hand that played over 3,500 shows —the one and only Jerry Garcia, who, in his youth, lost two-thirds of his middle finger in a wood-chopping accident.
This is a fun project and only takes a single rod of color to complete.
...

I knit with glass ...
As lampworkers, you may be picturing my lightning fingers, industrial needles and miles of stringer, all poised in front of a torch. On your mark, get set, GO! Fast and furious knitting: an Olympic sport where the athlete is pitted against time to knit as much as she can before the glass cools and becomes unworkable. And as a sucker for a good story, I would love to tell you you’re exactly right. Like the Roadrunner cartoon character, my hands move so fast, all you can see is a blur. It’s a good story. And you are not alone in wanting to believe it. Most people do think that is how I work.
But alas, it is just a story. Like real life knitting, with fiber, my work is a slow, and many would say tedious, process. It involves some heat, but no exhilarating contact with molten glass. It involves many messy techniques and several materials, but it all begins with knitting
...

When I first started working with glass, I had a lot of preconceived notions about the way things had be done. I first started to realize this when I took a class from Josh Lynch at the Mesa Arts Center in Arizona, and he challenged me to expand the way I thought about glass.
He asked us to blow hollow forms. When I told him that I had run out of tubing and only had about a 6 inch length of 5 millimeter to work with, he told me that was all I needed. He told me to just cover the stick of 20 mm clear I had with the color that I wanted to use, shove my 5 mm into it, and then just blow a bubble. I had been working as a neon tube bender for about a year at that point, almost exclusively with tubing. I suppose that is why his suggestion was so eye-opening. It had never crossed my mind to work the glass in that manner.
That paradigm shift caused me to question my preconceived notions. I’ve been working with glass now for 12 years, and still, when I talk to people in the industry, almost without fail, someone will give me a tidbit of new information that changes my perspective on the way I think and work with glass.
I hope you enjoyed this project as much as I have. Keep the torches burning and remember: Just because it’s the way it is done doesn’t mean it’s the only or best way to do it
...

Making a hollow pendant is an economic and efficient way to practice different techniques. Multiple different variations and arrangements can be used to construct a hollow pendant (encalmo sections, fillacello/reticello, wig-wag/switchback, reversal montage, implosions, fume, surface work, etc.; the possibilities are endless). This is a tutorial on just one of the many ways to assemble a hollow pendant out of two sections of borosilicate glass—it involves a simple, clear-dot pattern on a layered section of glass for the lens/face of the pendant.
For this project, first you need two sections of glass. The difference in the size of the two sections will dictate the distance between the face/lens and the body of the pendant. This is all a matter of preference that will develop with time and experimentation
...

Using only silver and gold fume one can produce a wide range of color. Many factors come into play when trying to achieve certain color through fuming. The kind of glass used plays a large factor in the fume color you end up with, as well as the flame characteristics on the torch when fuming silver and gold.
This style of marble can be made on most any size tubing to cater to the size you would like the end product to be. I normally start with 25.4 heavy wall Simax tubing on a 9 mm blowtube
...

Tektite is, simply and truly, space glass. These stones are found in various fields around the world where they were strewn after sedimentary material was ejected into space by large meteoric collisions. These strewn-fields are on every continent except Antarctica and South America, and the locations of the specimens dictate their names. The stones range from microscopic to softball size and from 0.8–35.4 million years old. Tektites are structurally unique, both chemically and structurally, and usually occur in splash shapes with a variety of colors, including brown, green, and yellow.
The different colors of tektite come from different areas of the world and have been associated with the formation of large craters in their regions. It is believed that these caters were formed when sedimentary stones were flung into space and transformed into glassy stones due to the extreme heat of reentry into our atmosphere. For many years, scientists questioned the origin of tektites but were nearly able to rule out the possibility of them being extraterrestrial. The first recorded tektites were found in what was then called Czechoslovakia in 1787, but have been renowned for their powerful energy in ancient cultures, including aboriginal and Chinese. The stones were considered to be good luck, and the metaphysical belief and understanding has been greatly furthered over the centuries
...
- Glassified Ads - August/September, 2015
- Vol. 29, No. 2.
- Workshop Calendar
|
June/July, 2015 - Vol. 29, No. 1.

|
In This Issue

One of the first things I noticed when I first started melting glass was how easy it was to create a spiral, even if by accident. Sometimes I would remove a punty with a twisting motion to reveal a little spiral left in its place. Before I got my “spin” figured out, I would often create a spiraling effect by accident, simply because one hand was spinning faster than the other. I’ve spent many hours obsessing over creating the perfect vortex with the perfect termination. Lately, I’ve been incorporating spirals into all my work as often as I can.
This project covers how I do my Spiral “Rocket” pendants. As with any project, there are probably many different ways to achieve a similar result. This can be used as a basic guide. To elaborate on the concepts, this pendant could easily be double-sided or have more attachments. You could use a different type of bail, or shape the disc differently entirely. Just try to avoid getting hypnotized in the process
...

Many cultures, through thousands of years in history, have used the eagle as a symbol. Some cultures view it as inspirational, others as despicable. As a military mom, it’s hard not to be in awe of these beautiful creatures and what they represent to those serving America.
This tutorial shows how to create the head of a Bald Eagle as a pendant on a bead mandrel. This eagle is made with soft glass. If you choose to create it in borosilicate, use comparable colors.
I use very few tools when I sculpt animals. My go-to tools are tweezers, a triangular razor blade clay tool, a butter knife, and an un-dipped bead mandrel.
Come melt with me — it’s time to soar!

Over the last year, I’ve turned my focus toward color development. I’m fascinated by all the colors I can get just by striking color rods or getting that perfect amount of silver fuming in a piece. Recently, I’ve been experimenting more and more with silver. I read everything I could find online about fuming and then, through trial and error, developed my own striking technique that I use in most of my new pieces, including the one for this demo. I’ve found, through my experimentation with silver fuming, that a slightly reducing flame chemistry produces a variety of vivid colors out of the silver that I haven’t been able to achieve through any other means.
My goal with my work is to share my passion and the beauty I’ve found in glass with the world. I love the glass community and how so many people have been friendly and helpful to me. The glass world really is a wonderful thing and I’m glad it brings together so many wonderful people. I’d really like to bring that sense of community to Ohio.
This pendant uses a very slightly reducing flame throughout most of the process
...

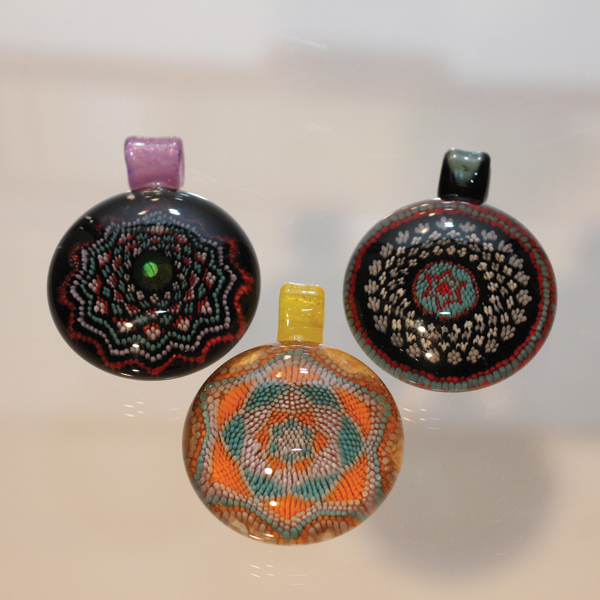
This piece is part of a collection of pendants made with Effetre glass. We call it Mandalas, which emerges from our constant research toward our own style.
We create them by using a mandrel, as in glass beadmaking, but we work at the end of the mandrel to make disc shapes. We decorate the disc with dots and, by raking them, we create a pattern that looks like a mandala to us. The mandala has a spiritual symbolism and a long-standing tradition, but so does glass, so it is a perfect combination for doing this kind of pendant — a unique artistic creation
...

If you are a marble lover, this show should be on your to-do list. Moon Marble is located in Bonner Springs, 30 minutes from the KCI airport in Kansas City, Missouri. There are usually 20 to 30 artists selling their work and doing live demonstrations. The event is free and it’s a great place to interact with marble-makers. Moon has brought many talented artists to Kansas over the years: Mark Mathews, Geoff Beetam, John Kobuki, Josh Sable, Goteston Recco, and Dan Neff, just to name a few
...

This tutorial is intended for artists with at least an intermediate level of skill with lampwork. While I prefer my teaching to cover all the minutiae in regard to improving technique and avoiding problems, or dealing with them as they arise, space and time constraints made this approach impossible. Therefore, you’ll get the most out of this tutorial if you’re already able to blow shards, pull stringers, and do basic encasing without further instruction.
Ready? Let’s begin!

A multi-colored barrel bead featuring silver glass effects with Double Helix Clio
This tutorial will show you a signature bead of mine that features multiple colors and multiple encased layers of glass to get brilliant color. This is my third tutorial featuring Clio. I love Clio because you can get a lot of interesting effects layering it over different colors. This is my first tutorial that shows you how I build my beads. This is an intermediate bead and it is recommended that you have some experience with encasing. Whatever your level thank you for trying this
...

A marble — like a pendant, like a pipe, like a lamp, like a sculpture — is a piece of work. Materials are considered. Craft and method is tweaked, ruminated upon, sometimes dreamt about. It is a piece of art, made in the malleable medium of glass; made portable and suddenly valuable in its gemlike quality. Seeing one of moderate size, perhaps an inch in diameter, is a curiosity. Seeing a half-dozen of assorted shapes, colors, and designs hammers in the point that these are individual works of art, reflective of each glass artist’s style, personality, temperament, and all the other oddities that make up people. A marble is a little world. Finding a world can be transformative ...
In the early moments of the group, it was the glassblowers making marbles — sometimes pendants or other small items — then hiding and posting said hides. The idea takes off, people really enjoy it. After awhile, some asked Johnston, Harper, and others if it would be all right to re-hide marbles previously found. Then came requests to purchase marbles solely with the intention of hiding them
...

This tutorial explains how to create a basic fillacello disc, which can be used as a decorative attachment to your work or made into a wearable pendant simply by adding a loop to the solid disc. There are many ways to make these and tons of variations on the patterns, so use this as a very loose guide to exploring the fillacello process
...
- Glassified Ads - June/July, 2015
- Vol. 29, No. 1.
- Workshop Calendar
|
April/May, 2015 - Vol. 28, No. 6.
|