June/July, 2015 - Vol. 29, No. 1.
April/May, 2015 - Vol. 28, No. 6.
 |
In This Issue
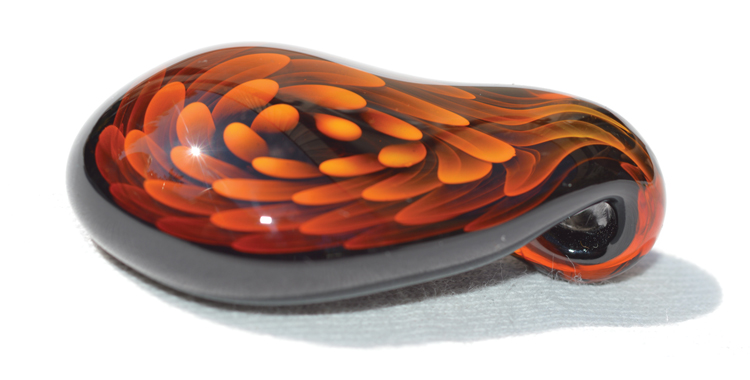
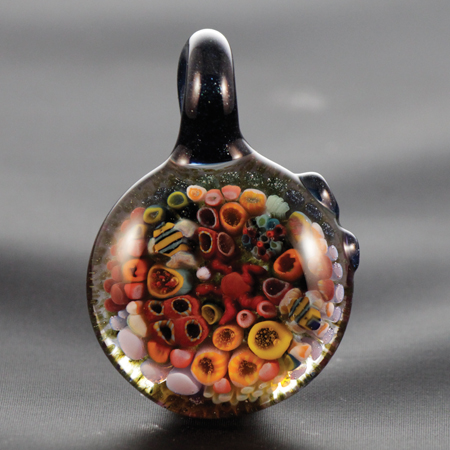
Coral Reef Millie Pick-up by Stephen Rhoades
Millefiori (millies) is an old technique of using murrine to decorate glass. This technique dates back to Roman era, but is most frequently associated with Venetian glass. The word millefiori breaks down into mille (thousand) fiori (flowers). You start by building cane from the core, creating large images that are then pulled down into rods and cut into murrine, and that starting image is revealed on a chip of glass. It is amazing to see what contemporary artists do with the millie, and the range of possibility and detail is incredible. It is a useful technique that can be incorporated into many other glass techniques. This tutorial combines a hollow implosion and millie cane to create a seascape
...

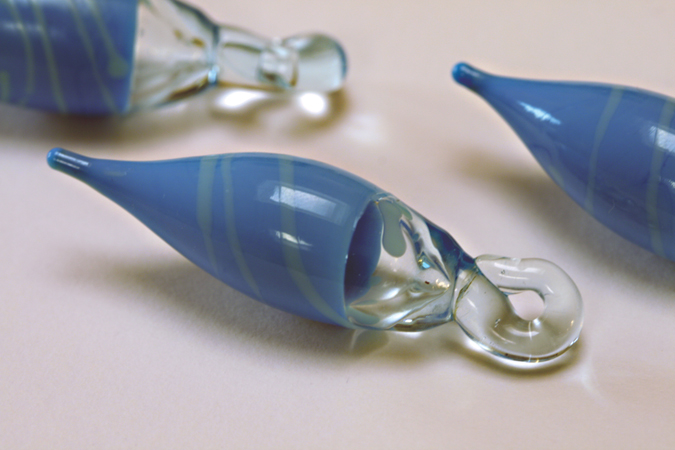
This tutorial shows to make layered tubing. I have been playing with variations of this for a while now and I really enjoy it. This particular batch requires familiarity with fuming, inside-out, reticello, and sleeving techniques
...

and the Future of Borosilicate Glass by Jason Howard
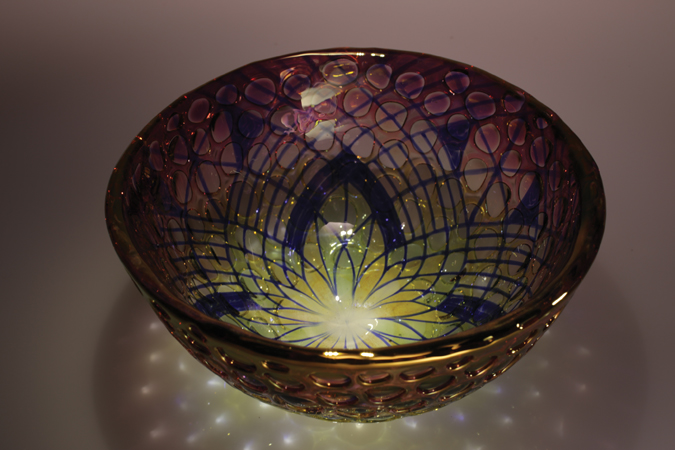
A new series of "Prayer Bowls" I’m working on has been a fun discovery. I tend to work very thin, Italian-style glass. I use traditional cup-making techniques, like opening bubbles with diamond shears and using jacks. I like to make cups as perfectly as I can, and then ironically burn holes in them—my cage technique. It’s my own interpretation of a Roman glass-carving technique, but I use a torch instead. Dropping a hot gather from the furnace into a caged bowl makes the bowl much thicker and returns the functionality.
The happy accident of discovery happened when I noticed how the shadows look when the light shines through from above. This effect on the light is created when the thick molten glass squeezes through the holes in the cage. The glass makes a little lens at each hole, and focuses the light in that unique shadow form. I find the effect mesmerizing. The great thing about happy accidents is that they lead to more ideas.
This series took on a new life and improved dramatically when I started collaborating with Doug Williams, aka “DEW.” I love Doug’s fillacellos, but they’re not something I use in my own work, so Doug makes an ideal partner to work with. The first fillacello we dipped and put into a bowl was opaque. It looked great inside the bowl, and the cage framed the design nicely. There was a sense of visual discovery when looking inside the bowl. The piece was very difficult to photograph, and looked much better in person
...
Monique Swinkels is a multidisciplinary glass artist who has been trained in soft glass, borosilicate, and furnace work. She works and lives in Hilvarenbeek, a small village in the Netherlands. Every day, she works on her new creations in her flameworking studio at her home.
She recently redesigned her home-based studio to explore the vacuum encasement technique after taking a two-day class at Colin Richardson Glass and a one-day class at Dave Graeber’s studio in 2014. In 2014, she did a collaboration with Colin Richardson—a marble created with the vacuum encasement technique that has a design on two sides.
This tutorial shows how to blow a pendant with the small Carlo Dona-blowpipe. After this tutorial, you can experiment with different shapes and decorations
...

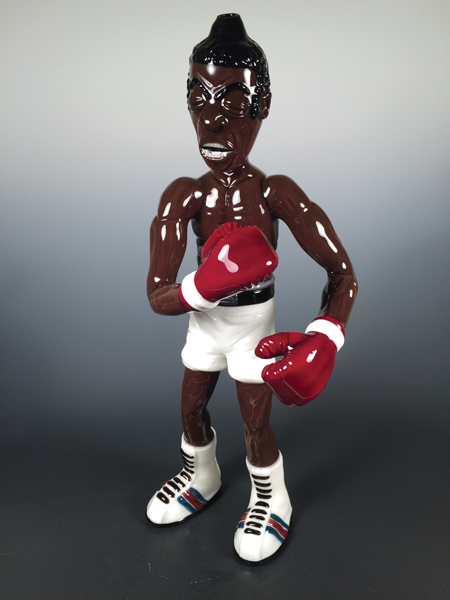
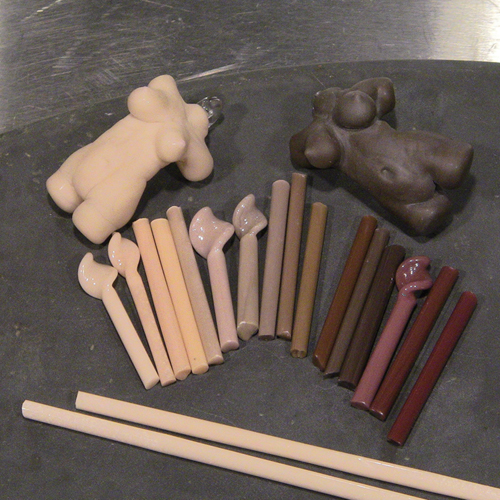
This is a general overview of what it takes to assemble a big, fully sculpted figure. I was commissioned to make a functional Muhammad Ali piece for a friend, which is what I used for the demo
...
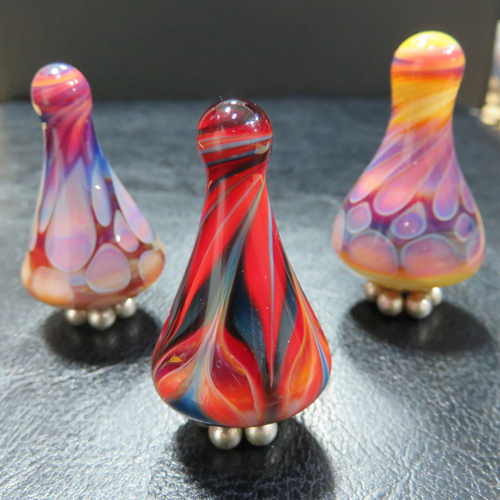
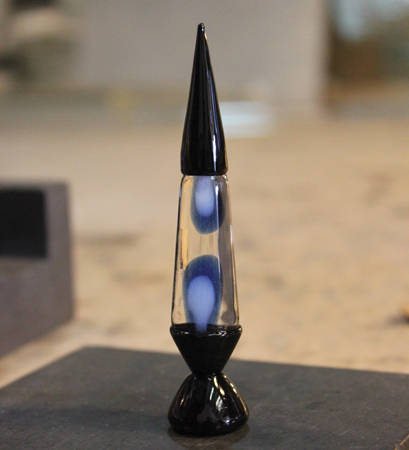
Lava Lamp Dabber by Joseph Skar
This tutorial will cover how to make a basic lava lamp dabber. I highly encourage you to expand on this concept. You could easily use different colors for both the lava and the base. You could also easily add more lava to the globe area, or even incorporate some opals or complex patterns. You could make this a pendant instead of a dabber, or maybe an attachment to a groovy retro-themed piece. Have fun
...

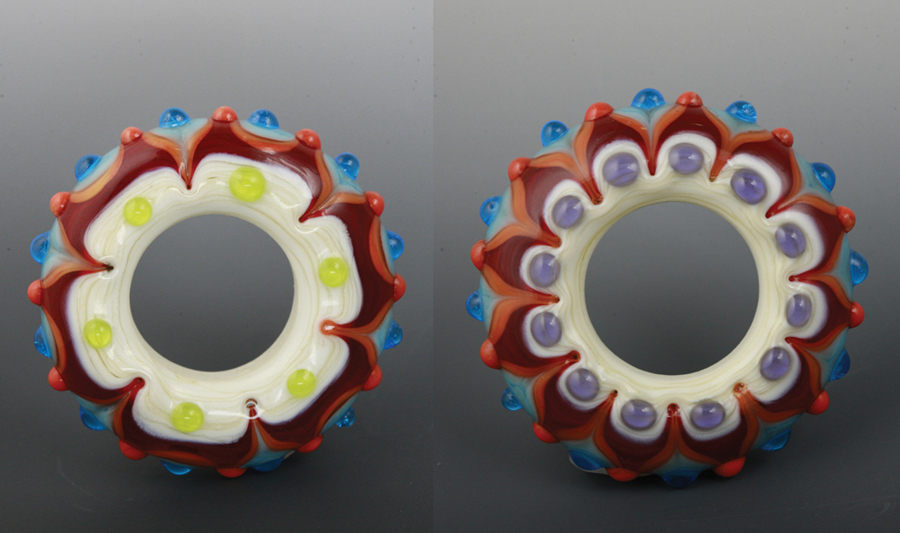
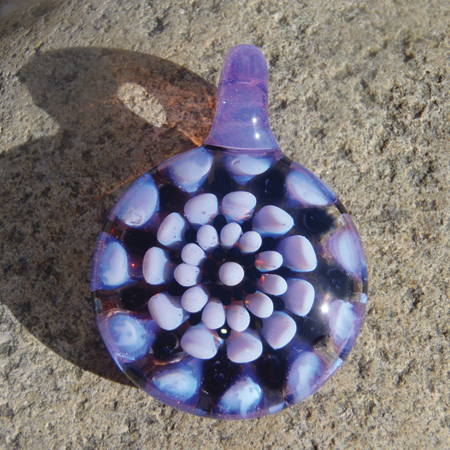
In this piece, you will see how using different diameters of raw color helps give the implosion the illusion of more depth to the human eye. The first three or four rings of dots will have the same number of dots in each ring; however, since the diameter of the dots will decrease with each ring, you will have to reduce the number of dots as well. Your color selection is very important when making this design—the use of highly contrasting colors will really make the design pop, but if you choose colors that are too similar, the pattern will get lost and look muddy.
...

In recent years, I have taken on flameworking as a fulltime job. I love making a variety of items to keep things fresh; pendants, plugs, spoons, sherlocks, mini-tubes, and kleins have become some of my favorite things to make. I plan on growing as an artist and increasing my knowledge within flameworking, as well as expanding to other forms such as slumping and casting.
Although in my first days working with glass, I allowed myself time to experiment without the benefit of instruction, I’ve learned that I can advance more rapidly by reaching out to learn wherever the opportunity arises. I plan to continue taking classes and furthering my knowledge of glass; it is never too late to learn something new.
This tutorial demonstrates two versions of making plugs (gauges) for earrings, an implosion plug and a basic color plug, although there are many different techniques and styles you may try—horns, hoops, and hollow plugs are among them.
Thank you all for your support over the years. I wouldn’t be here without the people who have bought my glass and this magazine!

I was born and raised in Southern California and have always had an eye for art. I started with drawing and then began painting. A few years later, I started blowing glass. I have only been a glass artist for about two years and constantly strive to push myself to be better, and to learn and try new techniques. I’m still trying to establish myself in the glass community and I’m still learning new things every day. I enjoying every chance I get to work, and feel blessed with every project I am commissioned to create
...
- Glassified Ads - April/May, 2015
- Vol.
28 No. 6.
- Workshop Calendar
|
February/March, 2015 - Vol. 28, No. 5.
 |
In This Issue
It’s bigger on the inside… by Andrew Lazenby
These five guidelines, along with careful observation of the effects of heating and cooling either with the flame or the kiln, will get you well on the road to finding the effects you are looking for.
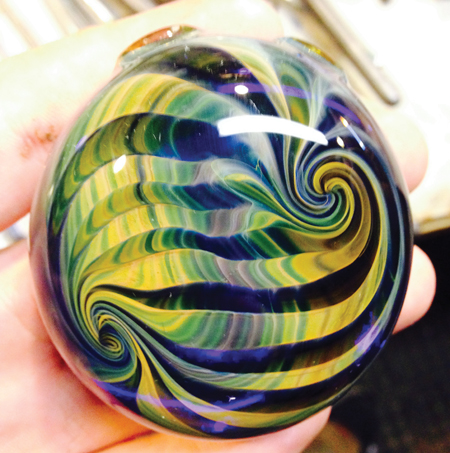
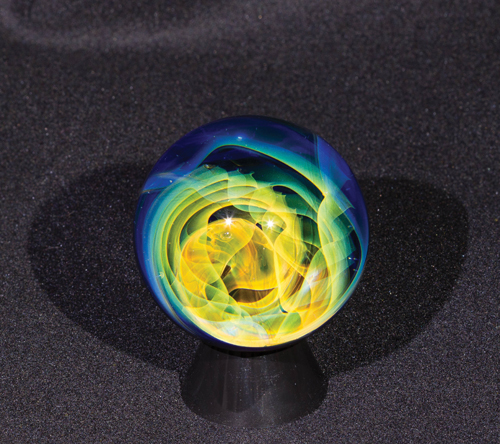
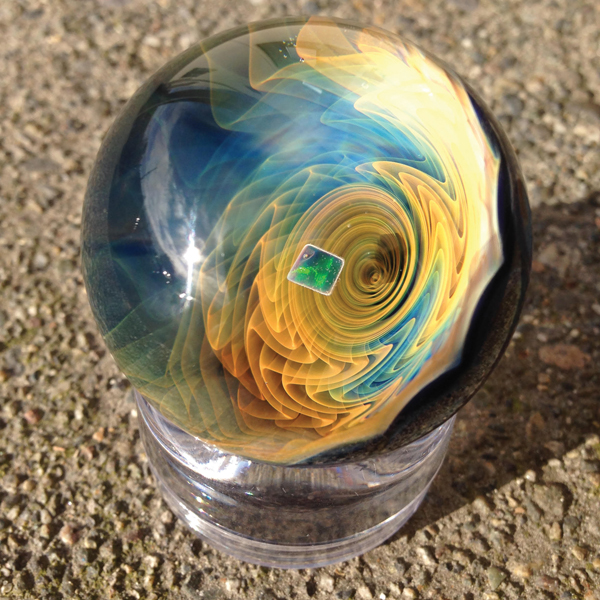
The marble created for this tutorial is one of my fumed vortexes. While this is one of the basic ones, the addition of opals or other effects internally can really change it up and make it something special. This marble ends up being approximately 2 inches in diameter. If you are not comfortable with making a marble of this size, simply reduce the initial size of the stock you begin to work with. Beware, though; vortexes have the ability to get fairly large fairly quickly
...

Kristen: When two artists collaborate, they both stretch and grow. The work they produce becomes more than a sum of its parts. When Jelveh and I made a quick collaborative bead at the end of a workshop, we unknowingly began a longer and now long-distance conversation (image 1). In our “Connections” series, we explore combinations of our distinctive styles in a yin-yang–like collaboration where delicate florals meet intricate line and dot patterns
...
Art and Reality by Michael Svenson
This article details the creation of a lily flower pod. This is a great starting point technique used by master flower-makers for years. I encourage you to use your creative juices and see what unique opportunity the techniques in the demonstration can offer your signature theme. The sky is the limit
...

Experimentation and curiosity are motivating factors in my glasswork. Creating intuitively and allowing the material to foster more questions has led me to discover the underlying meaning within my work.
I graduated with my MFA in glass sculpture from the Rochester Institute of Technology in 2013, but recognize that I have only chipped the iceberg of what glass can do. This article is about a continuance of that curiosity that I hope manifests in my whole life.
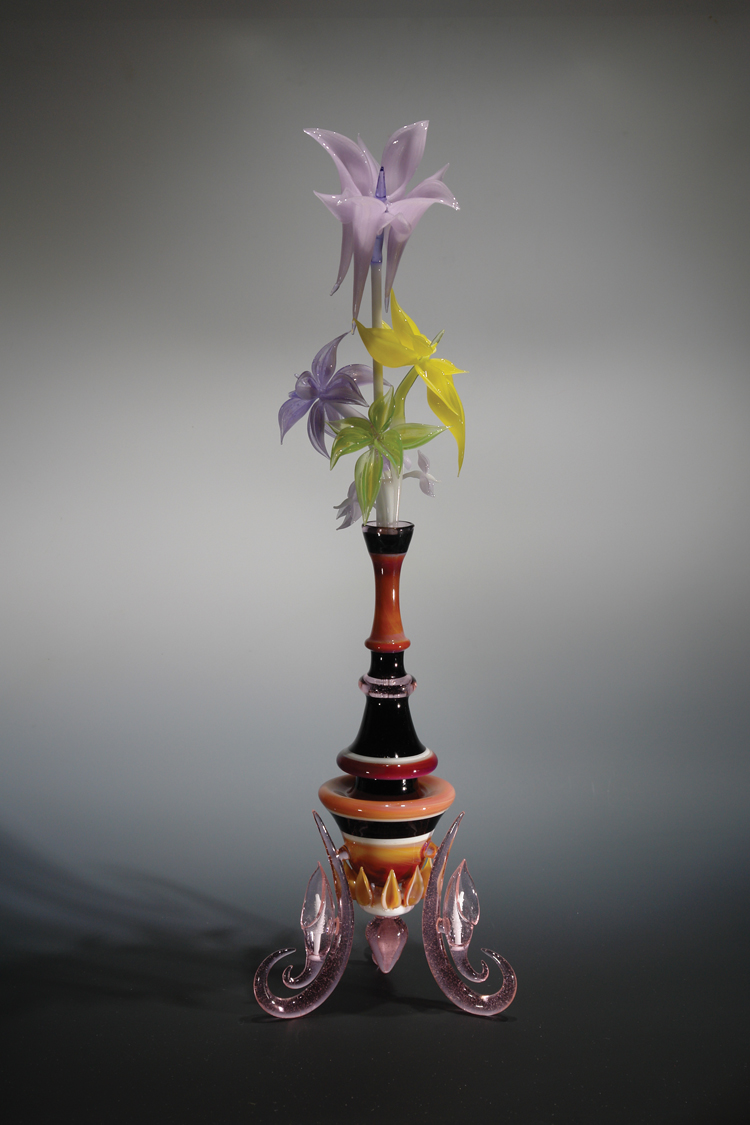
As a flameworker, I spent many years working alone at my bench. When I discovered furnace work, I began to understand how integral teamwork is for larger projects. I have learned that collaboration is an essential part of success and support makes everyone stronger. For this project, I worked on the lathe with the help of Dave Anttio and his team at Head Nectar Glass in Melbourne, Florida.
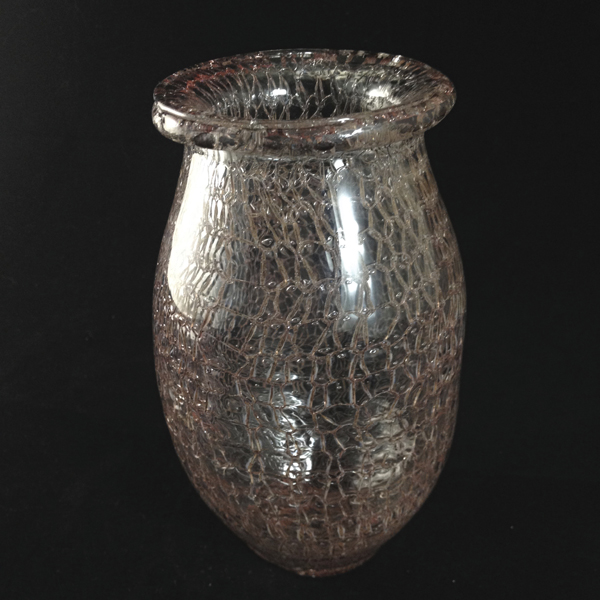
In the hot shop, I had some experience blowing System 96 into copper wire, taking advantage of its friendly compatibility with glass, so I thought, Can we hot-encase copper wire in borosilicate between two different-sized tubes and then shape it? We did just this, twice. The first time, we made a blank as a blown encasement and the second, as a vacuum encasement that was later blown and shaped into a bud vase
...

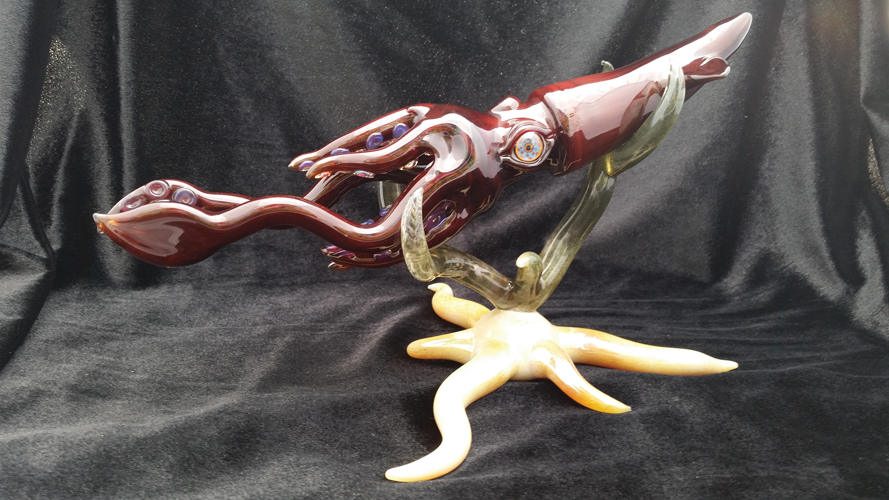
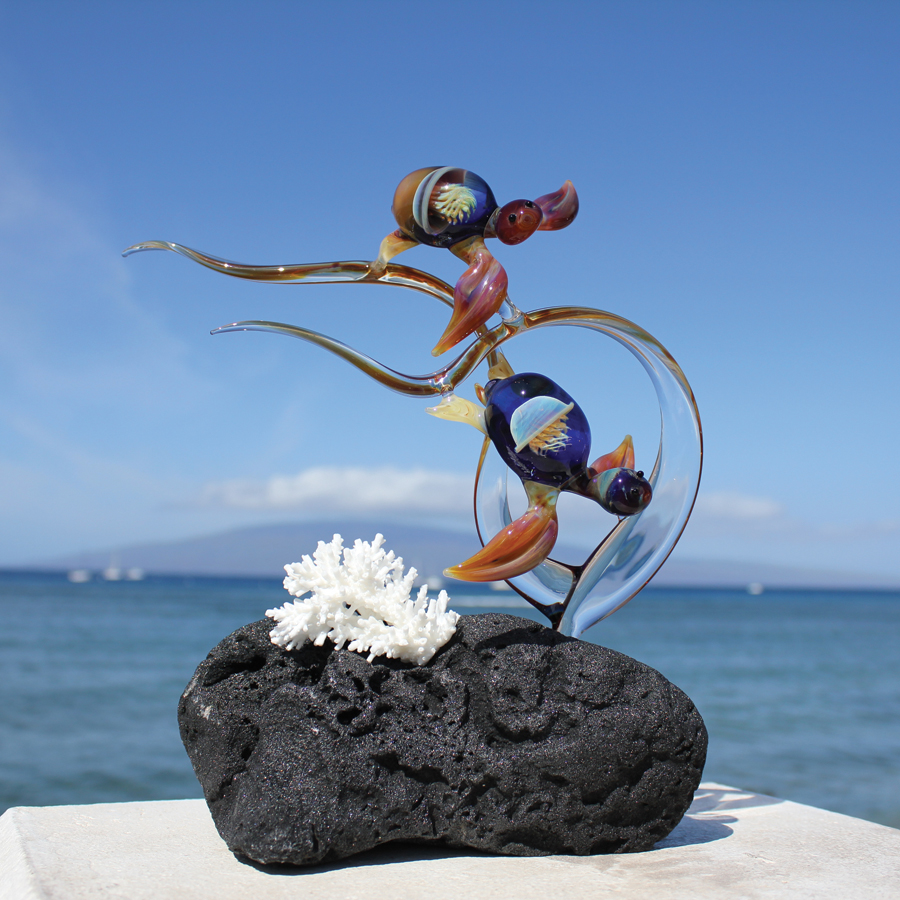
Growing up, I was fascinated with sea creatures and ocean life, so I always try to find a way to express that with my glass work. Whether it be an octopus, jellyfish, turtle, or starfish, the possibilities are endless. There are so many options when it comes to colors and styles.
One of my favorite sea creatures to make has to be a sea turtle. You can use almost any technique to create the shell, along with countless color combos for the fins and head. This tutorial shows my interpretation of making a sea turtle using a fumichello cab for the shell
...

I started working boro about five years ago. I began, like many others, in a friend’s garage. I then started enrolling in classes at the Pratt Art Center in Seattle. After taking my first class, I moved to Seattle. I’ve been lucky enough to have learned from top artists such as Mike Conrad, Jared Betty, Roger Parramore, Robert Mickelsen, Jennifer Umphress, and Matt Eskuche. Attending AGI in Hilliards, Pennsylvania, three of the last five years also gave me the opportunity to sharpen my skills, learn as much as I can, and make many new glass friends. I highly recommend attending AGI; it is an amazing experience.
I initially focused on marbles and pendants, which came from my younger years of drooling online over all of the OG marble artists. To make a living, I was also able to get a job in two prominent hotshops in Seattle, Glassybaby and Totally Blown Glass. These positions gave me more glass experience, but ultimately let me back to lampworking. More recently, I have tried to focus on developing my hollow and functional work, with a heavy emphasis on gold and silver fuming. Many talented and prominent figures in the glass scene have influenced my work, including Ease, Mike Gong, Carver B, El Heffe, Maka B, Jolex, N8, Stoke, and Cameron Tower. All this has helped me develop a style and progression. I’ve been lucky enough to be around so many talented artists who have given me pointers and inspiration along the way
...

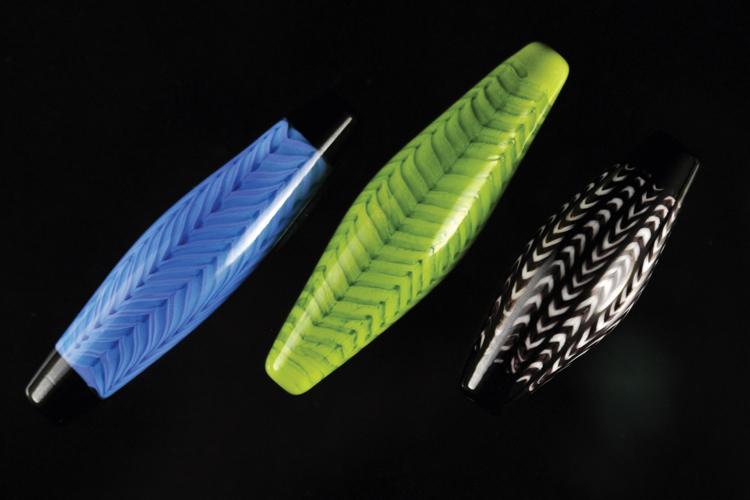
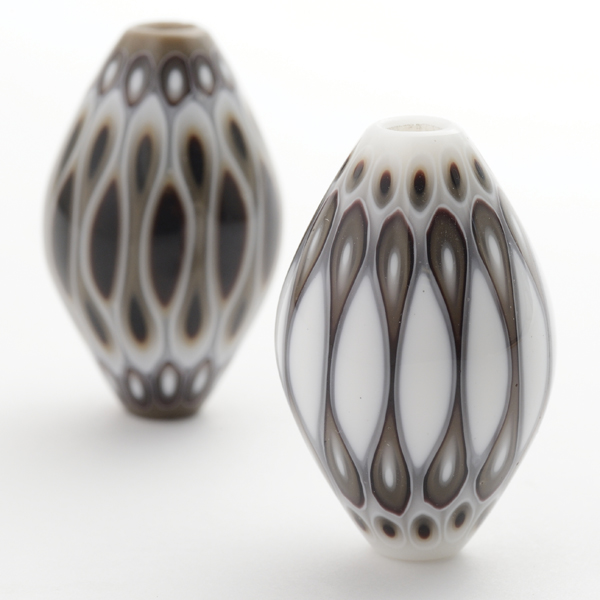
I will show you how to make a chevron bead by lampworking. You can have fun with creating various chevron patterns by cold working. You can create myriad of variations by using different color combinations.
They may not be the easiest beads to make because you need to have a grinder, but aren’t they a kind of beads a beadmaker wants to try making at least once?
...
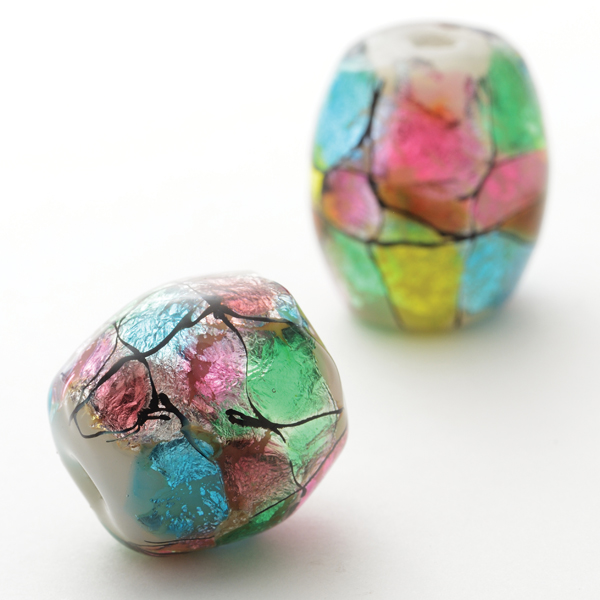
Stained Glass Bead by Kenjiro Semba
I named them “Stained Glass Beads” because the pretty patterns with colors inside the black frames look like stained glass. The black lines are formed by blackening reaction between lead and soda glass. Transparent colors are dotted in the black frames and then they are smoothed. It is a fairly simple technique
...
- Glassified Ads - February/March, 2015
- Vol.
28 No. 5.
- Workshop Calendar
|
December/January, 2014/15 - Vol. 28, No. 4.

|
In This Issue

When I decided to write about my color mixology, I had to determine what it is I do that is different from the information that is already available. I needed to not only understand what I was doing to explain it, but, more importantly, why I was doing it.
The answer to the question “why” always felt important to me when learning a new technique. How an artist does a technique is actually the culmination on a whole lot of “whys.” Trial and error goes a long way in explaining how we come to our conclusions about technique, and is fundamentally as important as how the technique is performed. Here is a brief history of how and why I came up with my mixology recipes, ideally to shed some light on the larger technique I use, which I call “painting.”
Several years ago, I figured out that blending borosilicate colors with clear made them stretch further. I would make 15 mm horn stock by mixing NS Butterscotch with 12 mm clear. After a rather rough, incomplete mix, I discovered I liked how the resulting horn stock looked, marbled with veins of silvery butterscotch and clear. The resulting color behaved in the flame more like clear behaves than how color behaves. My curiosity was piqued, and so came my first attempts to mix colors on purpose for the positive improvement in viscosity.
Rather than use large amounts of solid color when sculpting, I would use my mixed colors. Welds became easier to smooth out. Different colors melted into one another better...

I have had a passion for glass for 17 years; the one medium I enjoy more than any other. Most of my ideas are sketched out beforehand in pencil or ink, leaving little designs lying all over the house.
I am drawn to fantasy themes, unicorns, elves, fairies, and dragons, but I also feel a great connection with Mother Earth and the world around me. I guess you could say my time is spent partly with my head in the clouds and partly firmly planted on solid ground.
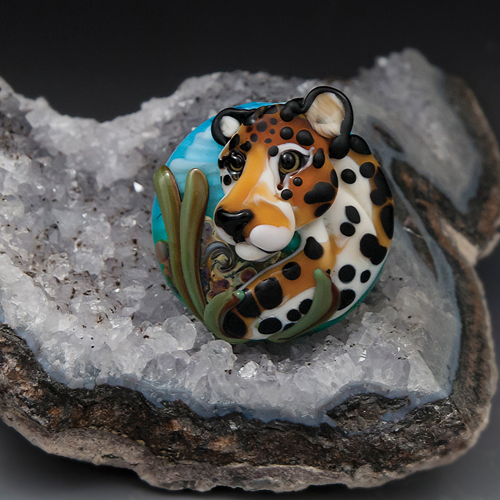
Our world has some of the most amazing and colorful creatures. I could go on all day about my favorites, but I have only time enough for one here. The one that I am drawn to is the amazing leopard, found in parts of Africa, Asia, India, and China. Its numbers are dwindling. Solitary unless mating, this beautiful cat is quite the survivor...

I realized it would greatly expand my options if I could incorporate other media into the bases. In 2013, I took a metal-working class at Snow Farm. Since then, I’ve made a jungle gym, playground slide, swing set, teeter-totter, and soccer net that I strung with knotted twine (image d). I taught myself to make a wooden bench, toy box, and chair for other figures (image e). I sewed miniature theater curtains and hung them around a proscenium stage on which a little magician performs (image f).
It’s great fun conceptualizing the vignettes in my mind and figuring out how to bring them to life. Glass is still central, but, by adding other media, the possibilities are endless.
I’m glad I didn’t allow myself to get stuck in a rut of complacency. Instead, I braved on through countless wonky beads, overheated details, reduced colors, and cracked sculptures. I may hit my head against a wall with some regularity, but I wouldn’t have it any other way.
If you want to try your hand at a fun off mandrel ornament, here’s my design for Rudolph, the Red-Nosed Reindeer. I hope you enjoy creating him...

Another recent set of character beads is the “Crazy Cats.” These are such fun to make. I love the way the placing of a line can change the expression and create an angry cat, a sad cat, or a lovable rogue of a cat. The eye dots can create a quizzical expression, the appearance of being cross-eyed, or staring left or right at some mystery object. I have found that even the small mistakes — a line breaking, for instance — can add character and charm, just as with humans. It is our subtle differences that create the beauty that another will cherish — a prominent freckle, a slightly twisted tooth.
Although I do sketch some of these characters, others actually come to life at the torch. By telling myself I am sketching in glass, I allow myself the freedom to make these small mistakes without feeling the need to put them in the water pot. I’m sure this “salvaging” has helped me to improve.
When I first started making these character beads, I found that I lost a lot to cracks. I would get so involved in adding the details that I would forget to keep the whole bead warm. To try to overcome this, I started to decorate both sides of the beads and flit from one side to another. Some of my beads are double-sided, with the same character (well, similar ones, anyhow: sober/drunk, happy/sad, etc.). On others, I add creatures or birds. One of my favourite is the long-legged bird. I never tire of these as, again, they seem to have such personality. This tutorial will take you through the steps of making your own...
sm.jpg)
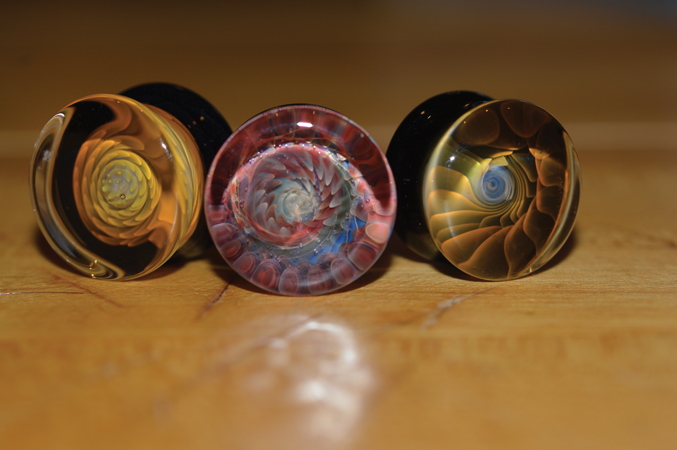
The first experiments using the lined tubing came out exceptionally well, and I realized that I could get sharp, cleanly terminated wig-wags and spirals with good depth on the main viewing side and a little washout of color on the opposing side. To remedy the one side being a little washed out, I decided to decorate it with different dot patterns of varying complexity. The results varied from a traditional cane marble to more modern variations with dot-stack backings.
Since my first experiments with this technique, I have added many variations that have allowed my marbles to take on lots of different looks, from vortexes to staircases. I believe this technique has a lot of potential in the marble-making world and I have only begun to explore it. I am happy to have this opportunity to share my passion for making these history-rich spherical gems we call marbles. This tutorial explains how I use pre-made, hollow, lined tubing to create a traditional color-striped cane marble. This focuses on the first basic form; you can take it to the next level...

On my way home at the end of the summer, the lines and colors of the Gallo-Roman beads remained in my memory. I thought that the foundations of our decorative techniques were great. I wanted to know how to do dozens of techniques and skip the rudimentary techniques. Then I looked again at my first beads, made during my various traineeships, and I thought it would be interesting to see my progress by comparing what I could do after all these experiences.
I chose a bead with strongly contrasting colors: a yellow and black backdrop with one whose technical rake lets pretty chevron print patterns appear. I reproduced this bead and it was at this moment that the beauty of this technique appeared to me. Now capable of realizing more clearly, I realized it was sublime. I began a series of racking beads to improve myself even more. The beads were a classic size — if they had been bigger, it would have allowed us to appreciate the advantage of motif /patterns, and then it would be a new challenge as a large-sized work. I am indeed facing new constraints because working more mass requires more attention in the heating and shaping of the mass.
What’s great is that, by investing more of myself in the art of making glass beads, I discover more and more things that enrich my life and give me the opportunity to meet interesting people who have the same questions or who are able to respond to mine. All these little discoveries carry me along every day in this fascinating world and are deep sources of joy. If the technique can sometimes make us take over the instinct, the pleasure is always present. As Chagall said, “If I create from the heart, nearly everything works; if from the head, almost nothing works.” I think it is important to develop our intuition and stay connected to our deepest desires in life every day, as in an area that is close to our heart. Having the ability to translate thoughts and desires into colors and shapes through a beautiful material such as glass is an incredible opportunity!
For this tutorial, the bead was made with soda-lime glass. The technique can be adapted to different situations; all kinds of variations are possible. Just experiment!
The black glass for the stringer and the light-blue bead base are the references for this tutorial. For this project, hold the mandrel with the left hand...

I love making sea life, and this is one of my favorite projects. It incorporates many different skills to achieve the final goal. In a complex piece like this, you have to envision the finished project and the fundamental shapes simultaneously to achieve proper proportion and flow. It’s like an instructional drawing diagram, where the basic shapes are overlaid on the subject so you can see the basic components and the end result at the same time. If you can view it that way, it really helps with the end result. This sculpture incorporates an overlay technique that adds sparkle and depth to the finished piece. With the new contemporary colors available, there are some great color combinations that will make any project stand out...

While I was in Austin, two good friends of mine opened up the shop, Supreme Smoke in San Antonio. As the business grew, it became a high-quality shop that only carried American-made glass and headies, and bought from independent artists. A good friend of ours, Adam Pearl (San Antonio Pearl/SAP), began working for them a few days a week. As he worked for them, he also began to have an attraction to glass and that led him to take a beginner’s lesson. After that, he purchased his own torch, kiln, and tools and began exploring glass on his own. I would come down every other weekend, since it was only an hour away, and we would fill most of our time just playing with glass. None of us knew what we were doing, and we couldn’t really make anything, but we were having a blast.
Eventually, I couldn’t stop thinking about glass, so I threw all of my things into storage and moved to San Antonio to get into glass more. It was not long after that I scraped up enough money for a torch and tools, and had my own setup.
We kept exploring things on our own and then we met someone named Koa, who became a good friend of ours. Pearl met him when he came into Supreme Smoke and he mentioned that he used to work as a full-time glassblower and that he could help us out. He pretty much gave us our foundation in glass and got us to a point where we could make sellable items. Koa ended up moving to Colorado, but Pearl and I stayed in San Antonio and continued to work hard at improving our skill level.
I have taken a few classes, read a lot of material online, and spent a lot of time on the torch. My skills and sales got to a point where I now blow glass as a full-time job. As I worked more in the industry, my overall love for glass grew even more and I began to branch out and make things other than pipes and bongs. I still enjoy making functional pieces, but I also love making marbles, stemware, and jewelry.
To me, fuming always had that mystifying “How did they do that?” effect. The colors and designs that came out of fuming were fascinated me. The fact that you have to burn silver and gold in the process made it that much cooler. I originally started fuming when I was making inside-out spoons but later carried over the technique when I began making jewelry and marbles.
I have gotten some pointers from others, but, for the most part, I have learned fuming through good old-fashioned trial and error. I now focus every day on expanding my skill level and improving the overall quality of my work...
- Glassified Ads - December/January, 2013/13
- Vol.
26, No. 4.
- Workshop Calendar
|
October/November, 2014 - Vol. 28, No. 3.

|
In This Issue
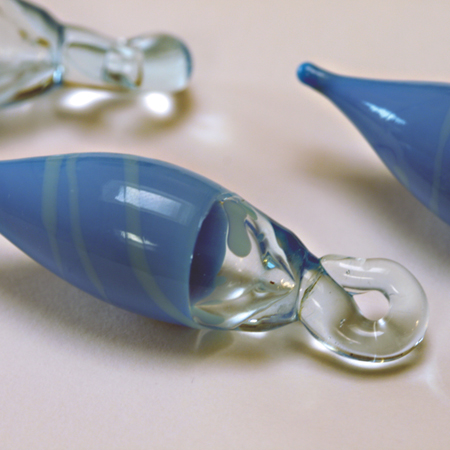
Spinning Tops by James Mills
Spinning tops have fascinated people for centuries. Some of the first tops date back to around 3500 BC and were made of clay. During the time of Troy, dating back to 3000 BC, tops were made out of ceramic. In China, whip tops were found dated from 1250 BC, as were fired clay spun-type tops in Thebes, Greece. Greek pottery dating back to 500 BC depicts scenes of people using tops. They have been mentioned in historical literature by writers such as Homer in 800 BC, Plato in 360 BC, and even Shakespeare.
What is it about the top that has held us captivated for so long? Is it the fact that it brings out our inner child? Or perhaps that it appears to defy all laws of physics and gravity? Simply put, yes. They bring out our inner child with every spin, they defy gravity with every effortless motion they make. Let’s not forget that they are super-fun to make as well as to use, so let’s get our glass hats on and have some fun ...

My greatest satisfaction in lampworking, aside from generous kiln fairies, is making someone else happy with my work or sharing with anyone curious about lampworking or BHBs. The best time so far is trading each year at the ISGB Gathering with someone who can make floral beads or cute glass sculptures/figurines—all the things I cannot do. I find in life that I still move toward the things I am afraid of, i.e., I hate heights so I rock-climb. I haven’t mastered the arts of encasing, scrollwork, or working with silver glass, so I love getting beads from people who have. I look to those beads for inspiration or something to strive for, and I love every single one I have traded for!
In that sense, if my BHBs can inspire someone to try something new, step outside their comfort zone, or not to give up trying something—or just bring happiness—then this tutorial is for those individuals.
There’s no rocket science or new technique in the following steps, but I hope you find inspiration or a better understanding of a simple process to conquer BHBs that will lead you to greater things ...

Fuming is something that takes some practice to have consistency and obtain the colors you want. It is easy to overdo the amount of fume you apply, especially with silver. To try and remove it is almost as much trouble as it would be to start over with a new blank. I would suggest doing research on Facebook, YouTube, and previous issues of Glass Line magazine to figure out the different alchemies for fuming metals. Don’t give up on fuming because it doesn’t come out right on your first attempt; different oxygen and propane levels and pressures all affect the fume color and hue. Propane combines with oxygen in a 1:5 molecular ratio; this is important to remember when trying to get certain colors out of fume.
I also find it helpful to keep a mental (or physical) log of how the fume looks before it is worked into the glass and afterward. The color of fume changes from when it is encased and with the flame it is worked in. You can also get colors to bleed and become more vibrant by striking it in a kiln.
Glass is an amazing medium with endless possibilities. Never limit yourself based on what others say; anything is possible in glass. Just remember to use proper ventilation and equipment when working with fume ...

I have a great love for my art and an even greater love and respect for all of my glass family, friends, followers, and supporters, for it is you who truly make all my dreams a reality. Thank you!
Try to keep a positive flow when you are melting glass; the good energy will always help your forward progress, with this hummingbird feeder and any others you undertake ...

Discovering what you can do with that chosen medium can intuitively lead to what you can voice through it. There’s nothing wrong with emulating or following another’s approach to help understand the possibilities of the material. Diverging from replication into developing one’s own style should be the goal. Continue to explore the seemingly endless possibilities that creativity and the chosen medium offer. Share what you wish and strive for your best.
I found this from a friend, collaborative partner, and admired artist, Joshua Steindler, to be inspirational and provocative in both writing this conclusion and much more: Momentum, Devotion, Creation: “It’s not always the techniques that create intrigue. Based on one’s perspective, haven’t we all in some way been reduced to technicians? Where is the magic, has it disappeared? Maybe that’s something that is causing issues or stifling progress beyond just the glass community. There seems to be a lot of continuity and similarity as of late. Instead of developing originality, style, or message, it often seems like the latest magic trick from the local joke shop down the street. Yes, one can impress with these ‘gimmicks,’ but where is the illusion of reality or ‘art’? Creating objects imbued with mystery is difficult to find or achieve when sought after. So much seems easy once a solid foundation of technique exists; however, it’s not. Technical skill takes time and devotion to hone in the effort to obtain. Finding a piece that makes you want to hold it, not just say, ‘Man, that person has skills,’ is something personal and to each their own. Feel like picking up much lately?”
In the spirit of the glass movement, I wish to embrace my colleagues’ openness and willingness to share techniques and ideas. The techniques highlighted in this tutorial let the artist create a piece that leaves many options open to develop an additional dynamic array of design ...

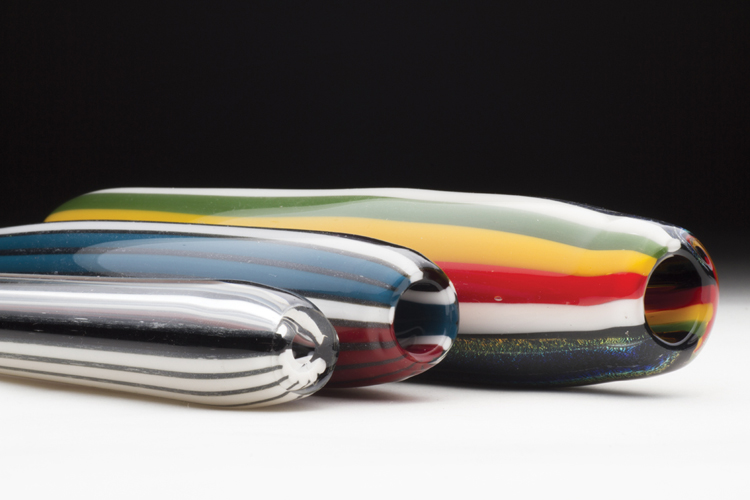
(Vac Stack Linework) by Freddy Faerron
The technique outlined in this tutorial is truly an example of a generational expanding dialog growing into a mass vernacular of studies. The vacuum-evacuated color rod lamination tubing technique (Vac stack linework) grew out of contemporary hollow-form functional borosilicate artists’ inspiration from the German montage studies of Albin Schaedel, Kurt Wallstab, Thomas Mueller–Litz, and Frederick Burkhill—a 50-plus-year shared dialog.
Contemporary glass artist Jason Lee, whose dedication to and exploration of this shared dialog has set the creative bar of the borosilicate hollow-form functional glass movement by expanding and developing many montage linework techniques, has said: “The artist Ease and I took over the German Montage path laid out by Albin Schnadel, Kurt Wallstab, Frederick Burkhill, and Thomas Mueller-Litz around 2000. Their process was based on encalmo balls of color tubing. We wanted to make pre-colored functional glass, so you didn’t have to dirty [it] up to appreciate the patterns.
“After many ball-stacked pieces, we figured out how to convert over to lined tubing prep for more complex effects. We started with tradition, doing all coil balls. Then we developed the lined tubing bulk pulls for more practicality, cleanliness, and complex capacity. Our process was building stripes and dichroic layers onto 50x5, then encasing with 10 mm rod or a sleeve. Many artists have added to the tube cane world with many new processes; we just did the first borosilicate variations. This contemporary borosilicate expansion of the German Montage studies has been growing now for close to two decades and many different styles of applications have expanded from it.”
Vacuum-evacuated color rod lamination tubing now allows many new artists to explore this widely evolving dialog. This article demonstrates how to create from raw material and vacuum-evacuate three different types of laminated tubes: a color line tube, a half-clear/half-color tube, and a color line tube with dichroic glass segments ...
- Glassified Ads - October/November, 2014
- Vol.
28, No. 3.
- Workshop Calendar
|
August/September, 2014 - Vol. 28, No. 2.
 |
In This Issue

When friends and family ask how we make those neat designs in our glass objects, they are always amazed when I tell them that almost everything we do is based on the simple dot and line. I have to admit that at times I am simply astounded as well that this is the case. This tutorial demonstrates how the careful placement of dots results in a pattern of cubes or triangles that seem to float up from the background. I decided to revisit a classic design and demonstrate how to make this design into a wearable piece of art.
This design, commonly referred to as a “Dotbox,” was first introduced to me in another Glass Line tutorial (“Matrix Marble Step by Step: Evolution of a Good Idea” by Brad Brandolino, Glass Line Volume 20, Number 5; 2007). I have enjoyed making them into marbles, and, like most marble designs, they translate easily into pendants.
Please note that, while this tutorial uses precious metal fuming to achieve the colors inside the pendant, you can get great variation by using various striking colors by omitting step 4 and using the striking color in place of the clear in step 5
...

What draws my eye into a marble is its wonderful optical qualities. Before I begin my process, I think about how I want my pattern to be viewed. I can choose to create the pattern on the inside of a marble or on the outside. For this marble, I wanted the dot-box pattern to be contained on the inside of the marble and viewable from the front. The back of the marble consists of a surface pattern that will mask the back of my original pattern.
This tutorial shows how to make a dot-box pattern with solid colors on hollow tubing. The pattern is then made into a section through the disc-flip technique. This section can be applied to whatever final product you desire. In this case, I added clear to the back of the pattern to form it into a marble
...

The Asheville Glass Center is a gem in the industry-turned-artists’ community of Asheville, North Carolina, known as the River Arts District. Located in a century-old brick warehouse half-buried in the hillside, the center offers workshops in flameworking, off-hand glassblowing, and coldworking, as well as hourly and daily rentals of most of their equipment. The center’s gallery wraps around the hotshop so customers can watch the process while being immersed in the results. Here’s what one of its founders, Logan MacSporran, has to say about the center
...

Since this process involves painting the back side of the tile with the image that will be seen on the front, we had to remember to paint the outer-most features first, such as pupils and lips, and background features last, such as skin. It felt similar to watercolor painting, where you have to plan ahead to save your whites and lights, since you can’t paint lights over darks like you can with opaque mediums.
One aspect of this technique I really enjoy is that, if you make a mistake or you don’t like what you just painted, you can easily erase the paint before firing a layer and reapply. Being able to correct mistakes feels so luxurious after working with hot glass, where a careless gesture or imperfect heat control can ruin a piece in a moment. I also like the fact that, once you do fire a layer, it is permanent and you can’t accidentally smudge it with the next application of paint
...

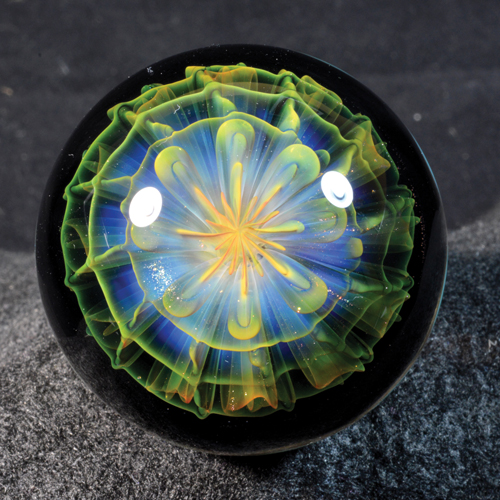
I started experimenting with implosions when I was very new to the craft, and continue to find myself fascinated with the process and the results. My favorite technique is to use precious metal fuming as the colorant. I began exploring implosions more closely about two years ago, while working on marbles—starting with simple dot work, then branching out to other designs.
I use a torchstand for my implosion work and find freedom of movement around the torch to be essential for this technique. You can achieve much of the same range of motion using a cinderblock under your torch to lift it off the bench
...

Conference marks 14th year by Bill Clark
The IFC was an eye-opening experience for a group of students and instructors from GlassRoots, Inc. in Newark, N.J. The organization strives to transform lives, especially of underserved youth, by fostering life-long learning and creative self-expression through glassmaking. “Sometimes working in glass can feel like one is in an abyss, but conferences like this remind us of how extensive and strong our community is,” said Jennifer Johnson, an instructor at GlassRoots. “This conference was educational, inspiring and mind-opening for all of us from GlassRoots and we are grateful for the opportunity to attend”
...

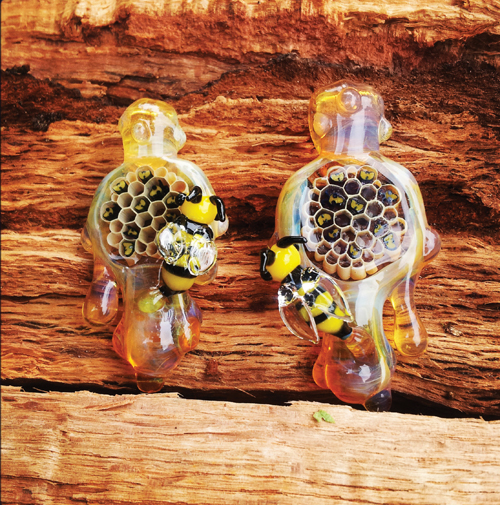
Sharing my skills and techniques feeds back to the general glass community, which, in turn, feeds back to me. I am continuing my work with honeycombs, never losing touch with my nature-centered focus, and have plans to create multiple volumes.
I am traveling throughout the country to meet and collaborate with those artists who continually inspire me. Although I am firmly rooted in my original studio, gRooper Studios, I will be leaving my comfort zone to head to Princeton, New Jersey, for a few years. In the meantime, I’m trying hard to stay focused on my passion, not allowing myself to get caught up in the theatrics, dramatics, and financials. Each day brings creativity, innovation, and inspiration. When I open my eyes every morning, I am humbled and grateful to embark on the day’s journey. With eagerness and excitement, I am fully prepared for my next big “jump”
...

This article features a demonstration by Yuko Watanabe, the popular beadmaking instructor at Kinari Glass School in Asakusa, Tokyo.
The murrine made of Kinari’s “C series” clear glass with the superior transparency and the opaque glass with crispy colors can achieve 3D effect depending on how they are applied. It would give you more potential in your bead creations
...

An exercise in color, design, and multi-discipline applications of art glass by Perry Kenin
In the 40 years since I graduated from the Arts Institute in Bournemouth, England, with a BA in environmental design, I spent some time exploring my major, ceramics, which I still enjoy and produce. At some point during all these years (probably about 20 years ago), I was exposed to glass and its many forms, and I became enchanted. After my wife Robyn and I made some stained glass windows, I quickly moved to hot glass, both blowing and flameworking. I am now addicted. Since there were no clinics for recovery, I continued down that path.
The years as a ceramicist had very little to do with glass, but the more I learned about working in glass, the more I found similarities, not the least of which was the chemistry involved. Having a firm understanding of the process was one thing, but learning the technical side of the chemistry opened doors to solving problems and making new creations. Glass and ceramic chemistry are similar. Taking on some of those similarities allows experimental work that gets the creative juices running
...
- Glassified Ads - August/September, 2014
- Vol. 24, No. 2.
- Workshop Calendar
|
June/July, 2014 - Vol. 28, No. 1.

|
In This Issue

Over the years, I owned and operated several other retail glass stores and a glass art gallery, but, in 2010, I decided to close the last store and focus all of my energy on the torch. Since then, I’ve been wholesaling my work under the business name Lunar Glass. My focus has been mainly on functional pieces, but, in the last year, I have shifted some of my energy to pendants, which has allowed me the chance to rediscover my creativity. I enjoy getting to experiment with so many new techniques and, thanks to social media, I am now able to more easily reach buyers, which allows me create new and better pendants.
Although I consider myself to be mostly self-taught, there are a couple of glassblowers whom I had as shop-mates in my early years who were huge influences on my work. I am most grateful to Dennis Sanborn and Cheyenne McQuilkin for inspiring me and for never allowing me to give up on my passion. I am also grateful to my family and friends who have always supported me, and to my customers who keep my torch lit.
For this particular piece, I made a fume implode pendant, surrounded by accent dots, with a hermetically sealed capsule filled with diamond, ruby, and sapphire melee stones (tiny ones that are less than .18 karats in weight) and a small Gilson opal chip. I used 24-karat gold and .9999 silver for the fuming, and Slyme and Cobalt for the accents and bale. The melee stones are from a jeweler in Norfolk, Virginia, who is also a family friend
...

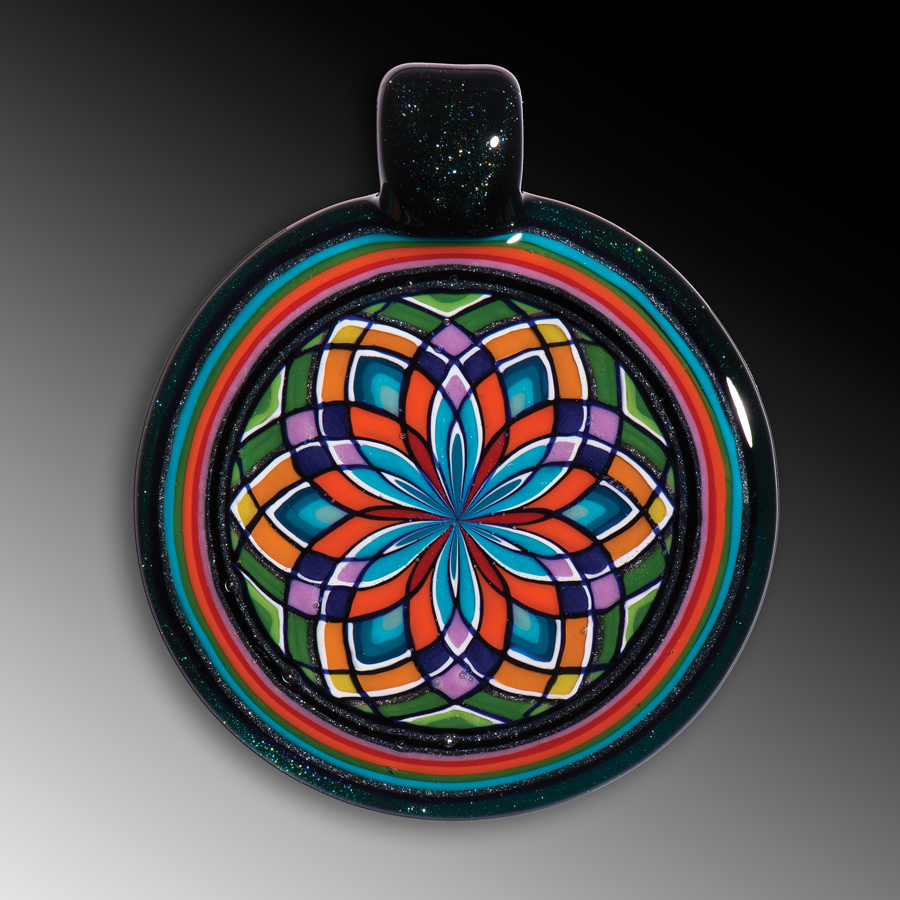
Glass artists are using these patterned motifs to decorate glass pipes and have recently found a growing demand for pendants featuring line-drawn geometric patterns. The inspiration for some of this work is sacred geometry, which dates back to Pythagoras in the 5th century B.C. Followers of Pythagoreanism embrace a system of beliefs based on Pythagoras’s philosophy on mathematics, music, and astronomy. The mathematical component of Pythagoreanism was mystical and had a significant impact on western philosophy and religion, notably through the philosophical and spiritual writings of Plato and St. Augustan. The most famous visual representations of these ideas are the flower of life, a universal pattern found in most cultures and religions, and the tripod of life, which represents the Holy Trinity in Christianity. In the context of Christianity, “Celtic knots” and “Celtic patterns” have been revered since the 3rd century A.D. and are most commonly used to decorate religious buildings and manuscripts. The most famous Celtic knot decoration is in the Book of Kells, created by Celtic monks in the year 800.
Because more and more young, creative people are being introduced to glass art through flameworked glass pipes, there is now a generation of glassmakers who draw inspiration from master pipemakers who express themselves, and bring their own creative vision to pipes, through decoration. Many of these high-energy artists are reinterpreting traditional Venetian techniques, such as reticello. By recreating the reticello esthetic in borosilicate glass at the torch, artists have opened creative opportunities unavailable through furnace working. This is because of the basic difference between working hot glass at the furnace and working glass at the torch.
Working glass at the torch is less spontaneous and offers more control. This control allows flameworkers using borosilicate glass to produce highly detailed, intricate, and uniform patterns. By filling in the spaces in the basic outline created by reticello with colored glasses (a technique casually and humorously named “fillacello”), borosilicate flameworkers can create solid non-referential geometric designs. The color palette, however, appears to be secondary to the line-drawn patterns and is generally limited to primary and secondary colors.
Three pipemakers stand out as pioneers of the line-drawing techniques and have influenced the explosion of patterned glass work: Scott Deppe, Scott Andrews (aka “Freeek”), and Eushene Goines. While this article will highlight the work of other masters, Deppe, Andrews, and Goines—through their innovative work and by giving demonstrations and workshops around the country—laid the foundation by setting standards that have challenged others. Together, their work represents the creative potential of line-drawn hot glass decorative patterns
...

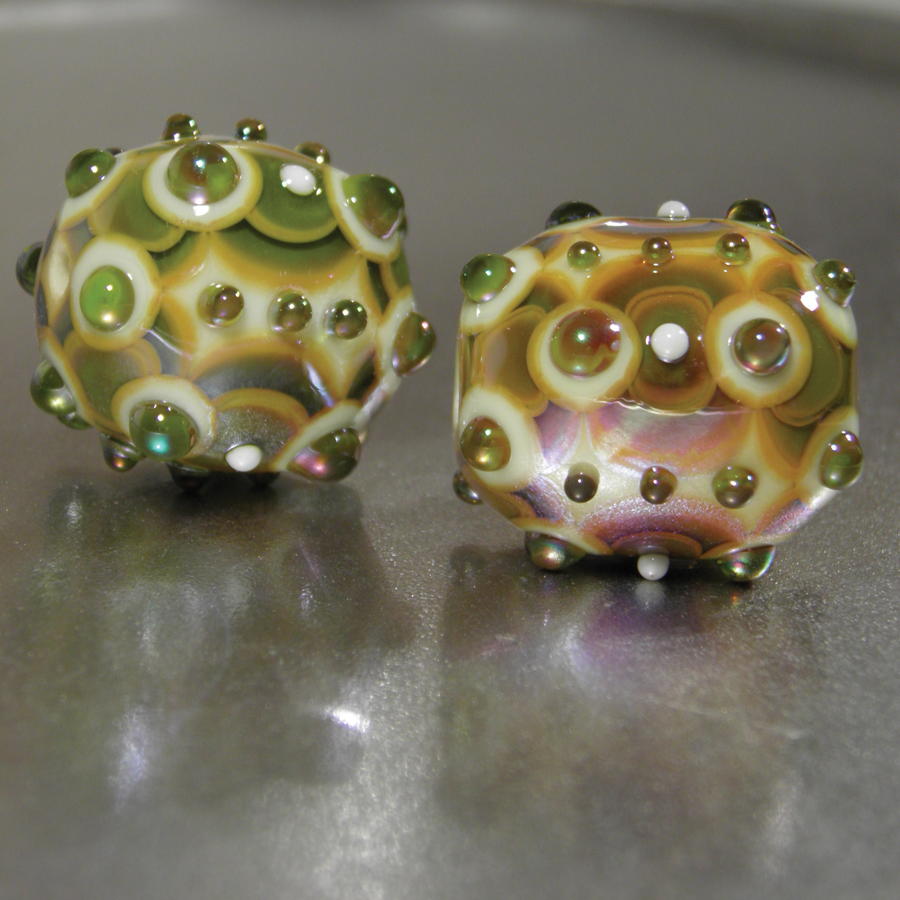
I live on the coast in North Devon, UK, on a tidal river estuary close to the sea and, like a lot of artists, my work is heavily influenced by the ever-changing landscapes and tides, colors, and foliage that the seasons bring. My workshop is open to visitors during our summer season and I love to demonstrate the mercurial qualities of glass to those who pop in to say hello.
It is the three-dimensional quality of glass that really fascinates me—it is like looking into a rockpool on a sunny day. The ability to layer the glass to magnify and to create depth is endless. This, and the many different designs one can achieve by layering patterns together, keeps me firing up the torch each day. My glass work is divided into two main areas, but both are governed by that three-dimensional principle.
The first style of beads I make uses layers of different patterns, topped with lashings of clear glass, to create a bead that lets the viewer look deep into its core and to see something different from every angle and at every level. The second is a three-dimensional surface design, exploring color to create light and shading on a flat bead surface. I love the endless challenge of layering glass to create new and interesting patterns on what is essential a very small canvas.
My wish for the future is to develop my teaching and share the knowledge I have gained with others, as well as continue to push the boundaries of design within glass in its smallest form: the bead.
Since I am lucky enough to be a glass “tester” for one of our big glass suppliers in the UK, I get rods to play with and then blog about. It was during one of these sessions that I discovered the wonderful things that the new glass from Double Helix—Thallo—and a fairly new CIM color—Cake Bake—could achieve when worked together. This is a fairly simple design, created by layering dots on top of each other to mask and change their shape and create this patterned bead. I love the way these two glasses react together, but you can use any color combinations that you wish
...

A Guide to Borosilicate Color, Part 5 by John Lindquist
Aloha from Maui! It’s time again to explore the borosilicate striking palette. This will be the last review for a little while, as I recently had wrist surgery and am on a forced sabbatical from the torch for at least the next few months. I’d like to take this time to remind you that, through blending, infinite possibilities of color can be achieved in your boro palette.
I recently started blending many colors with Star White to achieve some opaque pastels. I found that blending with striking color from the Amber Purple, Passion, Flambé, or Mai Tai families cancelled out almost all striking reactions, while colors like Experimental Green #5 and Elvis Ruby struck through the white. My point (other than sharing an interesting finding) is that, if you take the time to blend your own colors, not only are you adding another level of originality to your work, you may also discover colors you would never expect. Again, remember to keep your color journal or notebook handy, as you will want to remember the good blends and the amount and type of strikles you use to get your best results.
In this issue, we are going to play with:
Glass Alchemy
Passion Extreme
Silver Strike 3
Momka
Silver Iris
Silver Tears
North Star
Loki’s Lipstick
Yellow
Trautman
Mega Mai Tai
Sasha’s Oil Slick

A huge part of my glass consists of animals great and small, and each of them has a special place in my heart.
One of my favorite pieces to make is the African Bull Elephant. Known as the largest land animal on Earth, a bull can weigh up to 17,000 lbs. It is hard to believe these amazing and majestic animals are considered vulnerable in today’s world
...

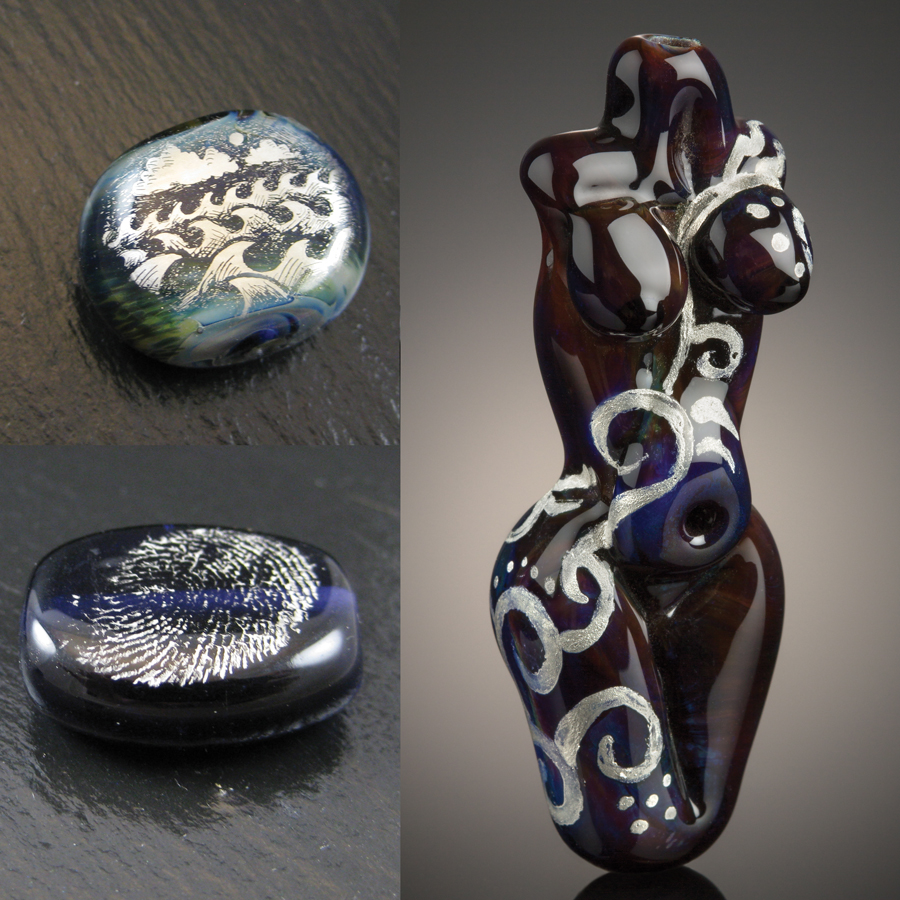
How to Fuse Fine Silver Decoration onto Lampwork Glass Beads a Flower of Life Vessel by Jennifer Becker
I have always liked to make personal keepsake jewelry for my family and friends, and had made jewelry with fingerprints pressed directly into silver clay in the past. That was neat, but lacked the color and shape you can get with glass. Since fine silver will fuse to glass, and silver clay is made from fine silver, I started experimenting.
There are various brands of precious metal clay (PMC), and you can actually get clay in gold, fine silver, sterling silver, copper, and bronze varieties. The bronze and copper varieties have to be fired in an oxygen-starved environment, which means they are fired in a tub of charcoal medium. I haven’t experimented with gold clay. Sterling won’t fuse to glass, but fine silver will, so you really have to use the fine silver variety in working with glass
...

At this time of year, the cherry blossoms bloom, inspiring our hearts and minds, and opening us up to the rebirth of spring. I love making cherry blossom trees, and these colors just pop together.
Before you get started, you should pull stringers that you are comfortable working with from the Effetre Purple and intense black, as these will be your tree components
...
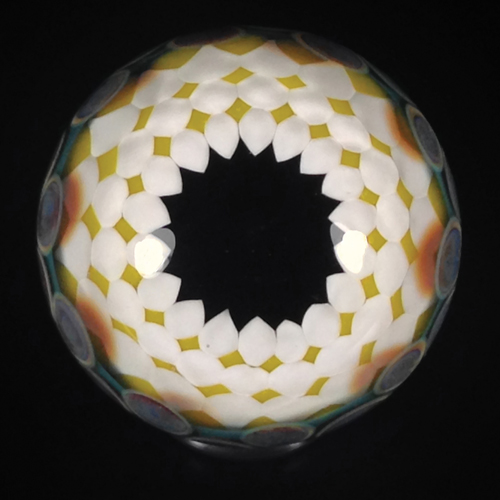
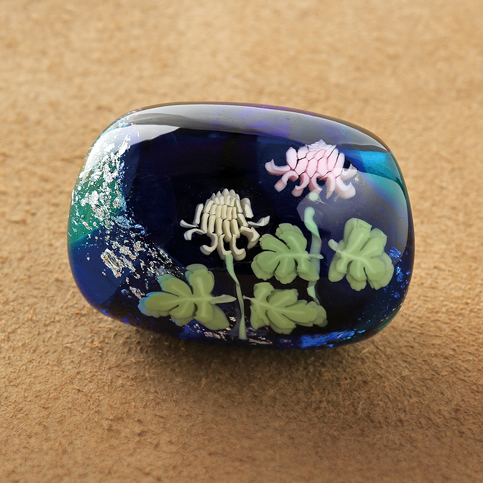
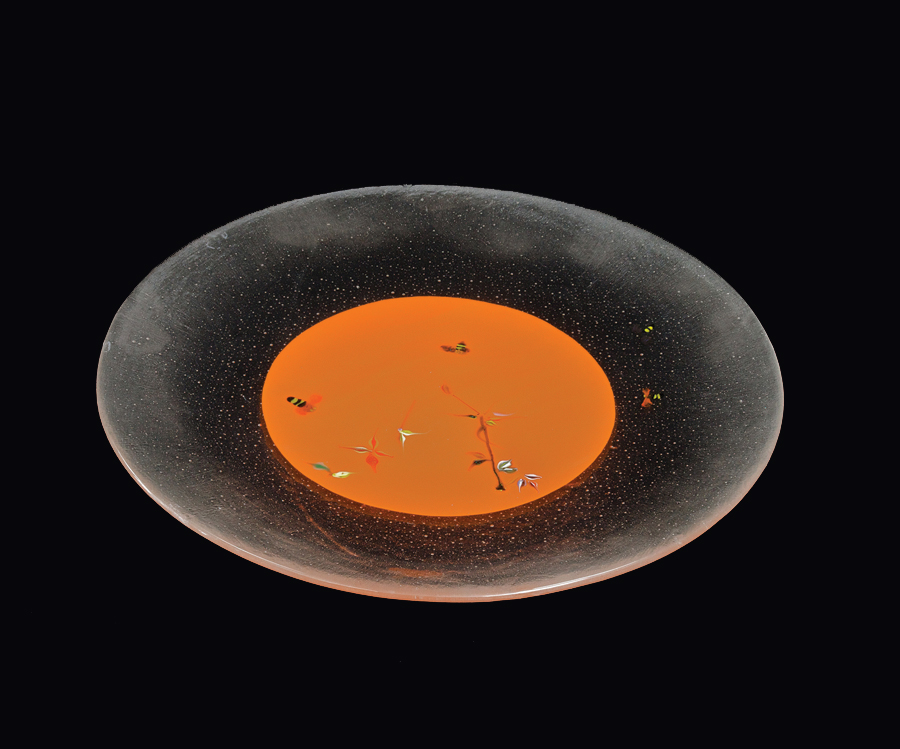
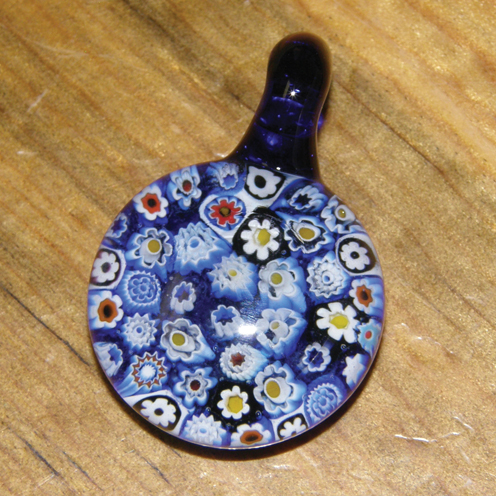
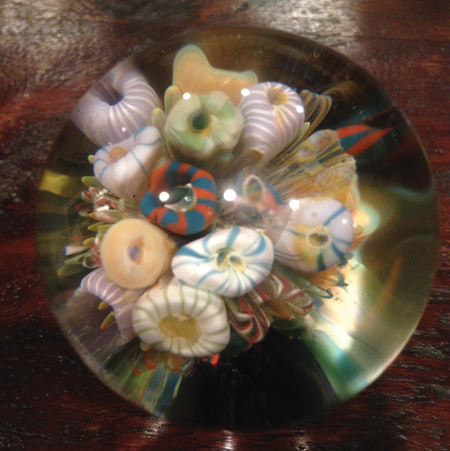
Miniature Millefiori Paperweight-style Pendants by Daniel Feitler
I’ve always been a big fan of Baccarat, St. Louis, and Clichy for their skill and perfection in making paperweights — perfectly arranged millefiori slices, picked up and encased in crystal-clear glass. After seeing many smaller versions (most from Caithness), I decided to make them myself
...
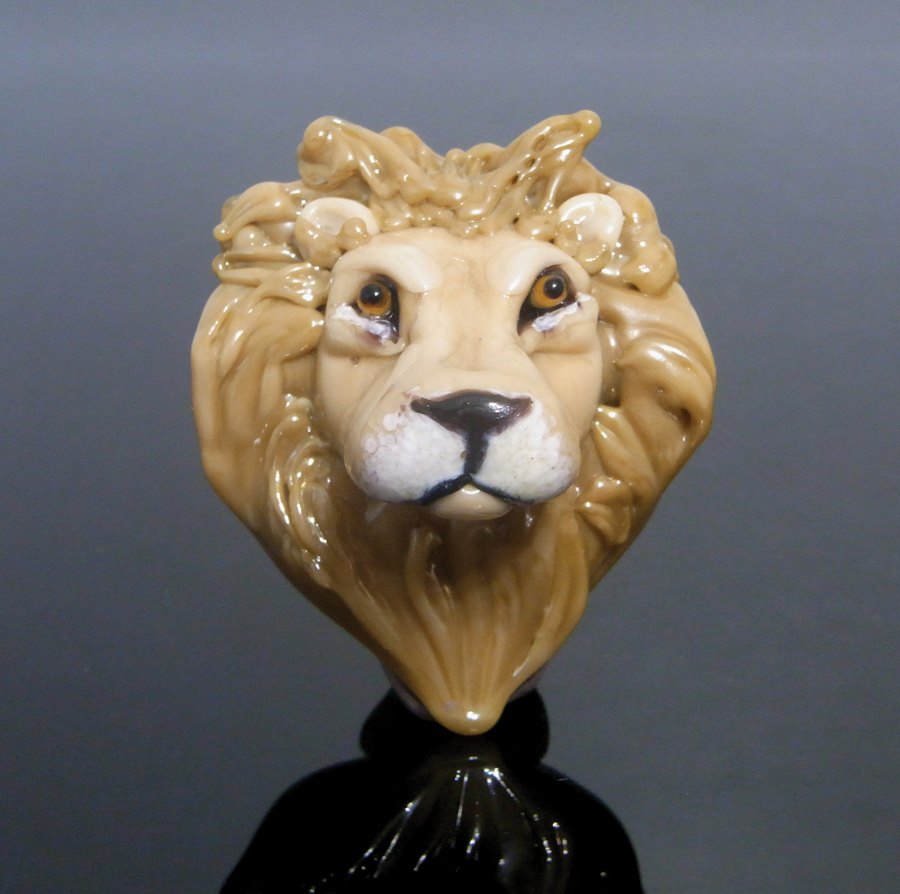
The Lion by Chelle Jovan
The lion is a majestic, beautiful and powerful animal. King of his jungle. Since I started flameworking a little over three years ago, I’ve had to fight through my own jungles at times to get to the point where I can take pride in my work.
Glass work always fascinated me as a small child. Animal sculptural work is something I find more satisfying than the usual round-beadmaking practices. Each piece is different and presents its own challenges ...
- Glassified Ads - June/July, 2014
- Vol. 28, No. 1.
- Workshop Calendar
|
April/May, 2014 - Vol. 27, No. 6.
|


.jpg)