June/July, 2017 - Vol. 31, No. 1.
April/May, 2017 - Vol. 30, No. 6.

|
In This Issue

I currently go to Salem Community College, in my home state of New Jersey, for scientific flameworking. When I am not in class, I can usually be found at the flame shop trying to perfect my work. I am lucky to have found a great school with both students and teachers who share techniques and skills in such an open and educational way. I would not be here, of course, without the love and support of my dear family and friends, especially my mother and father. Without them, I never would have put my work out there or had a corner of the garage to call my studio.
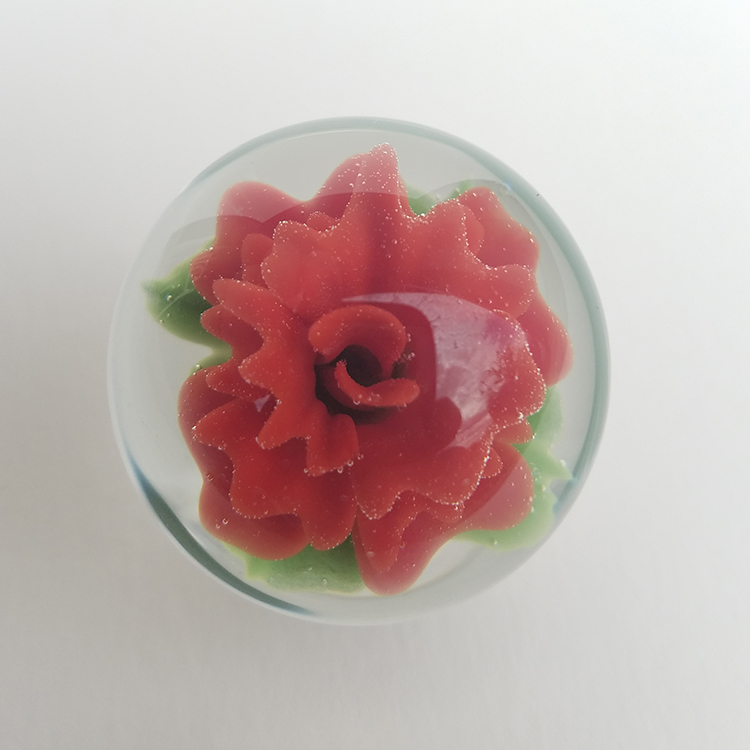
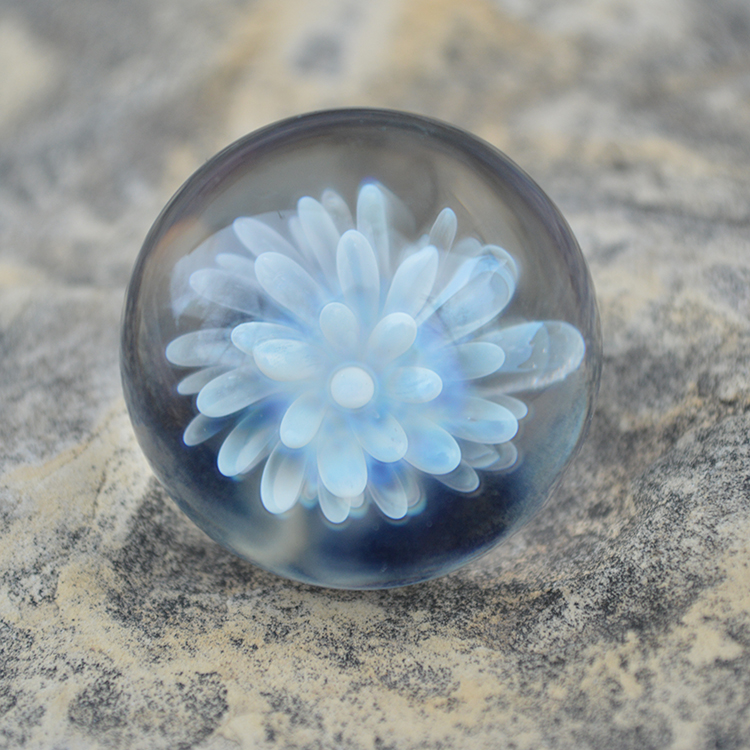
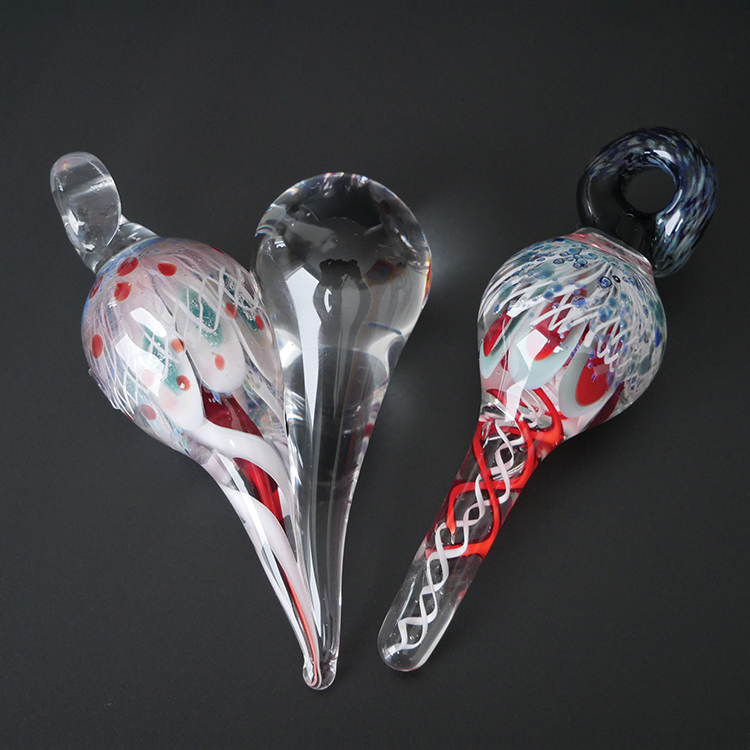
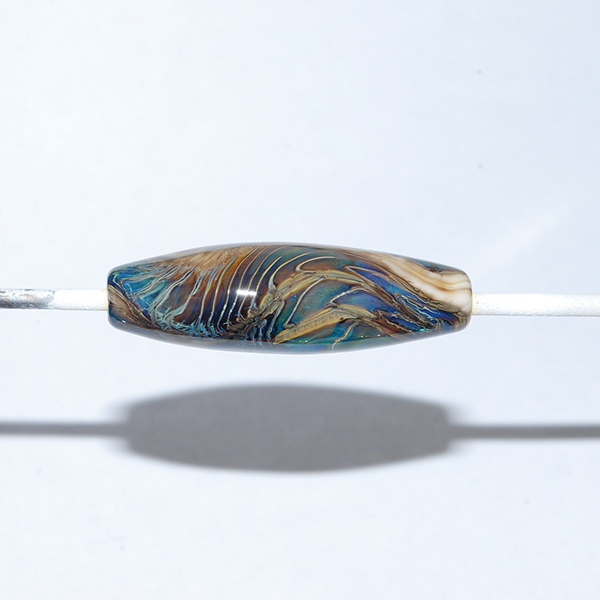
Flower marbles can be done off-tube, but I prefer to do mine the way I was first taught, which is off-rod. You can also make these flowers out almost any color that is stableenough to implode. I have chosen Northstar Cherry since I find it to be excellent for implosions—it does not thin out easily and the petals primarily stay uniform through the process.
Preparation for these marbles is very simple. I always clean my rods before using to cut down on unwanted scuzz in the glass. Next, I pull stringers of the Cherry and Jade. I do not pull a stringer of the Dark Green since it is used for the stem of the flower and more to cap the glass than to be turned into a petal.
The final step of prep work is gathering a ball of clear. This will be crushed into the maria. I achieve this by simply letting the rod melt down and ball up, although this can also be done by folding the glass onto itself and then shaping it; I have found this tends to trap air bubbles, so I go with the slower yet seemingly neater way. I normally aim for a ball around 1.2 inches for a 14 mm rod. This size will increase slightly since I am adding glass to it
...

It’s very easy to be inspired by other people’s work, nature, and daily life. I’ve bounced around, learning different techniques and trying new things, with the majority of my work starting out on the hollow tube. Implosions and silver/gold fume have been my favorite since I started; sculpting is another. I find that it’s good to push out of your comfort zone every now and again, and try something new.
The sky is not the limit when you can create a galaxy in glass. I will forever enjoy working with this medium and continuing on this journey it has provided.
Inspiration is everywhere; let your imagination run wild
...
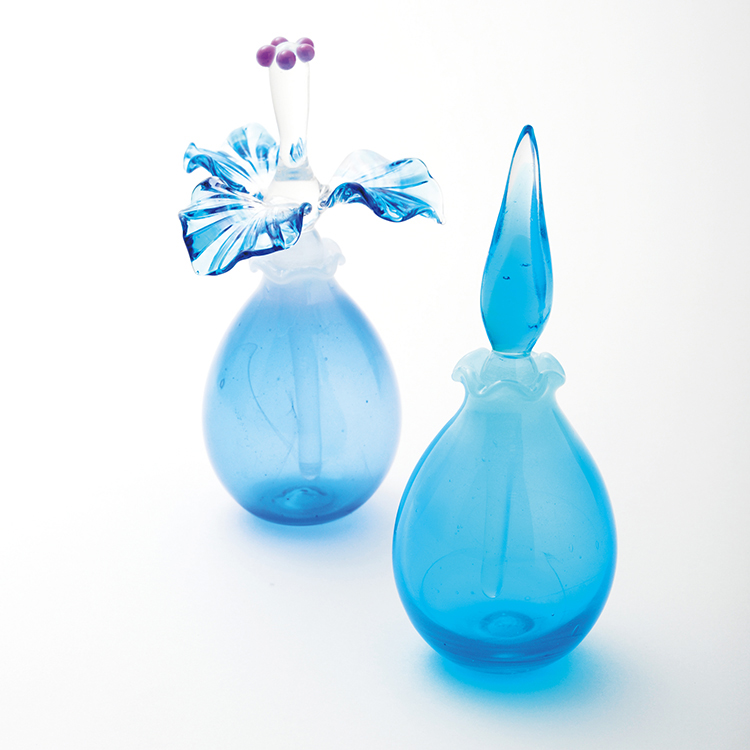
Perfume Bottle by Mariko Nogami
Basic floral perfume bottle
The bottle is pretty even if it becomes somewhat distorted. Even if there is no stopper, it looks cute—like a water balloon—if you put in a flower.
There is a separate tutorial for the stopper...

I experimented for many years with various forms of glasswork: lampwork, kiln work, glassblowing, and stained glass. From all the many glass art forms, I was most attracted to lampwork. It required fewer tools and materials, and let me work on my own.
I made lampwork accessories with silver, tableware, art objects with Boro glass, and glass beads with soft glass. In 1978, I began participating in exhibitions, both group and solo, and in 1992, I went to the Pilchuk Glass School in Stanwood, Washington, USA. For the last 15 years, I have been concentrating on making beads with soft glass. I have been living in the Greater Vancouver area for the those 15 years, where I have my own studio and enjoy making my beads every day. I sell my beads to customers around the world. Lately, I have started making and selling tutorials about some of my techniques for how to make murrini
Even after all these years, I still find glass a fascinating medium to work with because it offers limitless possibilities and continually stimulates my creativity
...

I use only a very few tools at the moment: a butter knife, a marble mold, and the table. I need to upgrade a bit, but I’m fine with using what I have right now. I am a self-taught glassworker; I may not do things the right way, but for now, this works for me. I have watched YouTube as a helping hand at getting ideas, but basically have learned through trial and error. I have had plenty of my marbles crack and not turn out the way I wanted, but that’s all part of the learning process. I fell in love with silver fuming—it just looks so clean and crisp and you can do a whole lot with it and get a lot of great colors out of it.
I am still learning and trying new things every day. I like working with blues and sparkly colors mostly, but will give other colors a try, also. My favorites are the silver- and black-fumed flowers, silver- fumed implosions, and silver-fumed sparkly marbles
...

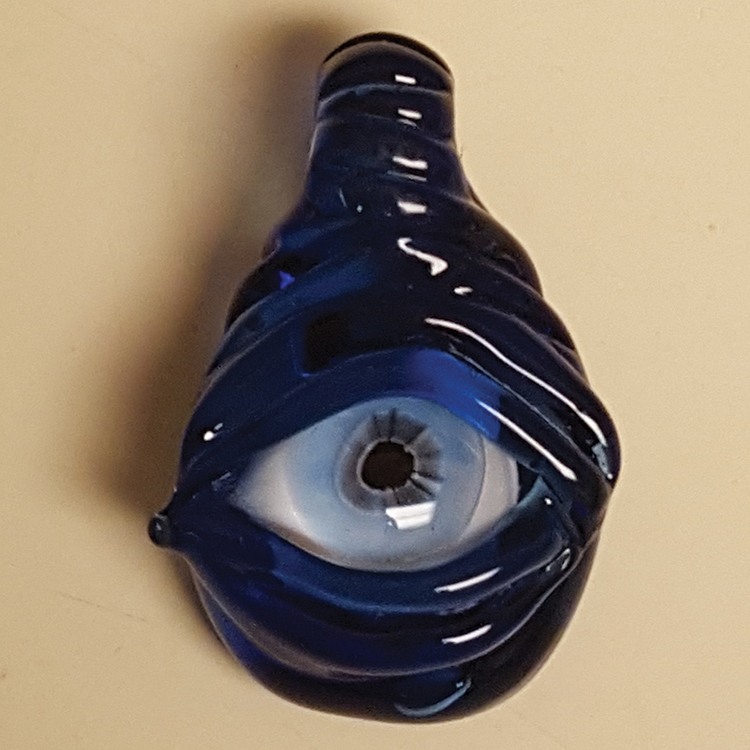
I created my first eyes by layering colored dots and capping the top with a small amount of clear to create a lens. As my technique evolved, I switched to making eye murrines. The result was an eye that looked real. The technique is a lot older than one would think. The first Venetian glass eyes were created more than 500 years ago. At this time, the glass eye technique was so refined that it could be difficult to tell whether the eye was real or not.
The importance of a well-done eye is same regardless of whether the art piece is a clay sculpture, a painting, or work of glass sculpture. The eye is a natural focal point for the viewer, so the need for intricate detail is high. While there are a few ways to make eyes, this tutorial focuses on a simple millefiori version that can be created by glass artists just starting out.
Millefiori translates to "1,000 flowers" and is commonly known as millie in the glass art community. This version does not require a large torch, so entry-level equipment—such as a common seven-jet burner—is more than adequate. Instructions on how to use a millie are followed by a simple, but intriguing, round pendant
...

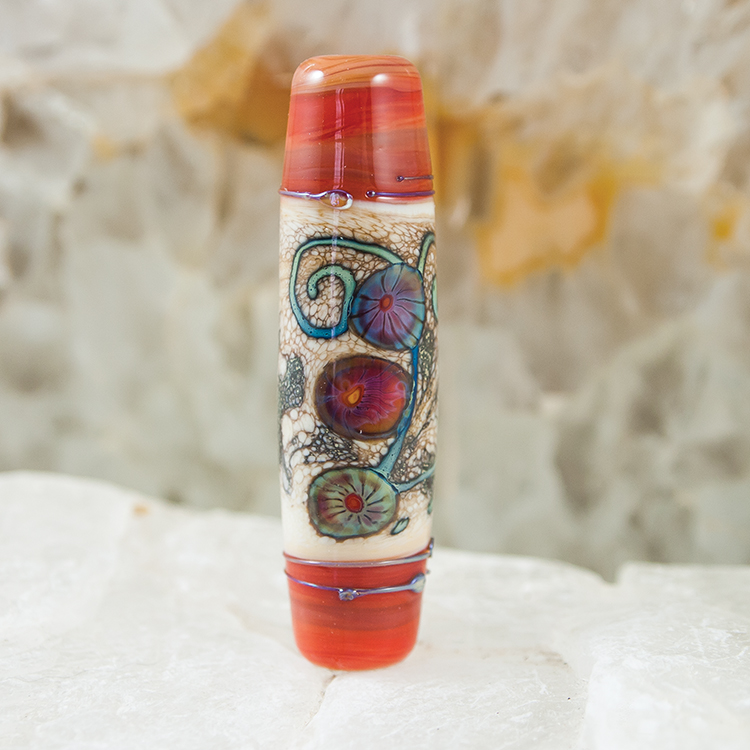
Over a period of time, the patterns evolved and grew in complexity. The silver glass reactions added another layer of interest. Using murrini added focal points around the bead; silver glass trails connected them into a continuous pattern of imaginary fossils and intricate designs.
What I love about the Fossil series is its mix of intentional designs with spontaneous reactions and happy accidents. Each one ends up different and unique, never to be repeated again.
This article shares the steps to create a Fossil Pillar bead. Every reader should end up with a unique twist on this bead, since each artist’s movements create different patterns and slight variations. The fun of this bead is to be spontaneous and let loose. Gently coax the glass into patterns and, at times, let the glass dictate the outcome. What can be better than a duet with forces of nature immortalized in glass
...
- Glassified Ads - April/May, 2017
- Vol. 30, No. 6.
- Workshop Calendar
|
February/March, 2017 - Vol. 30, No. 5.

|
In This Issue
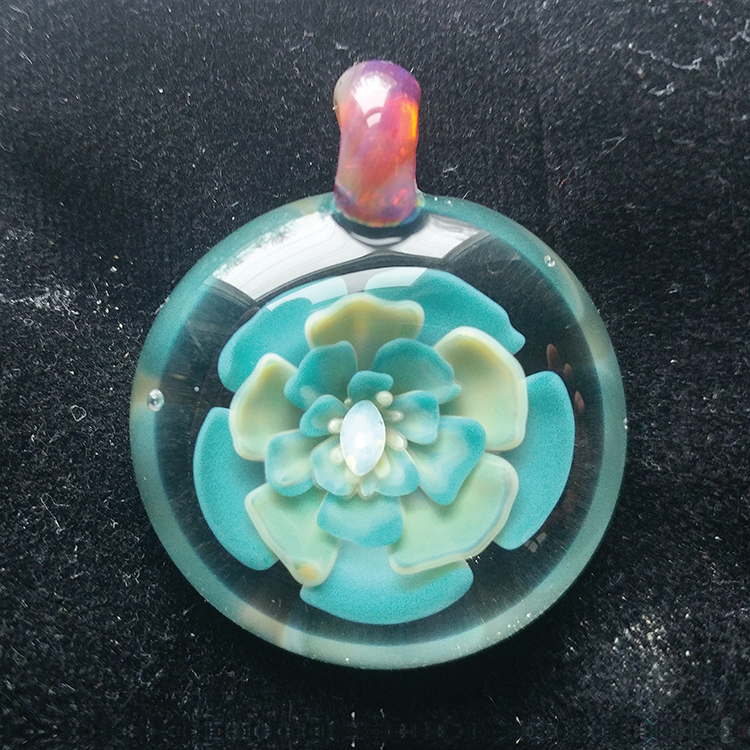
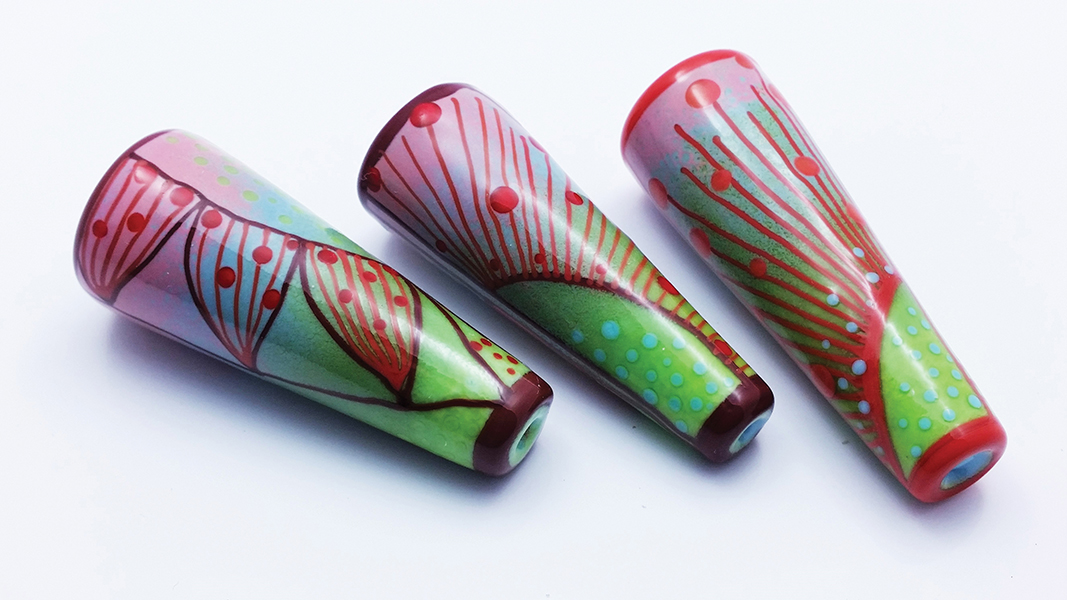
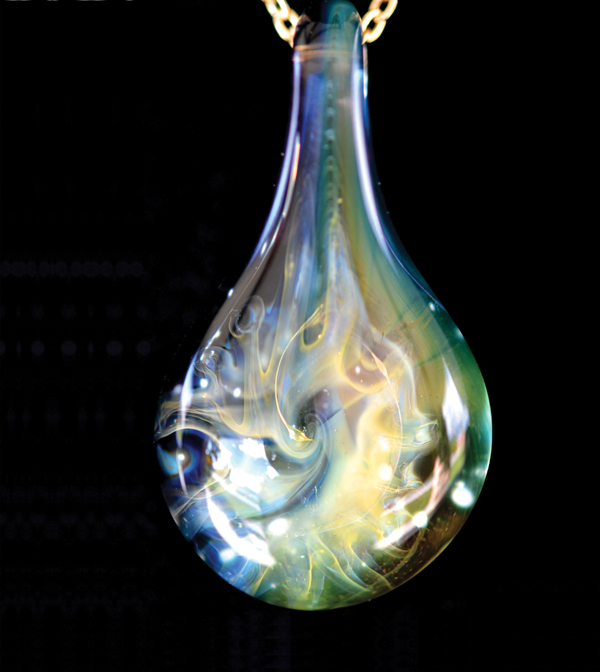
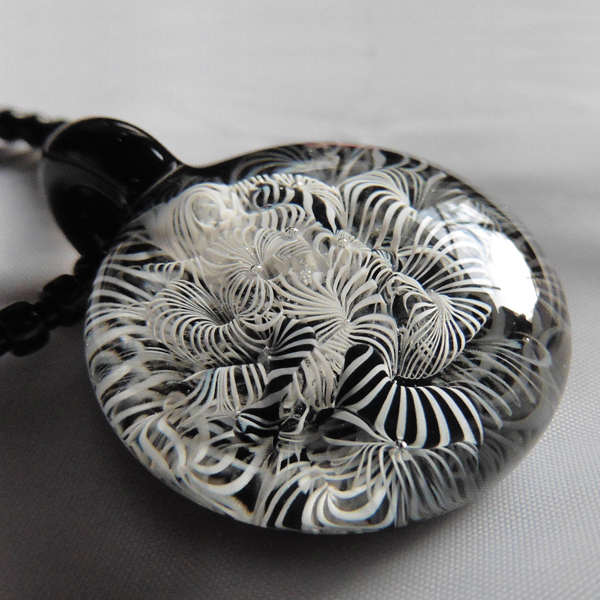
Bending Light: Optical Shaping and the Petal-Stack Implosion by Andrew Bethard
Of all the lampworking techniques, tube implosion has always been a favorite of mine. From retticellos and honeycombs to coral reef and floral designs, tube implosions can be a great skill to have in your lampworking arsenal. This article is my take on a floral tube implosion I refer to as a petal-stack, in which colored stringers are laid in a petal pattern and then layered. Pairing transparent or striking colors over opaque or sparkle colors can produce a variety of effects and color combinations. I also provide a glimpse into optical shaping, which I refer to as the halo technique. I shape the pendant to bend incoming light in a way that frames the design with a ring the color of the termination. This is a “naked” design, meaning no backing color is required...

In the cane made in this demonstration, the outside is rough and uneven due to differing viscosities of the glasses. By the time a murrini chip is placed into a bead, there is such a tiny amount of the variant glass that the bead is stable, but this is certainly an important consideration when using frit blends to create variegated murrini cane. (For more information about viscosity, see Bullseye Glass Company’s Tech Notes, “Compatibility of Glasses,” and the Corning Museum of Glass Rakow Research Library Digital Collection, both online.)
It’s always a good idea to test a frit color or blend with the glass color to which you plan to apply it. I do this by melting a gather on the glass rod, dipping it in a layer of frit, melting the frit in, flattening the gather into a paddle and pulling it out. This will show you how the frit looks on that particular glass, how the frit spreads, and whether there are any interactions or reactions between the glass color and the frit. Some frit blends react and reduce, some are fussy and boil, and some devitrify.
If you are not sure of the characteristics of a particular frit or frit blend, make a simple bead with the glass color you plan to use, apply frit, and then play with it in the flame. Give it some intense heat to see if it boils or is able to stand up to high heat, use a graphite marver to see if it devitrifies, and apply a reducing flame to see if the frit has any reducing glass in it.
Frits that boil will have to be heated more carefully and in a cooler flame, both when applying and melting in the frit and when heating the gather for the final pull.
For frit that devitrifies, use a cooler flame and do any marvering outside the flame using a cool tool, preferably brass.
Frits with reducing glass can be frustrating due to unpredictable results, but also a lot of fun because you can get more than one look from the murrini chip
...

Implosions and compressions in glass are individual, in many variants, in different colors and creative shapes. They are a high-level class of their own. A colleague says a long time ago, technique was for everyone; the different is what you design with it.
In our time, we have new ways to transfer this technique from the usual round shape ... the ability to “decorate” or transform a simple glass rod into a flower or a jellyfish without a maria or a tube is amazing. It even works in both soft and hard glass.
The techniques are not really new; they are based on different beadmaking and prep work techniques.
Note: Other colors and glass manufacturers can also be used for these techniques, in soft or hard glass.
The principle applies that the harder the glass, the more stable the lines and patterns in the imitation implosion. It is quite chic to use filigrana rods from Moretti for the inside optic/designee
...

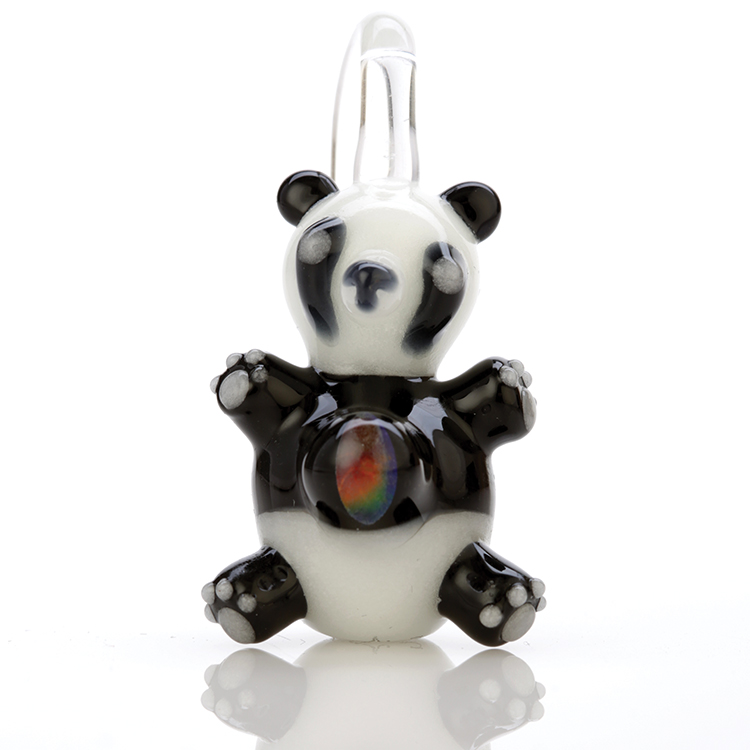
I have had a few rare chances to watch others work and learned my favorite technique yet in less than 10 minutes from watching my good friend, talented artist Michael Bush. He taught me that if you don’t melt in the glass all the way at first, it can be “erased” by knocking it off with tweezers and you can try again. His technique helps me with all of my mini-creations.
This tutorial covers how to make an adorable Glow in the Dark Opal Belly Panda Bear Pendant.
Throughout this tutorial, I usually work with a small oxidizing flame; this applies to using my mini torch as well
...

I went from slumping pieces in the kiln to tedious stained glass work to eventually buying an old Hot Head torch and some soft glass rods Kevin had sitting around. I started making beads and pendants on mandrels. I’d proudly show them to Kevin and he would quickly point out how awful they were. From the Hot Head on my parents’ back porch to an ancient National in Kevin’s shop to a Craigslist Nortel mid-range to my current GTT Delta Elite, I’ve slowly progressed over the last decade.
Between a full-time job and two kids, I typically only get to work on the torch for about five hours a night, one or two days a week. I hope to one day make lampworking a full-time career—I love every second of it and it truly is my happy place. I wouldn’t give it up for the world
...
- Glassified Ads - February/March, 2017
- Vol. 30, No. 5.
- Workshop Calendar
|
December/January, 2016/17 - Vol. 30, No. 4.

|
In This Issue

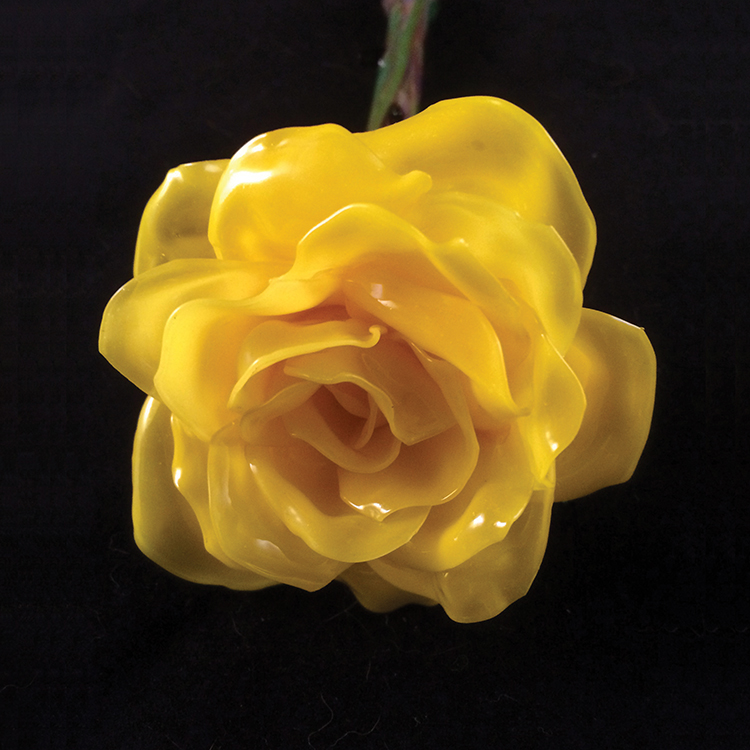
I began making roses using a technique I developed myself through trial and error. I worked on shaping the petals, experimenting with different techniques for creating leaves and creating a sturdy, yet natural, rose sculpture. I tried to make it a point to sit at the torch every day.
I posted some of my roses on social media. I received a phone call from Paul. He saw something in my work that was unique. He said that my roses were the most natural-looking roses he had seen done in glass. He encouraged me to continue studying art in general and to practice, practice, practice.
I completed another online master’s class with Paul Stankard and began attending the annual International Flameworking Conference in Salem, NJ, each spring. This conference provides an opportunity to meet other glass artists, to see various techniques and materials, and to learn about trends in the glass art world. I always find this conference to be inspirational.
I continue to work in my home studio most days. I experiment with varying size, color, and types of glass. Recently, I created some UV glass roses, which are interesting. I am working on combining colors. Mainly, I work to practice and perfect my roses.
I’m excited to share my process for creating glass roses in the following tutorial. I hope it will encourage other glassworkers to try their hands at making these beautiful flowers
...

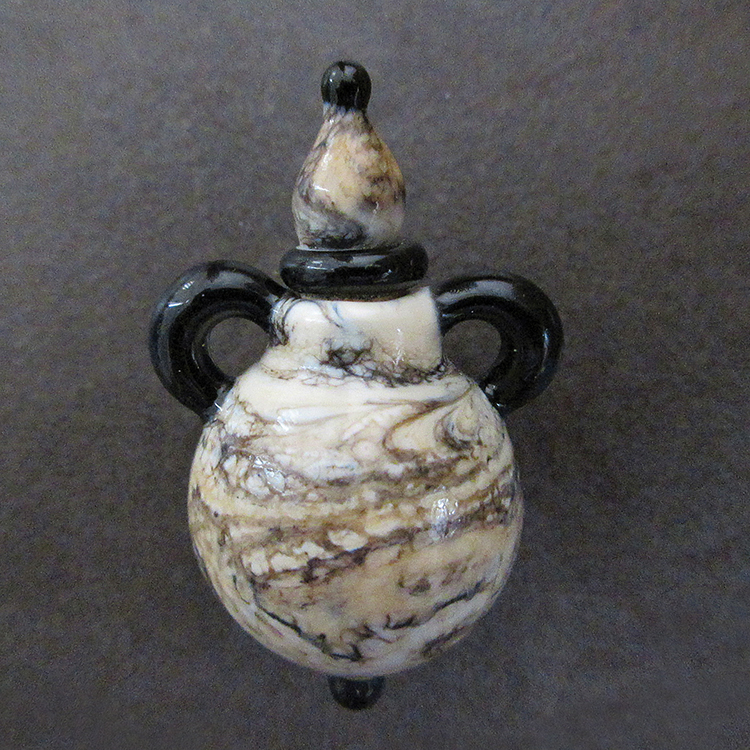
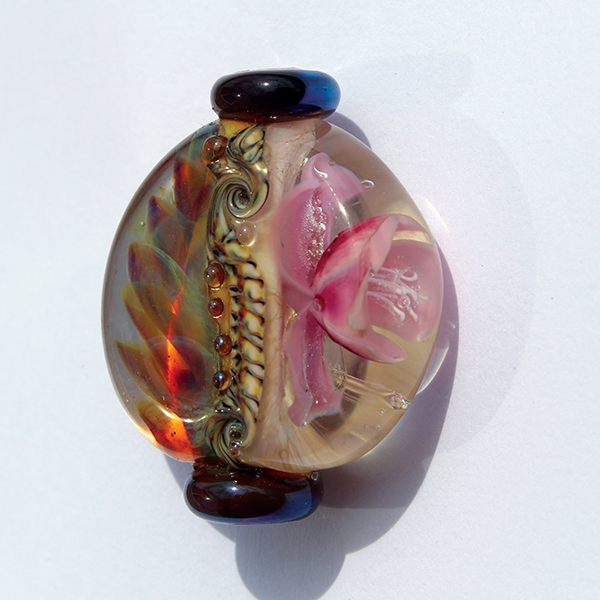
Vessels—who doesn’t love them? Vessels have been around for thousands of years and have been used to store anything and everything,; from human organs to the finest perfumes.
The soft glass (104 COE) vessels and toppers in this tutorial are small vessels (about 1 1/2"–2" long), to be worn as pendants. These can also be made in boro, either on a blowtube or straight from a clear or colored glass tube (I suggest 10–12 mm).
I have also made this vessel simply by using one rod of color that has variances already in it, but this does not have to be the case with your own vessels. Vessels can be decorated with a variety of designs by melting in frit, stringers, etc., before blowing them out. They also can also be blown out first and then decorated for a raised design—it’s all up to you
...

Unlike other interests that had come and gone, glass beadmaking became and remained a passion. Within a year, I had upgraded my torch and kiln and acquired an impressive stash of glass. I’m drawn to many different styles of beadmaking. My inspiration comes from the natural world, from flowers to wildlife, from the cosmos to geological patterns.
I love all colors, from organic earth tones to brilliant tones and soft pastels. And I especially love the jewel tones I am able to achieve using silver-laden glass. My lustrous encased silver glass beads are my most popular style and the one I get the most questions about. This tutorial demonstrates how to make one version of this style
...

I am a glass artist from Wayne, Ohio. I started making glass beads in July of 2002. After starting a jewelry business, I heard about a lampworking class at a local bead shop, the Bead Factory, in Tacoma, WA. I took the class, absolutely loved it, and bought a torch soon after.
I love art glass with depth. It’s like peering into another world. A lot of my focal beads are layered and encased to create depth and dimension. The first time I laid eyes on a borosilicate implosion marble, I was absolutely fascinated with the detail and the process. I started experimenting with soft glass implosions over the last year or two, and this simple implosion technique looked like it could be the center of a flower, so I added petals. The result was a flower with layers of petals like a Dahlia
...

The moral of this story is that the dedication, frustration, and struggles you may have in creating the most gorgeous of floral cane all go to the proverbial dogs if your murrine setting and encasing skills are lacking.
With floral murrine currently being all the rage in the Internet bead markets, I thought this would be a wonderful mini-tutorial for those who fear tackling these tiny chips of intimidation
...
Spider’s Thread by Teppei Okabe
I never repeat any of my creations. One represents the divine Buddha looking down into hell.
Another represents a corpse with reprehensible conduct that looks very painful.
I value color-matching to my imagination. There is no problem if I can imagine a bright color spider thread...
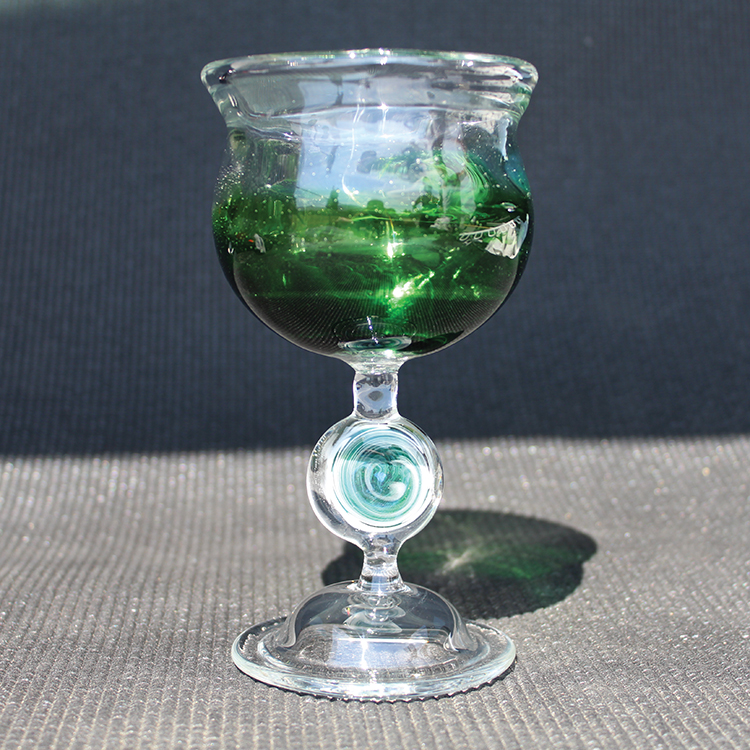
A Goblet in Glass by Robert Six
Glass is an exciting medium to work in; watching a solid form become molten and finally solid again as it cools into its final shape is fascinating. I love the challenge of incorporating new techniques into a piece and that there can be several different methods for achieving a desired end result.
Glassblowing offers me the ability to invent something material that can be perceived by the senses and gives me the freedom to creatively choose how
...

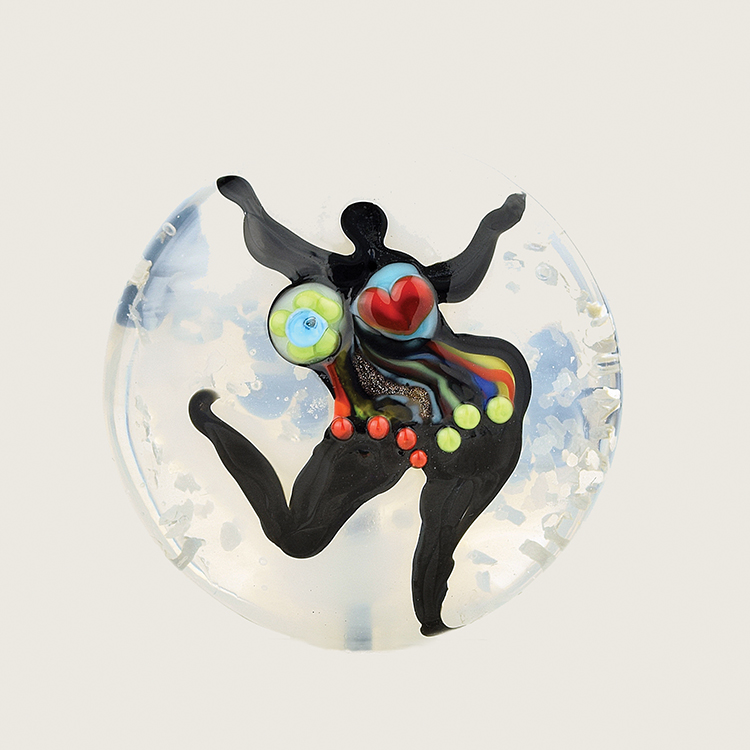
I have been doing lampwork for 10 years now, offering my work under the name “Feuerherz” (Heart of Fire). It was a reconnection to my roots. After 23 years of working as a therapist, I wanted to do art again—with glass, my favorite material. I have also studied fine arts, and it was a dream come true to be accepted in a glass class. Back in the early 1980s, lampwork wasn’t well-known in Germany, so the education was all about stained glass windows. I was immediately hooked when I first saw the technique of melting glass in a flame.
The colorful and cheerful “Nanas” of Niki de St. Phalle, one of the world’s greatest female artists, have been accompanying me for many years.
Let us get started
. . .
- Glassified Ads - December/January, 2016/17
- Vol. 30, No. 4.
- Workshop Calendar
|
October/November, 2016 - Vol. 30, No. 3.

|
In This Issue

I’m not sure if this approach will be of use to any other lampwrokers out there, but it made such a difference for me that it was the first thing that sprung to mind when I was asked if I could write something that other people might find useful or interesting. It may be more useful to someone just starting out, but this approach has saved me a lot of wasted time over the years because it instantly gives me a much better idea of what colors will work for certain techniques and ideas. When I am sketching, I know exactly what colors each element will be in and, more importantly, what colors are viable to use for these parts.
I began by isolating the qualities of the glass into categories that were most important and influential on my resulting beads.
I start with viscosity. I work only in 104 COE, but even within each manufacturer’s range, the viscosity varies hugely. Opaque whites, for instance, are incredibly “soupy.” For a base bead, they can be very challenging, particularly if you are trying to spot-heat just the surface to apply stringer lines. I experimented with layering to overcome this, adding stiffer transparents to the core or surface for greater solidity.
Next was reactivity. Sometimes, you want that lovely outline between two colors that magically appears, for instance, where red and blue opaque meet. If you need to go through several rounds of heating and cooling, though, that lovely reaction can take over and one color will swallow the other.
Next, workability. Some colors can only stand a few heating cycles before they pit or devitrify, so I categorized each color with a work time. On beads where I would be adding many layers, I got to grips with sequencing them so on the last round, for instance, I could add the more sensitive colors and give them just one or two rounds of gentler heating.
Once I had worked out all that, and it took quite awhile, I went on to focus on the techniques of applying stringer work to make the sketches I had been working on. Again, I tried to isolate what I needed to learn most to develop my skills. I realized that it was a little like riding a bike — most of the trouble with stringer is in being able to start and stop it where and when you wanted, and not where it pinged off across the workbench. The design for this tutorial has that in profusion. It also has design elements that allow for random line work and accents that can cover the odd mistakes that inevitably happen while you are learning how to do it. It’s funny that these elements have remained even though, most times, I am adding dots over complete lines, but I am very fond of how it looks. It also allows for adding more color, which is still the thing I love most about glass
...

The first couple of years, I had frustratingly little time to make beads because I was still working full-time. Developing my skills was slow going, but I persisted. Gradually, my technique improved and I started trying more complicated designs.
Two years ago, I decided to take the plunge and follow my dreams: to create beautiful things and develop my glass bead skills on a full-time basis. I am now a fun-employed budding artist. I don’t work full time anymore; I work all the time, and I am loving it. I am constantly excited and inspired by the amazing ideas that find life through the unbelievable creativity of the glass bead artists featured in this publication and elsewhere, and feel privileged to share one of my own.
This pendant bead was inspired by the work of Anouk Jasperse, a fantastic glass bead artist and teacher...

In the beginning, my work had an organic look and feel. As time went on, my work went through several different phases and styles, as I am sure everyone else’s has, too. My favorite style is whimsical; it has stuck around for a while now. I work in a pastel color bubble; it’s funny since, I am just the ordinary Plain Jane type. I guess it is an insight to my inner style.
I am truly inspired by country-side gardens—all different types of flowers mixed up with no rhyme or reason except to make the owner happy and content—which leads to my other little obsession, photography. From mushroom fairy houses and moon goddesses to flower sets and headpins, it just works for me.
When I get bored with making the same thing over and over, I play around with sculpture. There is enough realism in daily life, so that is something I work on in the background. My friend Amy Kuczewski once told me, “If things are not just perfect, add a flower!” That has stuck with me to this day, and is a large part of why I love making whimsical pieces.
I am currently working on a Nortel mega-minor in my small home studio, but I have a couple of minors and a Lynx set up in my main studio. Why so many torches for one person, you ask? Well, I would love to start teaching beginning beadmaking in the near future. I told you: full-fledged obsession.
I make this style of bead with different placements of the lines and swags, but the basics are all the same...

Japanese glass artist Ryo Ono was born in Tokyo in 1975. He started making lampwork beads in 1995, became a professional glass artist in 1997, and established his studio—Raku—in 2008.
His creations have appeared all over Japan, mainly in Tokyo. He is also a lecturer in art at Karitas Gakuen.
The bead in this article is using silver foil that can give this bead multiple colors. You also can layer similar color dots make a clear border
...

My inspirations come from many places: ceramics, textiles, polymer, glassblowing, fusing, to name but a few. Also from the natural world, the forces of nature, the mystery of creation, storms, seas, craggy rocks, algae, bark, sunsets. I don’t seek to create each individual petal or detail in a literal sense, but rather try to capture and evoke a feeling or mood or spirit. This is what my work is about—not replicating what is immediate and obvious, but trying to capture the essence, that ethereal, otherworldly place that takes us out of the mundane and elevates us to a more happy place where dreams blur with reality. A feeling that if you just reach out, you may be able to touch the other side.
In my work, I’m developing effects such as spirit veils, sky portals, storm doors, and dragon’s lace. Why not? Life can be flat and boring. Let’s have some fun! Being able to create artistically is a great pleasure and a gift. Glass makes me happy, and there’s no harm in that
!

This year marks my 20th year of making beads, even though I never thought I could be an artist. I’m not good at drawing or sculpting, but when I found lampworking, I was thrilled to find something I could make that was beautiful. I have enjoyed every minute of it, and it is more and more addictive the longer I lampwork.
As an art form, beadmaking is unique. The results are immediate, and the art is wearable and as beautiful jewelry.
For the last decade, I have been collaborating with my father, David Lutrick, to make art. He is a woodturner, and uses my beads to accent his turned vessels. We have been featured in two magazine articles
...
- Glassified Ads - October/November, 2016
- Vol. 30, No. 3.
- Workshop Calendar
|
August/September, 2016 - Vol. 30, No. 2.

|
In This Issue
A Fume-Backed Approach to Pendants by Anthony Barbano
I am a glass artist specializing in fume glass. I have been blowing glass professionally for nearly a decade.
This tutorial focuses on a technique I call fume-backed because the process entails fuming a piece before backing it with a dark-colored glass.
Fuming with gold gives the glass warm hues. The silver creates cooler colors. When gold and silver are combined, the result is an array of diverse colors. This tutorial uses silver for the fume layers
...
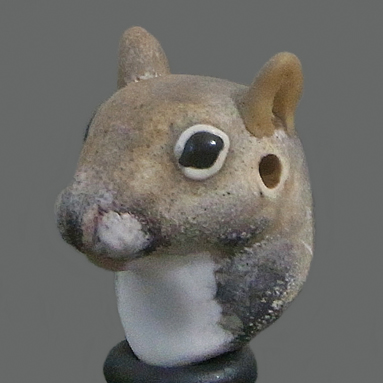
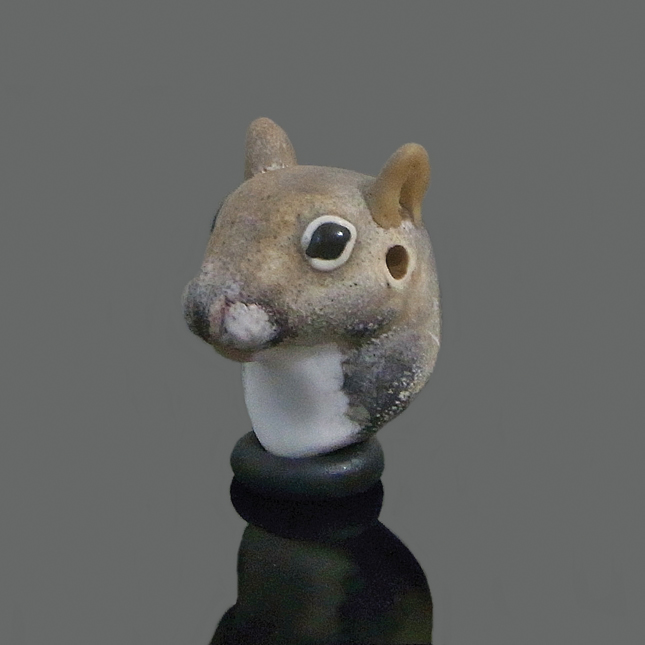
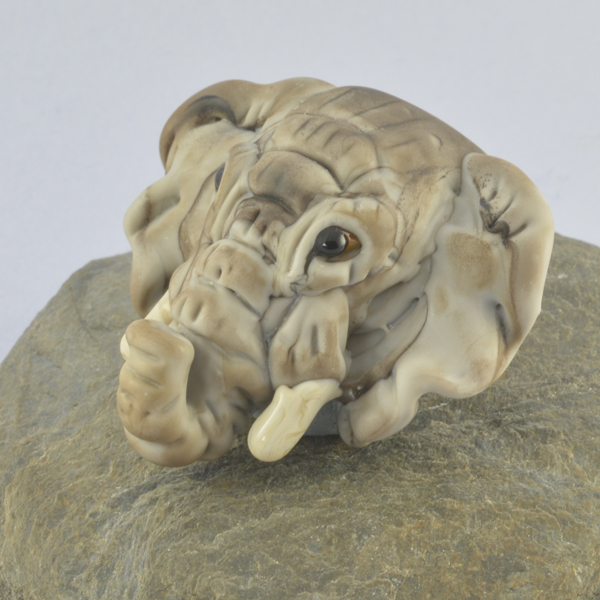
Glass artists take inspiration from so many different things. At times, it can be from another artist, a piece of art work, or just life in general, but I find most people get their inspiration from nature. That is where mine comes from. I‘m always drawn to all things living and try to recreate a realistic likeness in glass of their images. My work is primarily of people‘s pet dogs and cats, but I also like to venture off into other areas of the animal form.
My inspiration for my glass squirrel pendants came from a true-life experience. In April of 2016, two baby squirrels came out of their nest, cold and hungry. One came right up to my son and the other was hanging onto the tree. We found out from a neighbor that his dog killed the momma squirrel. Nearby wildlife rescue centers were full, so I made the decision to rehab them and release them when they were old enough. The next day, two more babies came down from the tree
...

I learned this technique from the owner of the shop, Steven Tilman. I was really impressed that you could take a solid rod and make a hollow vessel. Since then, I have refined the technique and incorporated other techniques
...

After a while, I wanted to create something different, so I started making flowers and leaves. These sold well, but I missed the animals and was beginning to really miss drawing a likeness, so I started to experiment with realism in glass. It took me many failed attempts, but with each disaster, I learned something new. I started to watch YouTube videos on sculpting clay, I even brought some clay and started saving for a ceramic kiln, but then spent the money on glass rods when I figured, why use clay and not glass? I use the glass in a way similar to drawing with pencils and sculpting with clay—slowly blending and adding more layers.
The more I work with glass, the more I want to learn. I am currently experimenting with enamels to change the color values on the surface of animal faces and have even been creating doll heads
...

This marble involves a bunch of basic processes combined to make something that looks pretty tricky. Ideally, the seasoned players will enjoy the recap, and the newer torchers will learn something.
And away we go
...
Face — the moment of Blue by Ayuko Shiroshita
Japanese glass artist Ayuko Shiroshita does marvelous work and we are lucky to have two of her articles in this issue, hopefully you'll enjoy them also
...
Single petal rose by Ayuko Shiroshita
Japanese glass artist Ayuko Shiroshita does marvelous work and we are lucky to have two of her articles in this issue, hopefully you'll enjoy them also
...
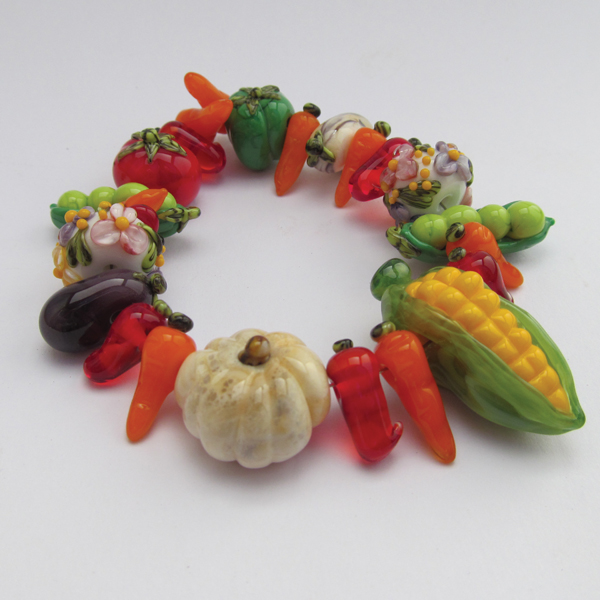
Micro Vegetables—An Unexpected Journey by Karen van Staden
There are a few things to remember when making vegetables in glass; they don’t all have to look the same! Each one can be slightly different, which makes it look more real. To understand what will make your glass veggies look real, study some real vegetables. Take it all in and add little details here and there.
When making beads on such a small scale, remember to be careful not to overheat the glass. Work with a cool flame and add only enough heat to prevent the bead from cracking throughout the process
...
- Glassified Ads - August/September, 2016
- Vol. 30, No. 2.
- Workshop Calendar
|
June/July, 2016 - Vol. 30, No. 1.

|
In This Issue

I’ve found my outlet in creating marbles that are both hot- and cold-worked. Working with striking glass can produce amazing colors and patterns, but it also creates a sense of the unknown. I’ll have a general idea of what the final piece will look like, but when it’s finally ready to remove from the kiln is when you see how the colors developed. Not all (many, in fact) strike in a way that gives you the result you want, but when they do, the colors are incredible. TAG’s Mai Tais are the best I’ve found for this.
My cold work began with sand blasting my pieces. I was happy with the results, but to me, it didn’t feel hands on, I felt somehow detached from the work I was doing. The equipment to cold work that I wanted, would put me into debt, but an uninspired artist is not a happy artist. I ultimately purchased a horizontal lap and a glass lapidary lathe. There’s a different experience when I am holding the glass in my bare hand, pushing and turning it against the grinding discs or the carving blades. The combination of striking colors with the carving produces a kaleidoscope effect that amazes me each and every time.
Not everyone has opportunities to go to a neighborhood glass studio and take some classes. Many of us learn from trial and error, asking questions in online forums, and watching YouTube videos. I have, and I’m sure many others have, still seen something and thought, “How did they do that?”
That’s why I am so grateful to have the opportunity to do this tutorial. Glass Line offers everyone in our community the opportunity to learn how to create something, step by step. I’ve met some artists who are secretive about their techniques, which is totally their right, but, for me, the sharing of knowledge, the sharing of ideas, makes us all better artists and is a benefit to the glass community and its future ...

I enjoy sharing things I have learned about glass with other glass artists, and I have always been blessed with people willing to help me figure things out. I have taken a few great classes through the years, and now I am really starting to see that I have my own style and a unique way of doing things that is my own. My designs are as much fun to wear as they are to make.
This pendant is a simple project that readers can take and make their own. The only thing you need to know how to do to start this project is how to press a maria. The rest is right here ... in black and white
...
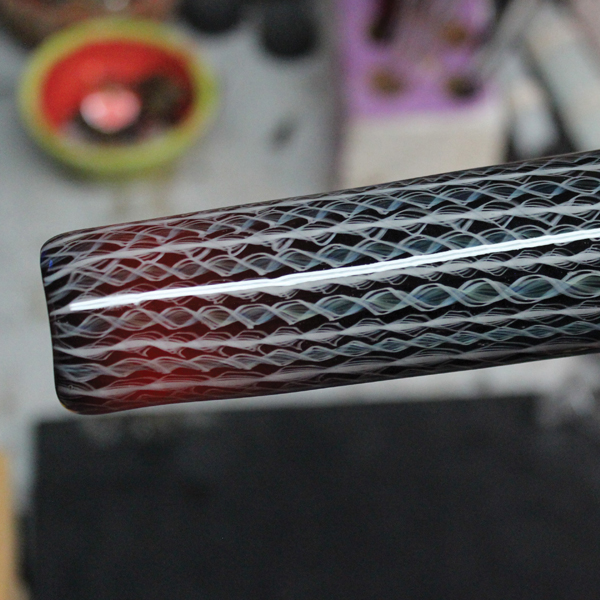
Dual-layered Zanfirico Tube by Luke Baylie
Glass has taught me patience and helped me find a good, honest living doing hard, hot work that I truly enjoy.
This article outlines some of the techniques I use for making custom-blended color and layered tubing
...
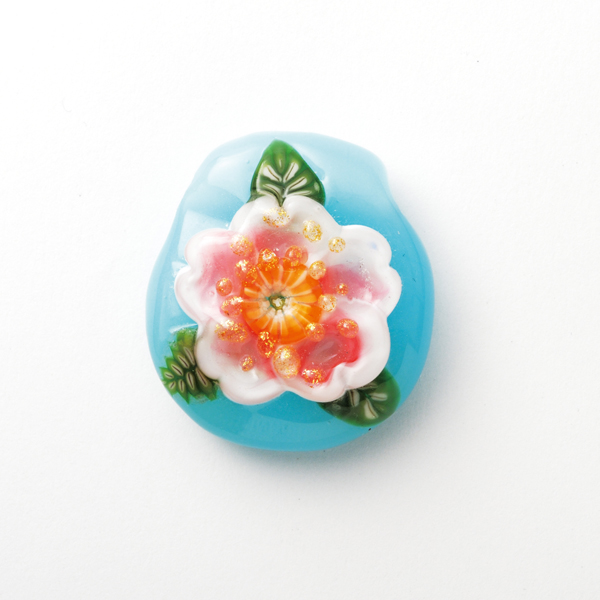
A Frit Floral Bloom by Brad Quintana
I am a native of Louisiana, born and raised in the suburbs of New Orleans. I was introduced to working with hot glass in the late 1990s after I got out of high school. My friend Rick bought a small starter kit from Glasscraft and set it up on a picnic table in the backyard. From the moment I saw that torch come on and the glass start to glow, I was hooked. Melting glass was an immediate passion.
I am always striving to get better at my craft, learn new techniques, and develop creatively. Even though my glass world has taken a back seat to my film career, it’s something that I will do forever
...
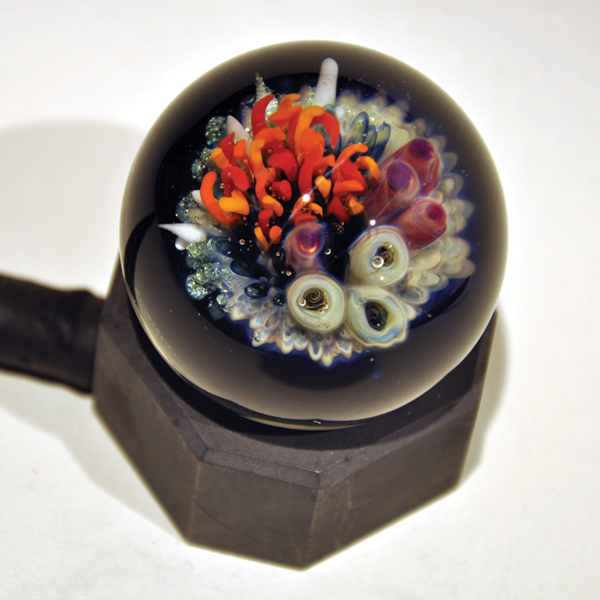
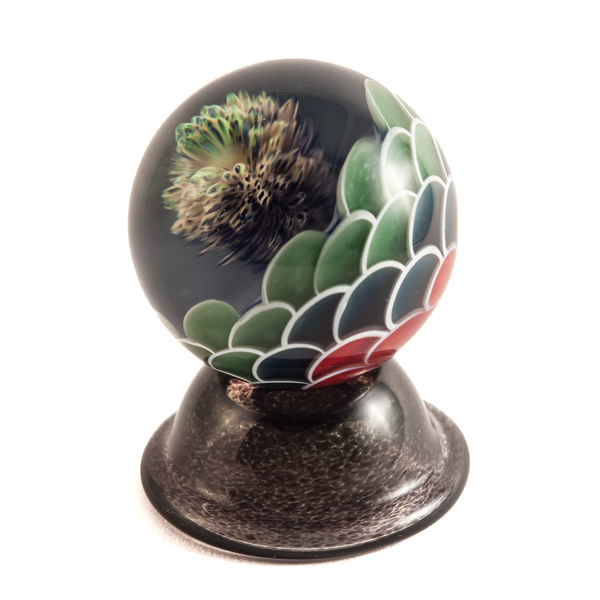
The Reef Marble by Jeff Tomlinsonr (Part 1 of 2)
This marble involves a bunch of basic processes combined to make something that looks pretty tricky. Ideally, the seasoned players will enjoy the recap, and the newer torchers will learn something.
And away we go
...

Working with fume has made me a better glassblower. A desire for different effects has made me focus on techniques that had been out of my comfort zone and I was subconsciously avoiding. I started paying much more attention to the little details, such as the sound of my flame and nuances of heat base and flame chemistry, after spending more time than I like to admit wondering what went wrong, or what went right (especially when I couldn’t reproduce it).
Right now, I’m in love with warm colors, and I’ve been focusing my efforts primarily on the spectrum available with gold. I plan to spend a lot more time on exploring the possibilities of silver used on its own in the near future.
Once again, I want to give a shoutout to everyone in the glass community. Thank you all for your support, the knowledge you so graciously share, and all the love!
This tutorial is for a gold- and silver-fumed implosion pendant with a drop. Many different techniques can be used, and there is always much interesting debate over the science and/or best practices to achieve amazing color. Torch type, oxy/propane ratios; the rotation of the Earth, the moon; and whether you made a proper offering to the glass gods all seem to be influencing factors. I am just going to share what is working for me, on my torch (a 6 knob GTT Phantom)
...

I started up a little more than two years ago. I can only light up my torch in the evenings, so I’m progressing slowly, but with the firm conviction that I can only get better.
The social part of the glass also interests me. Last year, I participated in organizing the first international French Flame-Off. Our guest star was Kenan Tiemeyer. It was a very rich experience (image a).
I’ve always had a passion for flowers, so here I’ll write a bit about how I make simple flower pendants using the implosion technique
...
I began my glassblowing adventure quite by accident; just a girl out exploring the world when I was introduced to it. It brought me from my native home in southern California to living in Oregon, where I picked up all the education available to me at the Eugene Glass School and from the Pacific Northwest glassblowers and multigeneration glass artists in Germany and around the world.
I began glassblowing by furnace, enjoying working with other artists pulling soft glass cane, gathering glass in its molten state, making off-hand vessels, and doing sculpture. I learned fusing so I could do inclusions and roll-ups, and then hit the trinity of glass art by learning the ancient art of working borosilicate glass with a torch, taking all of the skills I had learned from all forms of glass and merging them together.
Glassblowing has become my life. Every second I can’t work, I’m daydreaming and having visions of what I need to make next
...

Marbles have always been my favorite things to make when I get behind the torch. I started making floral marbles in Ryan’s old studio back when I first started lampworking in general. I instantly fell in love with the technique, and spent a lot of time trying to make different flowers, eventually getting to a point where they were nice enough to sell. I’ve sold a majority of the hundreds of floral marbles that I’ve made on Marbles & Things, and that has helped fuel my interest even more.
Eventually, though, I ended up slowing down on making floral marbles due to some incredibly rude comments from other artists regarding my “recycled techniques,” and started trying to develop my own techniques and ideas.
Of everything I can make, my favorite technique would have to be the vortex marble. I certainly did not develop it, but I have taken the material it consists of and have developed my own styles for this technique. One style that I like to focus on is my New Mexican Mineral Deposit. It’s a vortex that consists of a deep crevice in the marble that resembles a crystal deposit that one would typically find in some of the caves around New Mexico
...
- Glassified Ads - June/July, 2016
- Vol. 30, No. 1.
- Workshop Calendar
|
April/May, 2016 - Vol. 29, No. 6.
|