April/May, 2020 - Vol. 33, No. 6.

|
In This Issue

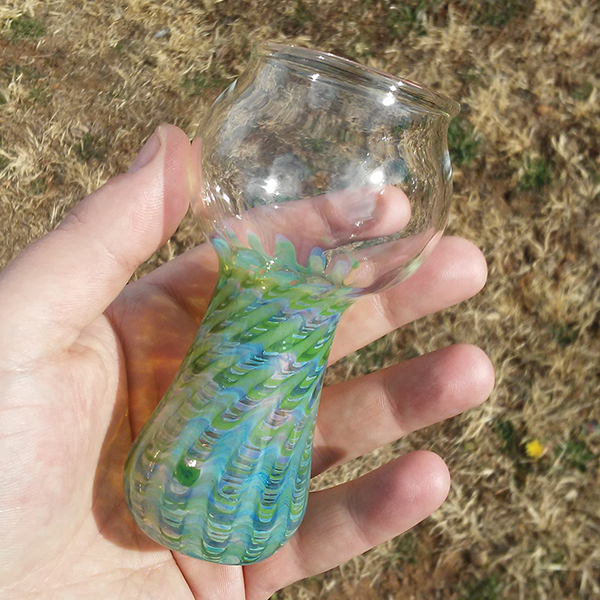
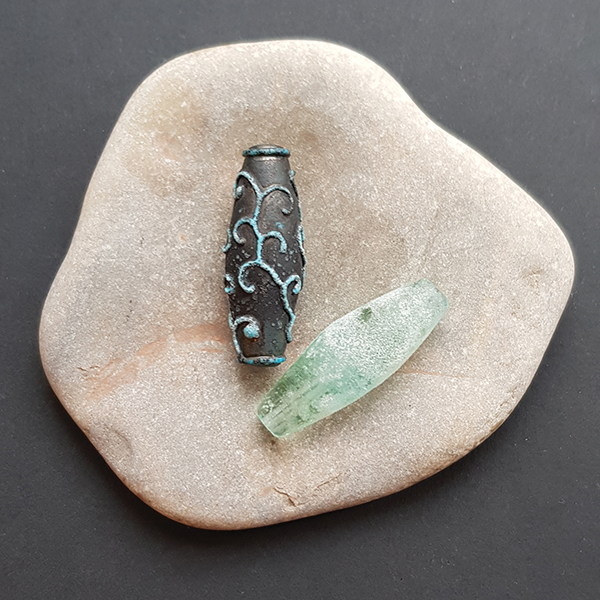
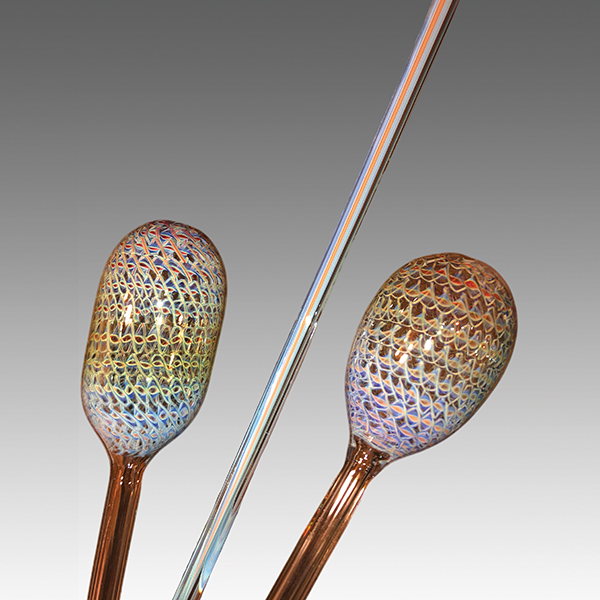
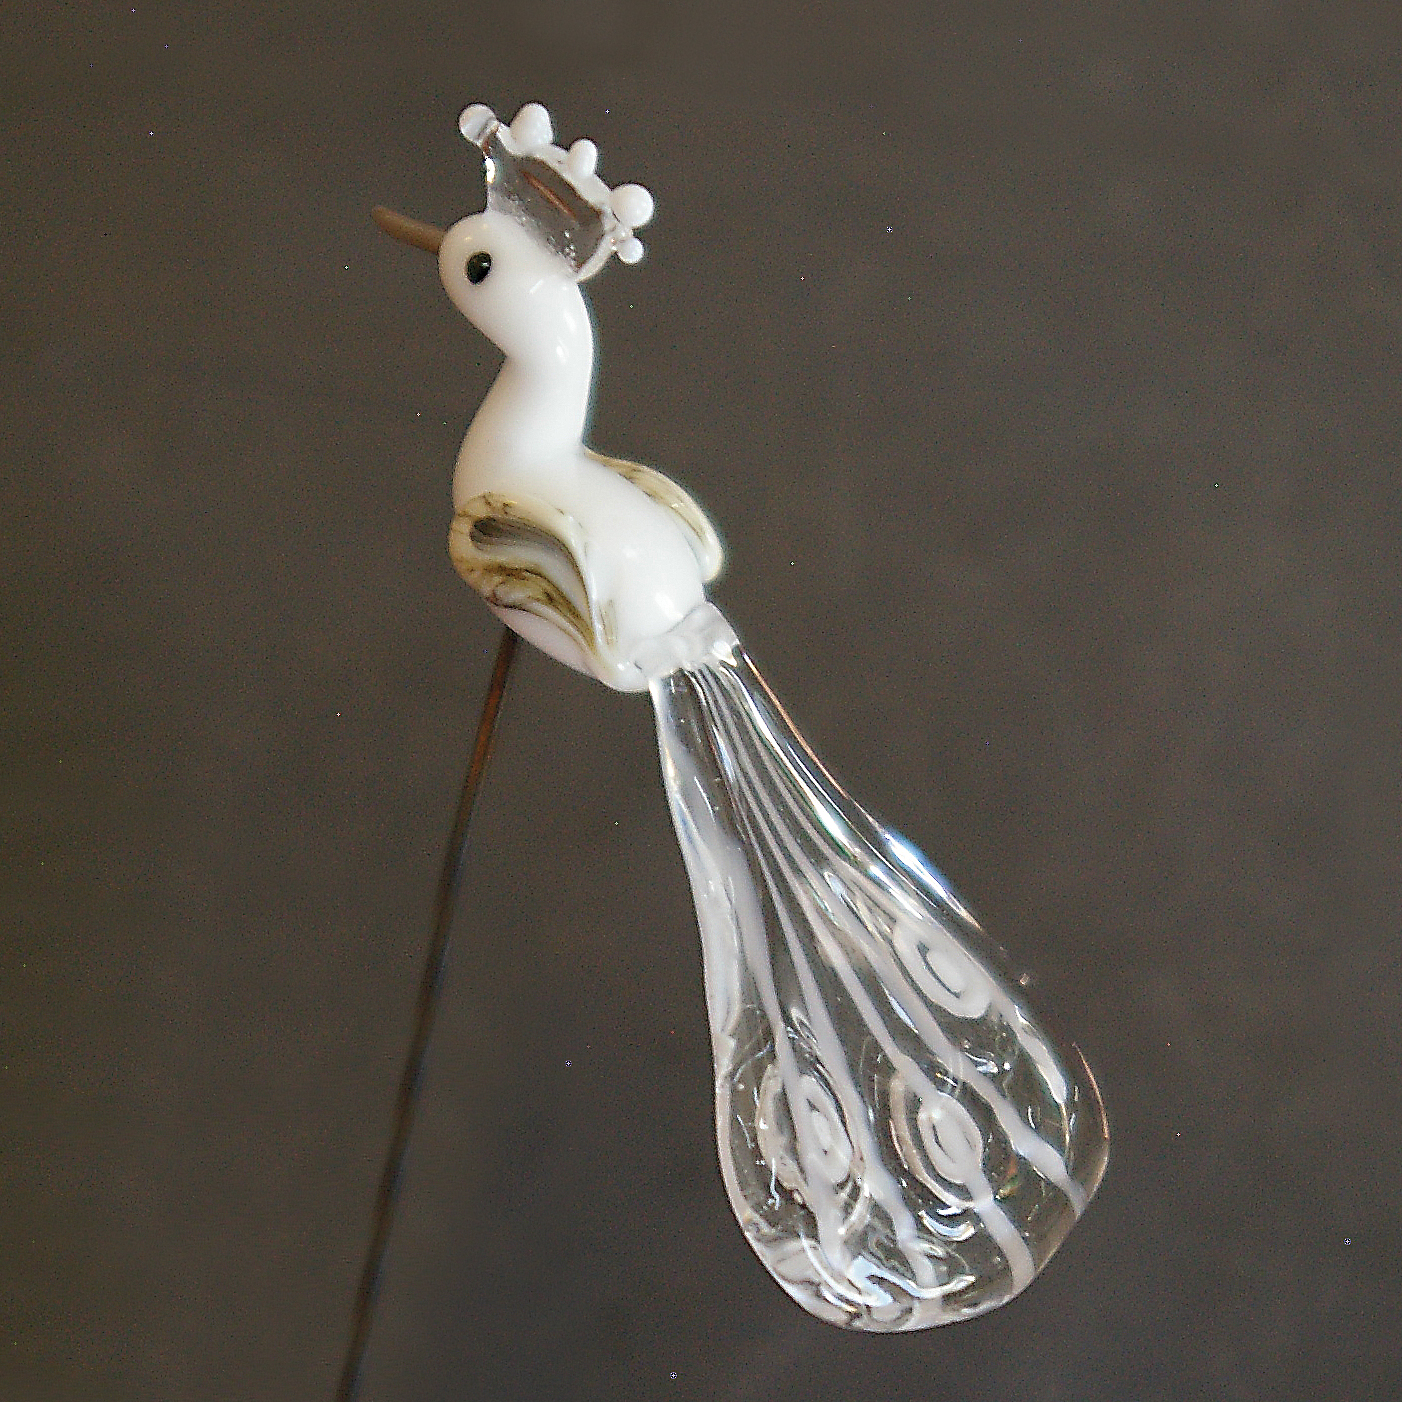
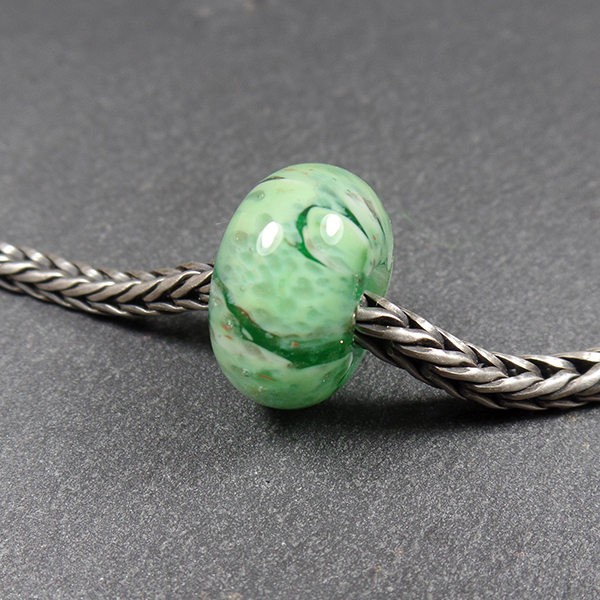
I currently live in a city surrounded by nature, with mountains, forests, and waterfalls, and a very rich fauna. To represent this, I often produce blown glass birds.
I usually start with a black or white boron tube and use beads or stringers as decoration. I like to produce my stringers from frit, because you can get a different range from the existing boron palette or can improvise due to the lack of a color. I don’t like to overload the decoration because normally my birds will be part of a set that is part of a larger piece. I follow the basic technique of “pulling point.” After the decoration, I shape the bird. I start by inflating the body and then the head. To make the beak and legs, I usually choose a translucent stick because I like the contrast with the opaque color.
To make this bird, there is no need to use any special tools; all you need is a torch. I remove the excess glass with the stick itself
...

I am currently working with soft glass, trying to learn heat control with a new Carlisle torch, which seems to concentrate heat better into the center of my work. My work leans toward sculpture form in miniature, and lots of beads. I value the miniature work one sees in the beads being made now. I enjoy the process of focusing on one thing to master the skill and bring my vision to concrete fruition. Every aspect of creativity in your medium has to be fully explored to understand the options, limitations, and possibilities for bringing your product to life. I have been working with soft glass because of the brilliant color choices. (Color is very important to me; the brighter the better.)
In borosilicate glass, on the other hand, new formulations from Northstar and Parramore Color have once again drawn me to hard glass. Boro folks can learn a lot from working with soft glass. Your control weaknesses really come to light when you try your hand at soft glass.
Each type of glass has its place in my work, and overall, my main objective is melting glass. It fascinates me.
I see the human creative process as a form of tangible meditation. Holding a piece of work in your hand is holding someone’s time on this Earth, their focus. As artists, we are sharing our meditations with the world, opening ourselves completely for the world to see. It is a very brave thing to do. We all have to encourage each other, buy each other’s work, talk about accomplishments, and celebrate our unique creations. We should always give each other recognition and acknowledge that we have value
...

In the early days, I spent a lot of time and booth space just educating the public about what lampworking is and why it mattered. With the advent of websites (pre-Ebay and Etsy) devoted to hot glass, we could direct the buying public to a forum that could educate them about what they were looking at and how to judge whether they were getting quality.
As time has gone on, more and more people have entered the hot glass arena and finding your niche got harder and harder. However, more and more teachers became available, teaching specific techniques to make the exploration easier and faster. This project draws upon basic techniques learned from a few teachers in my past, and I thank them all ...

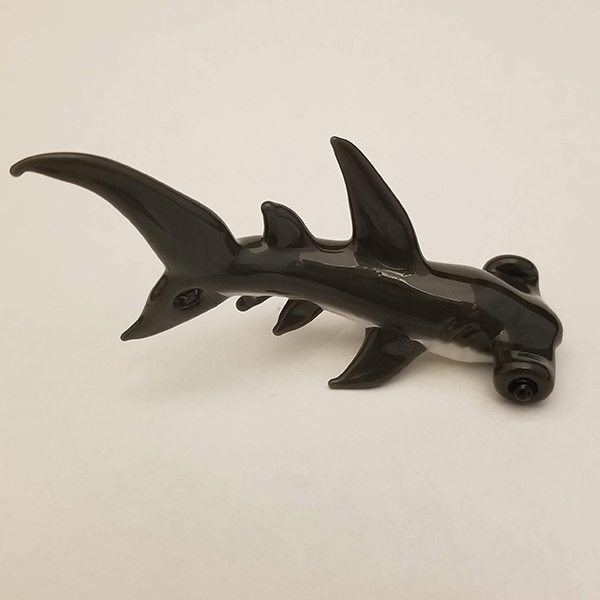
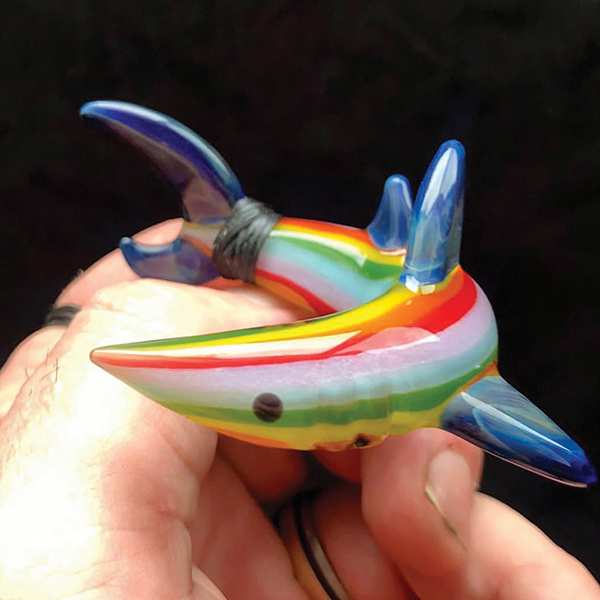
Diving into glass the way I did in my early 20s — spending every minute for a year at the torch or sleeping — fundamentally set me up to start doing my own artistic thing fairly quickly. The glassblower who mentored me was thorough, and got me going on tons of methods and projects that turned out to be good building blocks. I found that glass sculpting was my thing, and over the last decade, I’ve spent a majority of my time developing that. I consider glass work to be art work, so like any art producer, I tend to try to recreate what I find attractive in ways that attract me. Nature is my main inspiration, from bugs to amphibians and reptiles to fish; while I do some other work, these things are where my focus is.
This article shows how to make one of my favorite projects: a hammerhead shark. It’s a guide for form and shaping, but it is just a guide. How your sculpture turns out is up to your vision for how you want your project to look. You can also apply the concepts in this tutorial to any glass sculpting you’re interested in: mentally split the goal object into parts; decide how you’re going to form, shape, and attach each part; and work your way from the bottom up ...

Over the years, I have become known for customs, repairs, and glassblowing lessons. I have participated as a demonstrating artist in events such as the Glassroots Art Show and F.A.M. in Madison, Wisconsin. I am on the torch every chance I get, and glassblowing is an integral part of my life. I am thankful to have found such an engaging hobby and welcoming community.
For this tutorial, I made a Sherlock, created with a series of one of my favorite patterns, using a technique called benderbacks. I used a 50/50 fire and ice/jail stripe variation tubing that I came up with, pulled by hand in a 75 mm vacstack. I find the benderback technique to be time-efficient way to make consistent wig-wags. I do all my work on a GTT Mirage and a DIY oxygen setup built around a Gast compressor. Without further delay, here we go ...

I have been flameworking since 2000. I have taken classes from Roger Parramore and Robert Mickelsen. While cup-making has always been an interest of mine, I spent my time teaching and making glass pipes on the side for the first 19 years. I taught beginning sculptural lampworking classes at Clovis Community College for approximately 18 years. In the last year, I have focused my time on cup-making and have found it very rewarding. My long-term goal is to teach classes all over the country ...
|
February/March, 2020 - Vol. 33, No. 5.

|
In This Issue
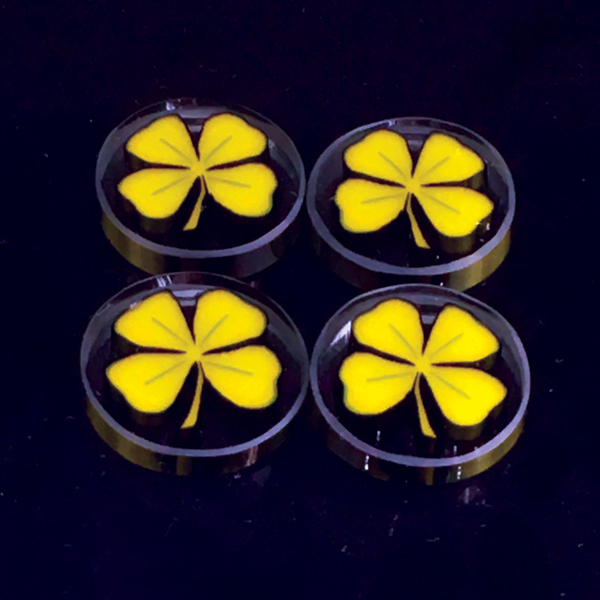
Make Your Own Luck with Four-Leaf Clover Murrine by Ian Cohen
After my nternship, I moved to Boulder, Colorado, and rented a bench from a local studio for a while. I moved from Boulder to share a shop with Erik Anders, a veteran glassblower whom I had met during my internship. We then won the AGE award for Best Milli Collab series of 2016 with David on our Rick and Morty images. Erik and I now work together on a unique line of complex geometric patterns that require expertise in many techniques. I have done several custom milli images such as company logos and cartoons. I also offer milli classes for groups or individuals ...

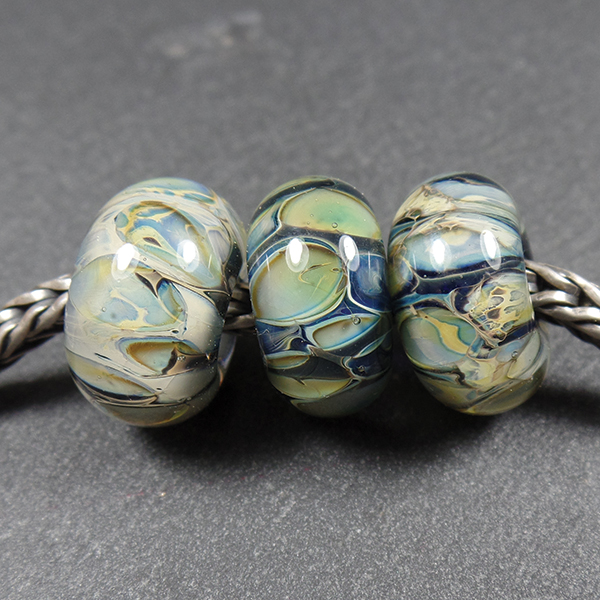
I have been a lampworker for eight years, and never does a session at the flame go by without my thinking of the many talented artists who have been generous enough to share their knowledge in written tutorials, magazine articles, social media posts, and studio classes. Every artist has left an impression on my torching style. I have developed my own way of doing things and have learned that there are several ways to do just about every creative technique in beadmaking with soft glass, and that there are as many techniques as there are artists. I still love to watch other artists work at the torch. I observe with the eyes of a novice, taking in everything, no matter how basic. I look at how they pick up and hold their glass rods/stringers, how they marver, what they marver with, etc. Sometimes we discover that old techniques done in a slightly different way may serve us best.
Like most lampworkers, I have days when I want to pursue that dream of creating a spectacular masterpiece unlike anything anyone has made before, and will spend precious time working (aka playing) at the torch, willing to devote my time for what may yield nothing but a bunch of ugly beads, but I have also found that no time at the torch is wasted. Those hours help to hone intricate skills. We are taught early on to accept that valuable practice time and the many lessons learned from failures are essential. There are absolutely no short cuts in this craft.
My torch studio is my happy place. I am still amazed at the happenstance that brought me to this artform that 10 years ago I didn’t even know existed. The glass community has become an extension of my family and has enriched my life, for which I will always be grateful. I can’t imagine my life without it.
Just a reminder to be safe at all times while at the torch. While adding tiny detail to a bead, I have gotten so close to the flame that the nail polish on my thumb caught on fire — twice
...

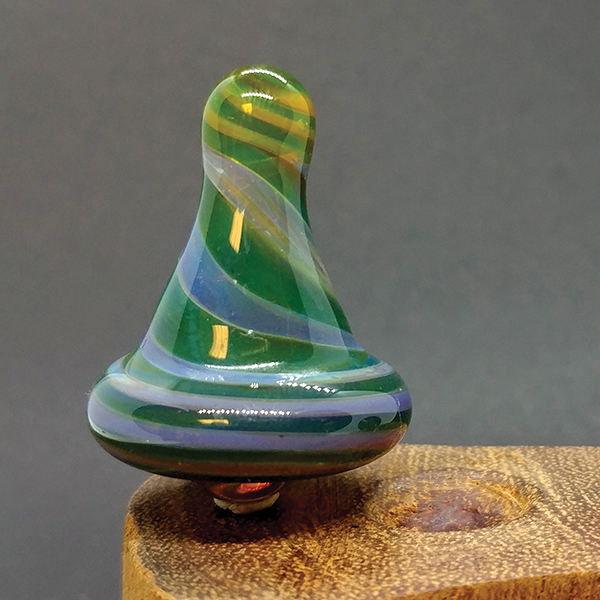
I’ve been a lampworker for 12 years and making spinning tops for six years. I work with Xanadu Animation and Multimedia Studio in Honolulu, Hawaii, as their chief lampworker and director of development. I make a lot of spinning tops — one or two every day — and enjoy sharing my knowledge.
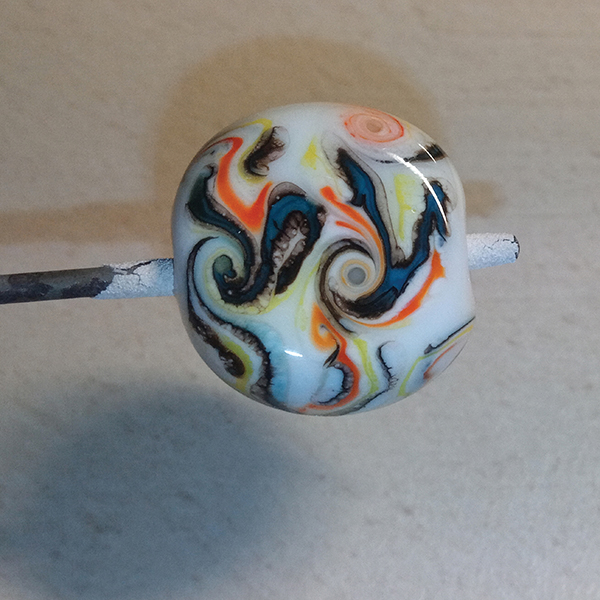
This article is about making two-color spinning tops with a swirl. There are ways to keep the lines straight, but for this project involves making the colors swirl to the center. It has the beginning lampworker in mind.
Over the course of the years, I’ve learned a lot about balance and keeping an even heat base, but it takes time and patience to master those techniques. Heat is important when making multi-colored swirled spinning tops, mainly because you want the top to be all one piece of glass, not three pieces of glass swirled together. If you don’t melt everything in well, there is a high chance of breakage in the kiln or afterward
...

My cousin gave me a lesson in glass painting. And .... I fell in love with glass and had to break up with my office job. That was a difficult decision. It lead to complicated circumstances in terms of finances. But I have never regretted it.
Half a year later, I discovered lampworking. It made me love glass even more for being such a versatile material. It is glass that allowed me to realize my childhood fantasies and ideas, and discover my own creativity. I see magic in the way glass objects transform our reality, bringing light and colors in everyday life. It is amazing how a combination of glass and colors can make a simple object look beautiful and unique
...

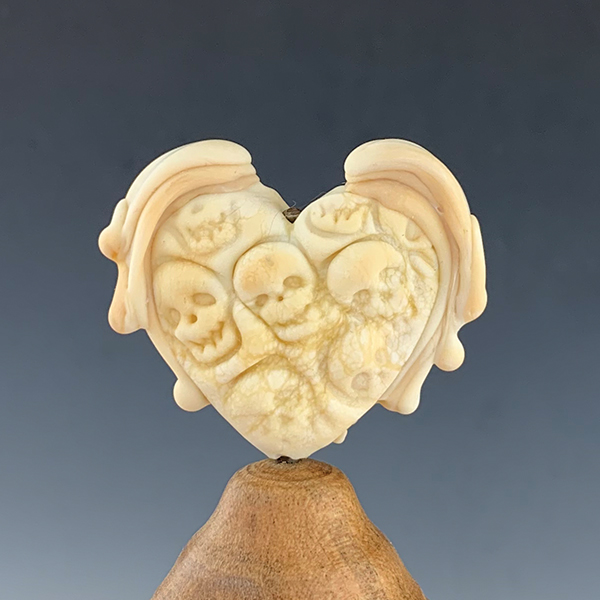
Karen Leonardo is the author of Creating Lampwork Beads for Jewelry and Art Bead Jewelry Seasons in Glass, and has taught courses about bead- and jewelry-making.
Karen is demonstrating how to make her Catacombs Heart Focal Soft Glass Bead
...
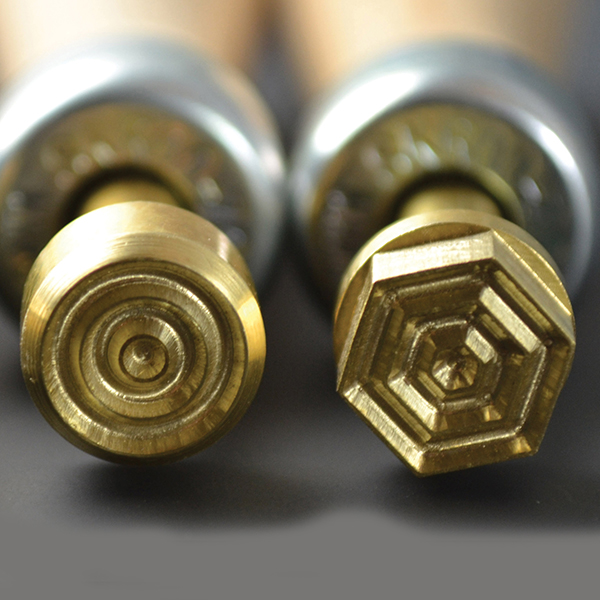
The Ins and Outs of Using Imprint
Tools in Hot Glass Designs by Karen Leonardo
Karen Leonardo is the author of Creating Lampwork Beads for Jewelry and Art Bead Jewelry Seasons in Glass, and has taught courses about bead- and jewelry-making.
There are many uses for imprint tools in hot glass designs, including shape, texture, themes, expediency, hiding mistakes, and specific final touches. Here are a few things you should know before purchasing a tool ...

My interactions with customers and other people are vital to me, and they spawn lots of design ideas. About eight years ago, it was a customer at farmer’s market who suggested that I make fairy garden accessories. I had never heard of fairy gardens; I had to do an Internet search to learn about the hobby. Now, making fairy garden accessories is an obsession. Many of my designs were derived from the animal beads we developed back in the beginning. Other design ideas come from suggestions or brainstorming sessions with family and friends. Two heads (or more) are always better than one!
I currently work a part-time job for health insurance benefits and human interaction. The rest of the day and on weekends, I’m spending a lot of time in my studio, melting glass and making what I love.
This simple fairy design is a miniature because I like to make my pieces tiny — this little fairy is only about 5/8” tall from foot to ponytail. Feel free to work larger
...
|
December/January, 2019/20 - Vol. 33, No. 4.

|
In This Issue

Over the last 13 years, in my pursuit for acquiring knowledge of glass, I have become known as dLow. This was a nickname that various unrelated, and glass-related groups started calling me early on in my journey and, as nicknames often do, it stuck. For some time, I pursued the fame and glory that I saw some of my predecessors acquiring. I realized eventually that it was not the possibility of fame and glory in glass that I loved. I love working with glass and the complexity of the medium. Thus, the nickname dLow has come to suit me quite well.
Sharing this medium with others has become a sub-passion for me. I share in the thrill when a peer or colleague expresses or demonstrates how they have “leveled-up.”
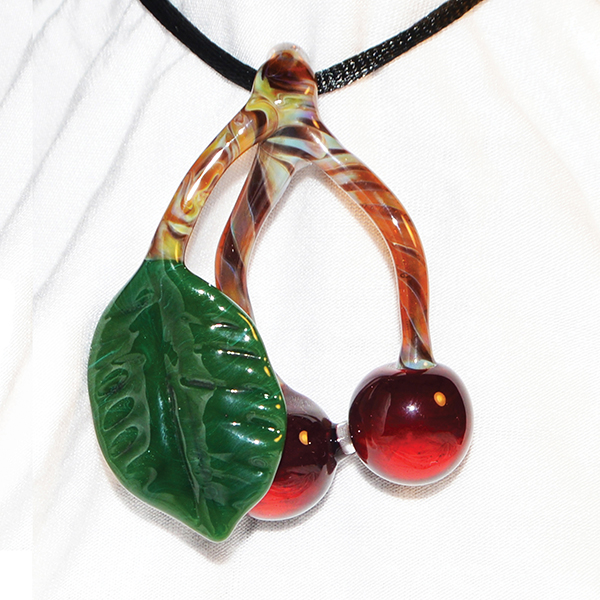
This tutorial is not a celebration of my own ability and skills. It is intended to help those beginning their own glass journeys understand the importance of process — of how understanding the process to achieve a desired result can and will lead to perpetual advancement of skill. The shaping and techniques of this cherry pendant are the most-basic, and this project is intended to help even the newest glassworker produce an item to be proud of. As a student flameworking instructor at the University of Oregon’s Craft Center, this is one of the no-experience-necessary, three-hour workshops that I teach
...

My passion for art and craftwork has been with me since childhood. Growing up around candlemakers, woodcrafters, and other small home-craft industries, I was allowed to explore the world through creating. This lead me to many media, but lampworking and glass have been my passion. I have spent more than 20 years exploring this medium of art.
I was lucky to be living in Oregon in the mid-1990s. Lampworking was starting to blossom and thrive in the Willamette Valley area of Oregon, and I, like many others, tapped into the creative environment of early West Coast blowers. With the help of a few friendly blowers, I started my journey in glass. Between ’99 and 2005, I sold work through galleries on the Oregon Coast and represented myself with a booth at Portland Saturday Market. After 10 years of playing with glass, I spent the summer of 2008 attending classes with Lucio Bubbaca and Loren Stump. Their influence can still be found in my current work techniques. I use both boro and soft glass in the studio, depending on the project.
Currently I work on a GTT Phantom and a Bethlehem Barracuda, and use my old National as my hand torch. My studio is simple — an old garage — and my tools are pretty basic.
In recent years, I have moved away from production work and enjoy my freedom to explore designs in depth. Color glass has always been my fascination, and I love to work with all the new palettes available in our medium. I appreciate being able to work a few hours every morning, not feeling pressured to keep a large studio going. Glass has provided me with freedom to enjoy life in full, being a father first for my three boys. I’ve been given the ability to create my own path in glass over the years, thanks to the support of my wife Eugenia. She is an important partner in my business side of life. Together, we sell my work at various local festivals and on Dead Tour (whenever we can). We also just recently opened our store, Ripple Emporium, in Lancaster, KY (check us out on FB).
Over the years, I have tagged my work with JJP. I feel blessed in this life to have the unique pleasure of creating American artifacts that will last the next 1,000 years, perhaps to be dug up long after our culture is gone.
Glass is such an entertaining medium to work with, and I’m always finding new inspiration, always learning new techniques.
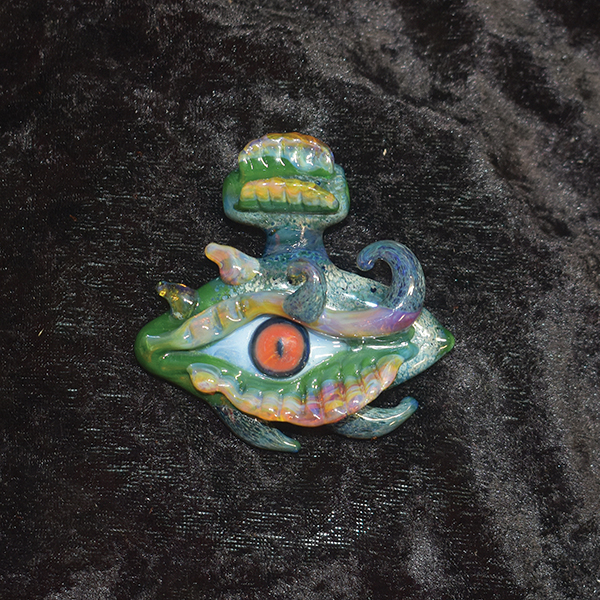
My Dragon Eye Pendant is currently my favorite piece to create. It’s inspired from binge-watching “The Game of Thrones.” I like these pieces because they are abstracts built around a solid natural design (the eye retina). This provides the freedom to mix colors and use various shapes and technique to create individual one-of-a-kind pendants. The first steps (1–8) are the same for each piece, but the later steps (9–13) open up a canvas of interpretation. Since we have never really seen a dragon eye in real life, any interpretation is correct, and that makes it fun each time
...

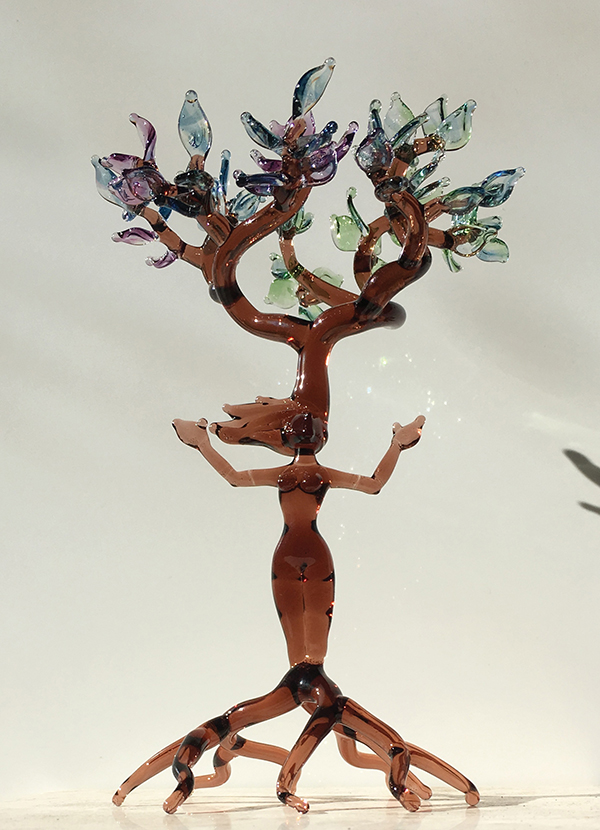
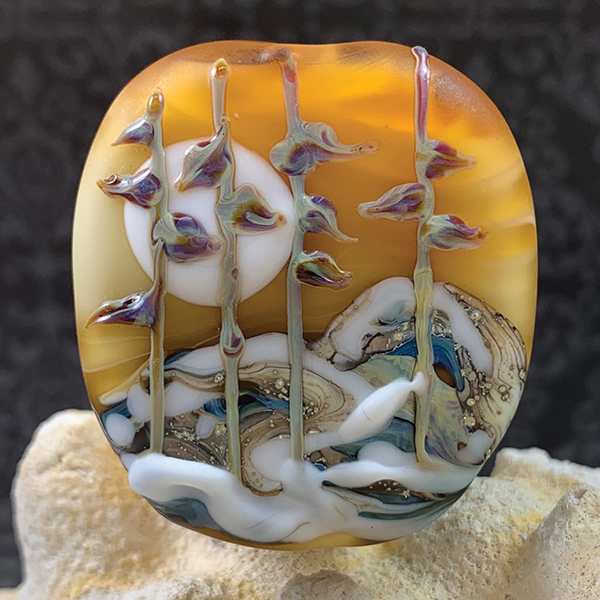
When planning any creative project, I think it is important to consider the symbols and meanings inherent in the subject. In this way, you can best understand it and make a true representation of what that thing means to you, and thus create a reflection of your own soul in the art you make. I believe inner reflection and inspiring greater understanding are the purpose of both art and the process of making it.
This is a dryad of springtime, youth, and hope. The green/blue/purple leaves speak to me of blossoming colors while the transparency of the trunk and leaves lets them be bright and filled with light. Her arms reach outward toward the future. Color, position, and decorative elements add shades of meaning and offer an opportunity to express different emotions in each piece. An autumnal dryad might have a few fallen leaves at her feet or mushrooms representing the stages of decay and recycling of nutrients back into the earth. A winter dryad stands bare without her cloak of leaves, while a summer queen may have a bed of flowers at her roots and fruit ripening on her boughs
...

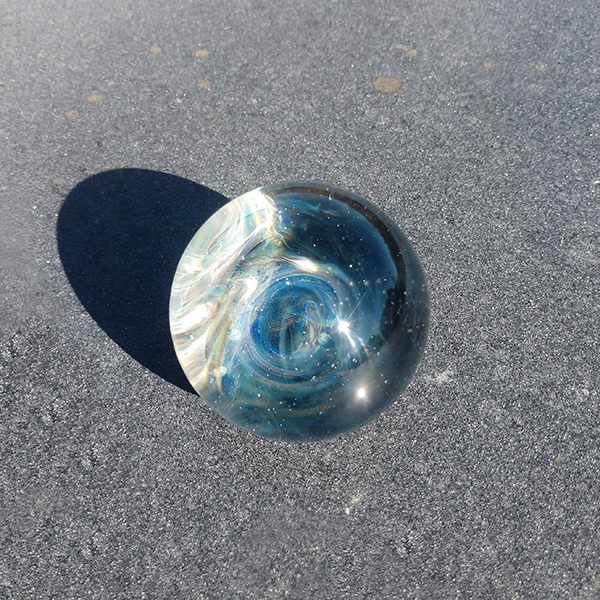
A nebula marble creates a universe by Adam Baggett
I fell in love with marbles long ago and was determined to succeed as a marble maker. David convinced me to attempt some functional work (pipes) for skill and financial reasons. I ended up falling in love with that process. Making functional glass allows for larger-scale templates and the challenge of making something that is both beautiful and functions beautifully is gratifying.
This article takes things back to my root love. Marbles mean a lot to me and have always been both mystical and grounding objects. They bring me a lot of joy. Early on, I gravitated toward the vortex and nebula marbles, so I decided to share some of that in this tutorial.
The technique here can be expanded on and applied to many projects. This demo — a nebula marble with a raked backing — is an early one that I use for my nebula marbles, and I now apply it to silver implosions, spikes, backing, and many other uses. You can gain a large variety of color by adding frit and gold, but this version only uses silver. I call this silver splatter prep
...

My personal journey to murrine started back around 2011 while I was learning glass in general. The tiny images in glass were so intriguing to me and I wanted to make my own. I did not try and market my creations yet and only created them for my own use. In 2014, I was working for a production studio doing repetitive work — but work that paid the bills — when I got an ear infection. During my time off, I got bored and decided to try my hand at murrine again. Using a small oxygen concentrator and a Nortel minor, I created my first murrine that I marketed for sale. This was an “all-seeing eye” in the Franchini style. It sold well and I never went back to the production shop. From that point on, I focused on my own production line as well as murrine.
Skip forward to 2015; I had been making and selling murrine for about a year. Many of my releases were component stacks. These were components made in the flame using the traditional Franchini method that I pulled into long components and stacked together in a tube to be vacuum-encased into one solid rod. These releases sold well and allowed me to make more-detailed images, which led me to try stringer stacks. I produced my first two images on my own. This process was very difficult, mainly due to it being harder for one person to pull long stringers, as well as the time the stacking consumed. I was lucky to produce a single image per month. I needed some help if these were to be done properly.
After the initial two pulls, I brought a friend in to help with the process. Shane Conlon was a talented glassworker I had known in town who also had an interest in the process. He helped me pull long stringers that were more consistent and helped with the stacking process itself. This is where things truly started to come together and when Precision Pulls was formed. As a team we were able to release more, faster, and — most importantly — more detailed images. My wife Sara started to manage the advertising and sales of the murrine and my son Jake came on board in 2017 to help with the process as well. Jake being involved was a dream come true and the time we spent working together was some of the best time in my life
...

I get the greatest support from my friends, relatives and close people, primarily from my dear mom. In my creative process, even our pet cats, Sema and Leva, are taking part. Ready-made beads will never be left without their attention. They say that cats feel good energy and they do not fall asleep anywhere. My cat Lyovushka really likes my workshop. If I forget to close the door, then he will definitely need to lie down on the desktop among all the tools and glass rods.
My creations flew away to almost every city and town in Ukraine. I have a lot of friends, as well as fans of my work. And this is all about “giving wings” to me. Much jewelry got into good hands in the USA, Italy, France, Spain.
The creation of new images depends on the mood, on the people who surround me, even on the time of year. I love almost every creation. How else? You are making each bead with love, putting your soul into it.
I like completely different styles: animals, beads of any shape and size, rings, buttons. All this can be done in a variety of styles. Depending on my mood. And sometimes on the task itself
...

This is a fun tutorial where you will learn to “paint” with glass. Be sure to pull stringers ahead of time so you have everything ready before you start your bead. If you have never made silvered ivory stringer before, simply take a sheet of silver foil, roll it onto a hot gather at the end of a rod of ivory glass, marver and melt it in and pull. It creates a lovely effect for landscape beads and so much more...
|
October/November, 2019 - Vol. 33, No. 3.

|
In This Issue

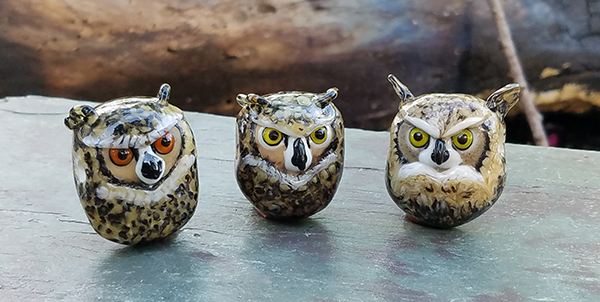
In between creating pet portrait pendants, I like to make other animals. I have a fascination with the big cats, but always try to expand my learning with other animals. I almost always work from reference photos in recreating what I see — I am more of a visual learner over written instruction. I see what I want to imitate and break it down into shapes. Most all of my work is built on the same foundation, and when I add glass, I automatically process it into shapes. All of the fine-tuning comes afterward.
Constantly challenging yourself is the only way to grow and expand on what you already have learned. With birds of any kind, the challenge is getting the feathers to look like feathers. These tips should help you with the most-basic way to achieve that. Similar techniques can be applied to create snakes, lizards, dragons, and — of course — other birds.
This project uses soft glass on a mandrel, but the same techniques can be applied using comparable colors in the boro palette
...

I am in love with glass and am inspired by the many talented artists I see online, as well as patterns, shapes, colors, and nature. I continue to experiment, create, and learn on my own every day!
Here is how I make monster beads. The possibilities are endless and I enjoy the idea of “no rules apply” when creating these little guys. They can be any color, have one eye or three; whatever you want
...

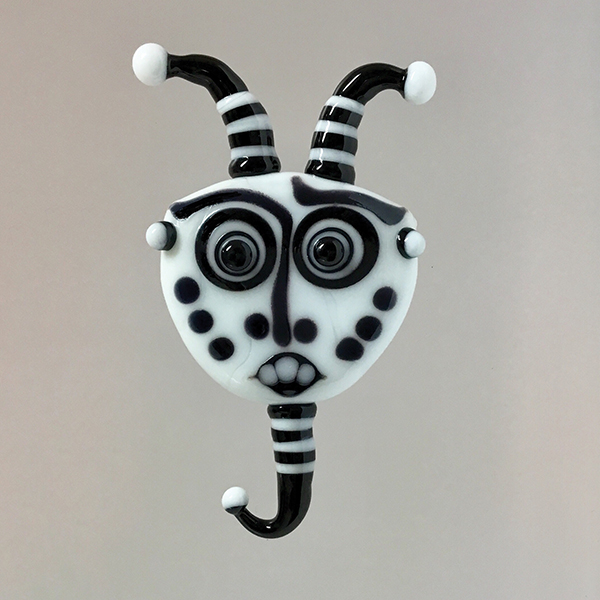
I have always been drawn to masks and at one time collected them. It only seemed natural to make them once I started making beads, so they were some of the earliest beads I tried, probably around 2001. As I began making these, I saw some other glass artists doing interesting faces — that recipe for inspiration included Sharon Peters, with a touch of Sage and Salt. Eventually the masks morphed into having quite a variety of eyes, along with horns, hats, wings, boots, skates, mittens, leafy heads, hands and feet .... on and on. I named them Elementals and sold them on eBay and my website, each with a story listing its associated element and containing a bit of its history — usually ridiculous, since they had lives in those stories. I made them for around 15 years on a regular basis and make them now only on occasion; I no longer tell their stories
...

After so many years of glassblowing, I get some mental and physical therapeutic benefits from the craft, as well as great pleasure from bringing some beautiful creations into this world. I am pretty much self-taught in all of the art I create, through old-fashioned trial and error processes and finding ideas in the beautiful surroundings of everyday life and adventures in the tropical Whitsundays of Australia.
I have a wonderful setup at our property, including an oxygen-producing plant and holding tank running from a large solar power cell. We invested in this to effectively give me free oxygen. All the tools I’ve collected throughout my career make my studio an appealing and exciting place to be. I thoroughly enjoy the time that I spend in there
...

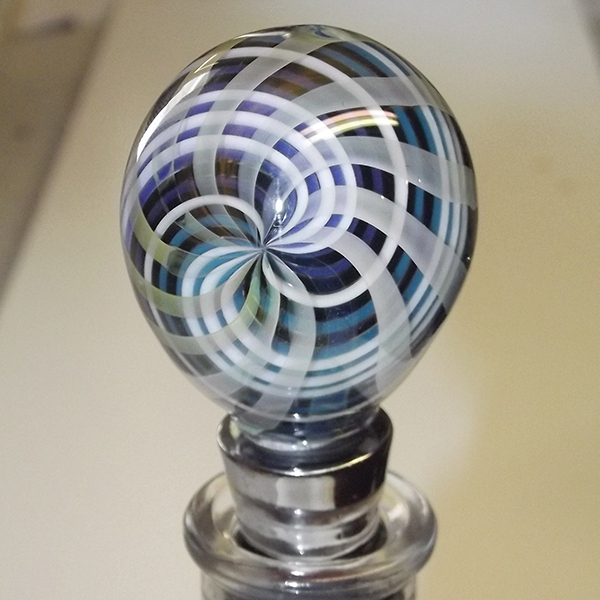
This project involves making an opposing spiral (also known as a reticello) with the axis rotated at 90°. It will become a gorgeous bottle-stopper for that fine bottle of spirits, or soemthing to show off on a bottle of wine at dinner.
This project involves one layer inside the tubing with colored stringers, and another layer outside with gold and silver fume work lines ...

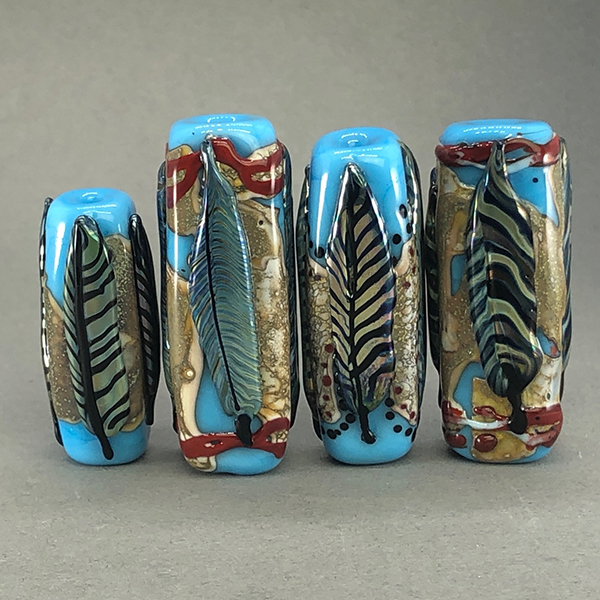
Feathers are amazing organic structures and are represented easily in every art form; you can make them as simple or as complex as you like. They are also an easily identified symbol, representing everything from hope to courage to death. Every bird has their own feather design, color, and complexity. My raven feather explores the use of latticino and Double Helix glass in the design, and for the beads I made for this tutorial I also used silver foil and ivory shards to create an organic base. In this tutorial you will learn feather construction, as well as my process on finding the best color combo, and how to make and apply shards.
Using silver foil for making shards is one of the best ways to make interesting backgrounds for your designs. I’m using dark and light ivory for my beads; most of us have some color of ivory lying around, so this is a good excuse to dig it out and play! The chemical reaction between foil and ivory is well documented, and experimenting with the foil and other colors can lead to exciting discoveries! Learning how to make shards also opens up a world of color combos and textures. I hope this information gives you a springboard into creating new ideas for your own beads
...
|
August/September, 2019 - Vol. 33, No. 2.

|
In This Issue

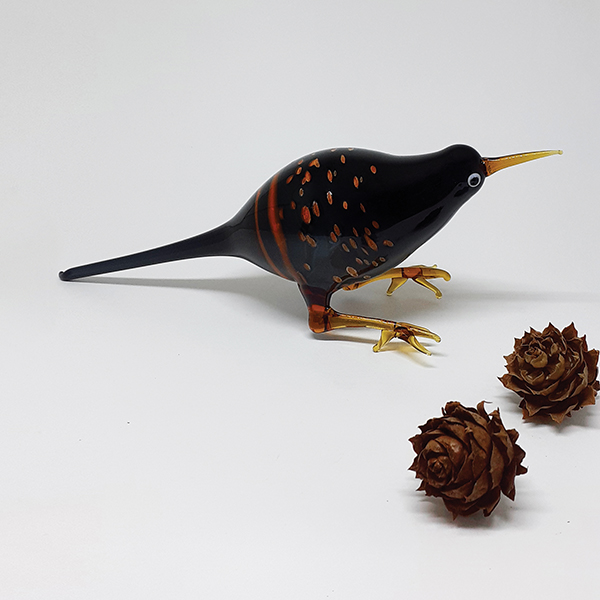
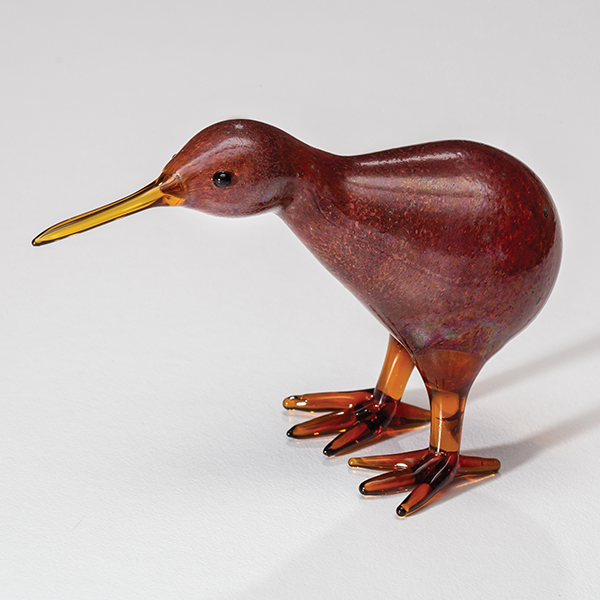
Glass kiwis are my bread-and-butter line. I usually make these in my garage, using a Bethlehem Alpha running on two oxygen concentrators. These appeal to tourists who are looking for something locally made. Being small in scale, they are also easy to pack in a suitcase.
As a scientific glassblower, I use a lot of glass cones and sockets, as well as stopcocks, which results in a number of scrap ends. Instead of sending these glass scraps off to a landfill, I like to turn them into things such as amphorae, perfume bottles, and small birds (especially kiwis). I also use brown Kraft boxes and Kraft tissue as packaging.
The subject of my tutorial is our native bird the kiwi, using scrap glass covered in frit for the body. Kiwis are relatively straightforward to make since they have vestigial wings and lack tail feathers. Even though the kiwi is endemic to New Zealand, I hope some of these techniques are useful to flameworkers interested in making other glass birds
...

I work solely borosilicate glass and my work focuses mainly on cane work and applying it in a functional and esthetically pleasing way. I draw constant inspiration from my surroundings and love to incorporate nature and plant life into my work. I try to let my work free-flow organically, allowing each piece to be shaped and designed in a unique, one-of-a-kind fashion. I tend to make the prep work for each piece individually as well, to keep all the colors and everything unique.
When shaping, I like to work with the glass rather than work it — to see where the glass wants to be taken and take it there. The technique I call “coilcane” says it all: Basically, it is traditional surface and encased color cane, pulled untwisted and coiled up hollow in a controlled manner, allowing the twist to form as it is coiled. The endless color and arrangement options with cane mean that the possibilities are almost infinite. It can be a relatively simple technique when done on a smaller scale, or a real challenge when you get larger with it. It is great for lip wraps or in chaos work
...

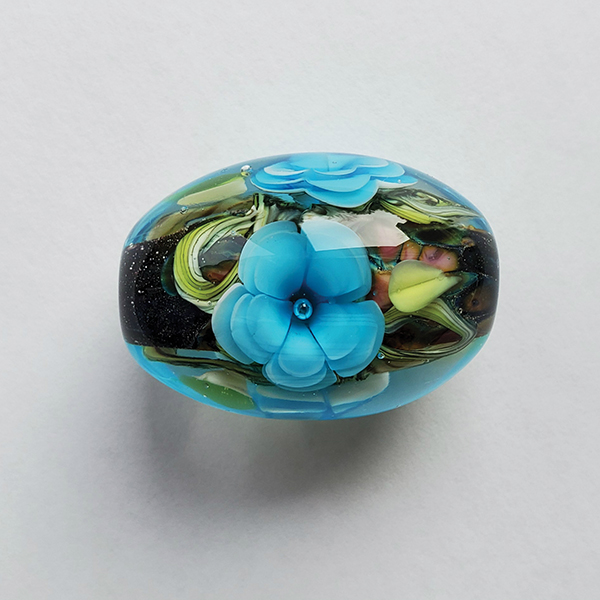
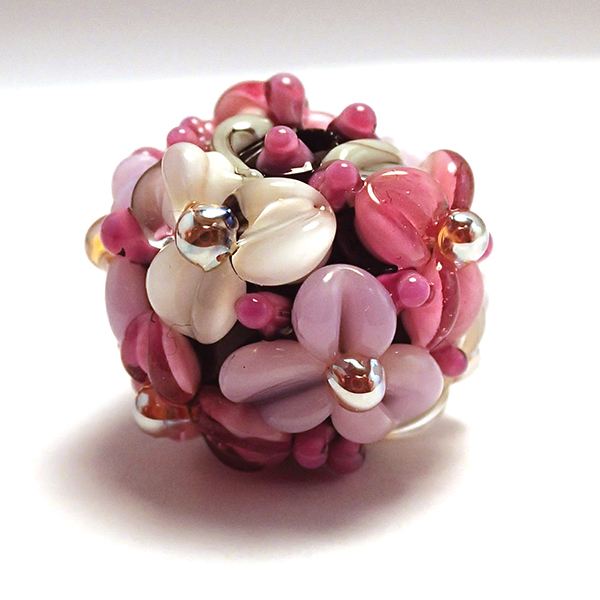
The beads I’m making for this tutorial are covered in 9-10 flowers made up of an opaque base with a transparent top layer, formed by creasing the center of each softened dot with either a knife or a razor. This transparent top layer gives the flowers extra intensity, and as the artist, you have the ability to create hundreds of shades of colors by combining the base and top layers. These beads will have almost no negative space since the entire bead is full of buds, flowers and leaves. The most important tip is not to let any of your initial dots touch. If you can achieve this, you will end up with a clean design. I work exclusively with 104, Effetre, CIM, Double Helix, and Vetrofond glass. Most of my pinks and purples are hand mixed to achieve the colors I need for my combinations
...

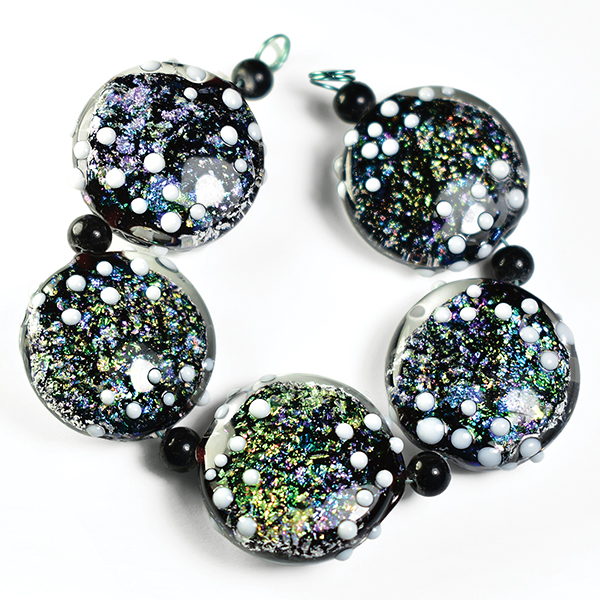
This tutorial shows how to work with the flakes in a 104 COE glass bead. They also can be used in lots of techniques, including vacuumed tube work, vortex marbles, and layering.
Lumiere Lusters are a new metal oxide flake product that produces similar results as dichroic coatings, but have their own design qualities unlike anything else. They can take quite a bit of heat, but like dichroic coatings, they are sensitive to overheating with a direct flame or prolonged working times. The most important tip is to remember to keep them out of the direct flame until encased
...

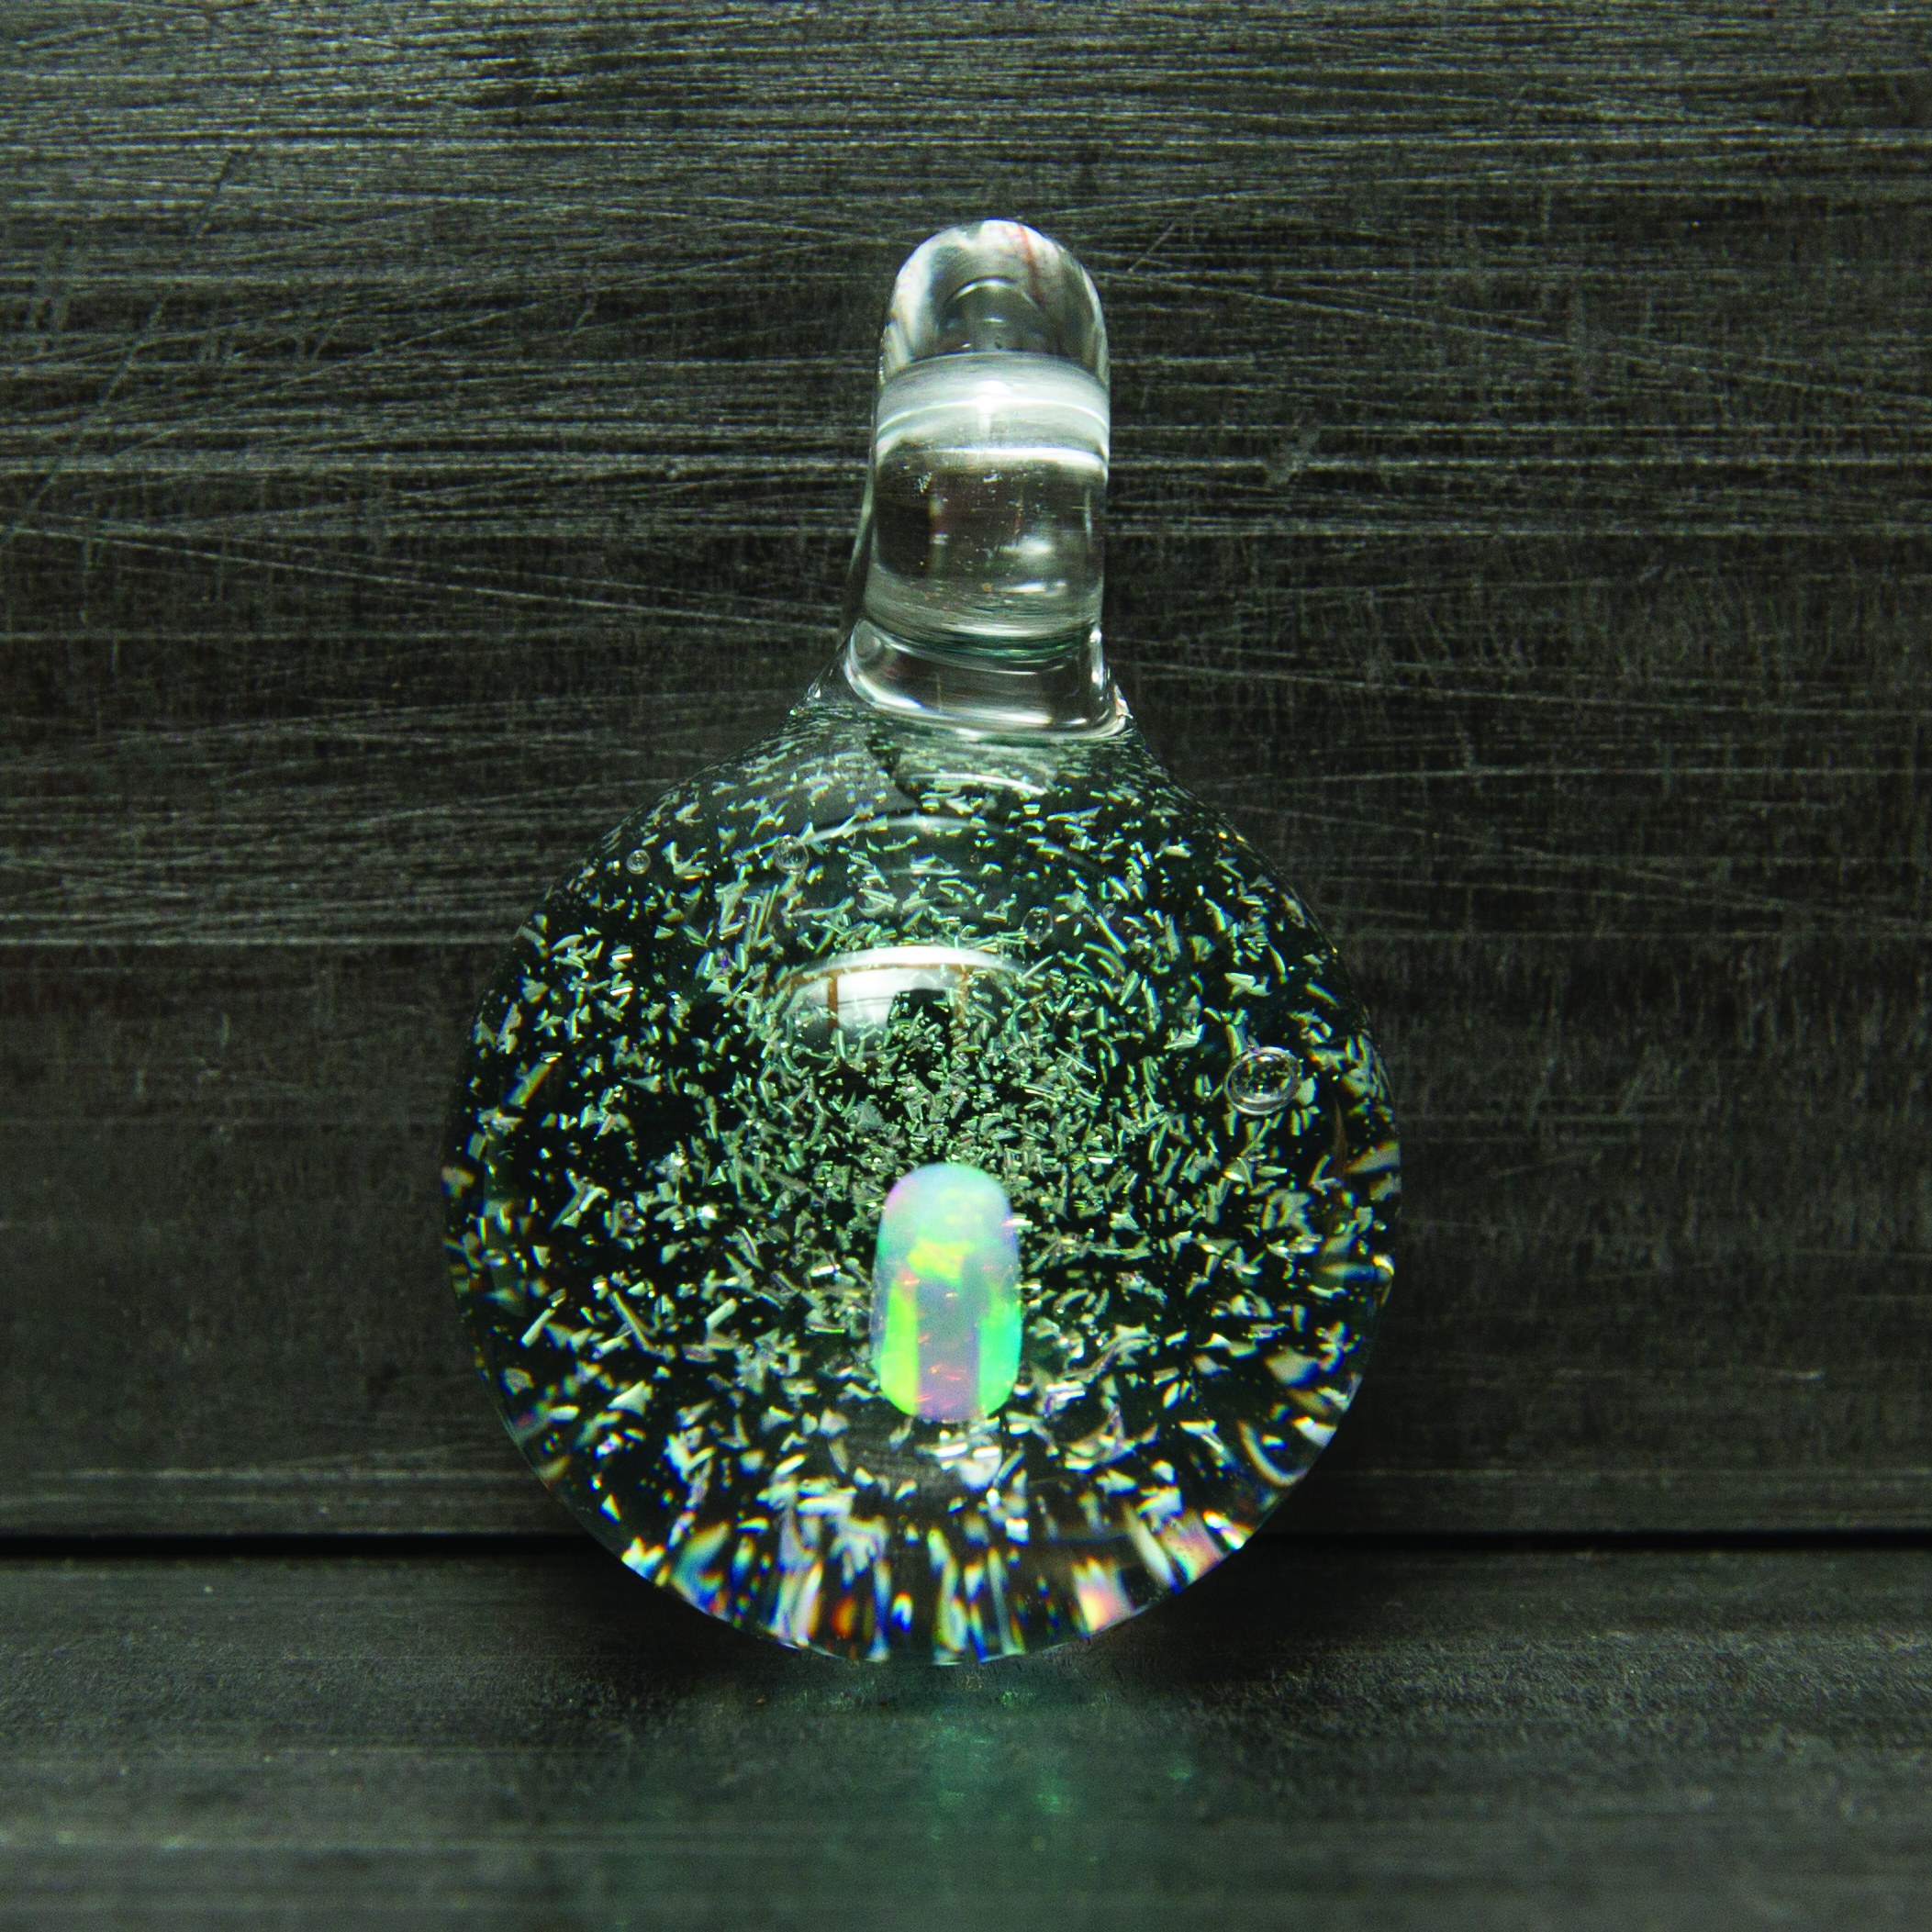
These pendants can have many small variations, but the general idea is to have an opal floating over a field of dichroic and backed with a solid color. This pendant is small to medium size, but the clear lensing rod can be scaled up for larger finished pieces. Almost any dichro will work, but generally newer, better-quality pieces will produce the best results.
The most important part of the whole process is heat control, since both the opal and the dichro are sensitive to heat. Opals can haze up or even have their luster dulled, and it is easy to burn out dichro and see it lose its color. Before the dichro coating is encased, it is especially sensitive, so be careful to keep the flame away from the side that has the coating on it until it is fully covered in clear.
Most of this process is done with a small, tight flame that isn’t very hot or worked quite far out in the flame. To figure out which side of the dichro sheet has the coating, look at both sides to see which has a reflection around the edges: That is the clear side with no coating
...

One of the projects that I return to periodically is the “pinch pin” — a Danish phenomenon that can be traced back to the end of the 1800s. In the 1920s, pinch pins were very popular, especially among young women, who started putting them in “pincushions.” There was also a “pinched‘ game that could be played either outdoors or indoors, where you tried to win the pinch pin. indoors, the pinch pins were placed with their heads facing each other, then you had to try a small puff (pinch) with one finger, to get two needles to cross each other. Outdoors, the pinch pins were tossed into a circle, and the one whose pin came closest to the center won a needle.
Today, a pinch pin is a great collector’s item. The old pinch pins are sought after. The new pinch pins will grew old and sought after too.
When I make a peacock pinch pin, my husband makes the needles. He buys stainless steel with a diameter of 1 mm and cuts it into 6 cm pieces. He sharpens one end so it can be inserted into a cushion and be ready for me to use
...

These beads are always an experiment; you never know what the end result is going to be. One time there is a lot of color in it; the next time, no color at all. If you make several beads, they will all be different and not resemble each other.
For these beads, I use Double Helix glass. You can use different colors, and they all have different effects
...

When someone asks for them I make reminder beads. These beads contain ashes of a person or pet who has died — a tangible reminder of a loved one ... In the last few years, I made lots of these beads, containing cremains of everything from human to dog, cat, and rabbit. I even made one with the ashes of an owl.
The beads are made with an ordinary hole or a large hole and 925 sterling silver core. The customer can add the bead to a necklace or bracelet, it can be made into a pendant. I send any remaining ashes will be sent back to the customer.
The bead can be made in different colors. If you use transparent glass, the ashes can be seen. Each bead is different; each ash reacts differently with the glass
...

This tutorial features my best-selling, easiest, and most-fun beads to make because your customers will love them; they are perfect as sets for full-gold necklaces and main beads for necklaces or earring pairs. (For beginners to intermediate lampworkers)
...
|
June/July, 2019 - Vol. 33, No. 1.

|
In This Issue
A Quick & Easy Bead by Irene van der Maas
I prefer beads that are easy to make. Quick & Easy is my motto. This way, I can be very productive and offer new beads to my customers several times a week. These beads were born because I did not have the right color combinations of frit, so I created my own combos
...

One morning, I went into the studio and they were packing everything up. Glasscraft was closing and I had to find a new space to work. A group of glassblowers decided that we wanted to continue working together, so we tried to start another studio. Little did we know how hard it would be to agree on things among ourselves. We ended up not starting a studio with everyone, but one of the guys and I decided we still wanted to do it, so we started C&C Studios LLC. That’s when my glass journey really took off.
I started learning from more people, establishing my own style, and improving my basic skills. At the same time, we were getting the business off the ground and finding clients to carry our work. Now, a few months later, we are in several Colorado shops and the business is growing
...

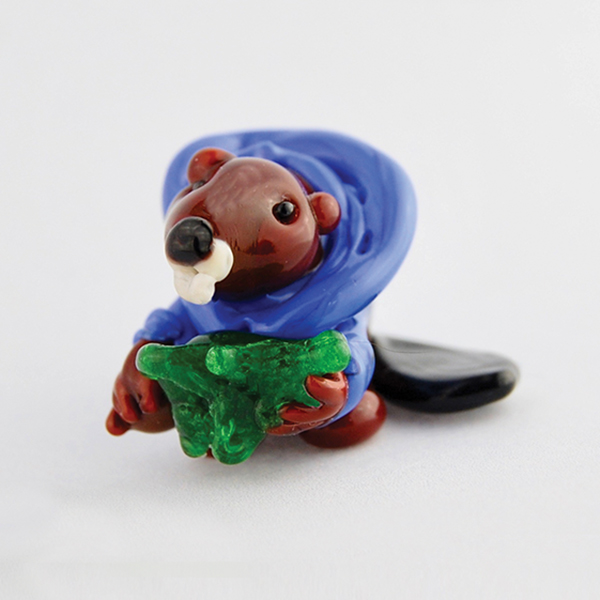
I sell online in private groups with a show every two weeks, and often entertain requests for beads. One of my customers requested a beaver. Not my usual request, but I get some wild ones, so I made one and then received orders for four more. I try to make each one a little different and thought that when they wear clothes or hold something, it adds to their uniqueness. One result is this beaver wearing a hoodie and holding a branch. It’s easy to change the animal a bit to make an otter, mouse, and just about any chubby little animal that is sitting and holding an object. Put a hat or other clothing item on it and you have an extra touch of whimsy
...

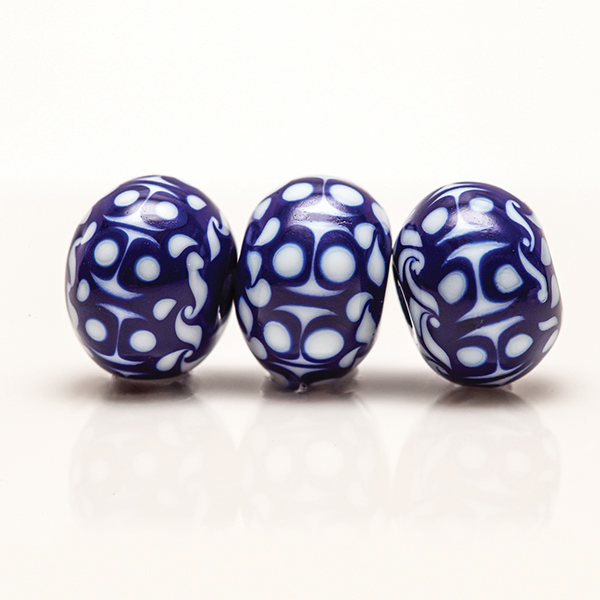
These glass beads are inspired by the beautiful Venetian fioratto beads and resemble decorative treasures from the past.
The base color can be whatever you prefer, including white.
This project uses EDP encased in Rubino Oro for the rose cane, but you can use any kind of pink, as long as the color is sufficiently saturated. With EDP, be careful not to leave any core exposed when applying it to the bead — it might devitrify.
For the light-blue cane, this project uses white encased in a medium-dark transparent blue. You can always make a different color cane, using the same principle: a light, opaque color encased in transparent glass
...
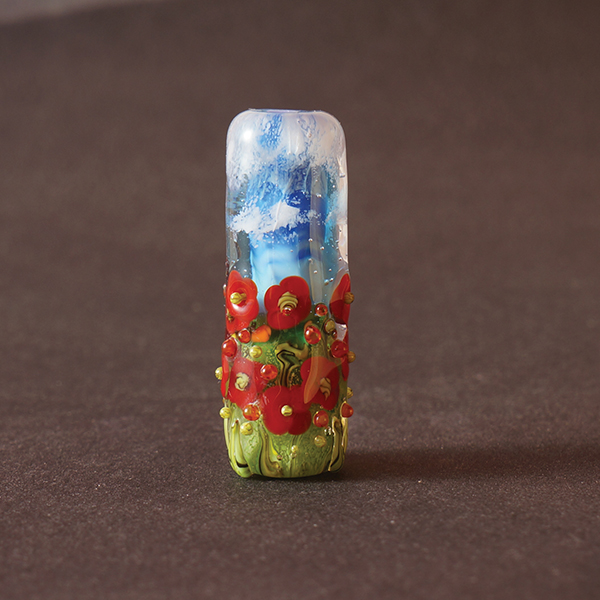
Poppies by Palala Lampwork by Olia Oleksiichuk
We are the founders of a small family brand, Palala Beads. We got into lampworking in the most trivial way imaginable. Five years ago, adventure called, and we — Olia Oleksiichuk and Nemo Snark — traveled to Tibet. Believe it or not, we were kidnapped
...

I am a member of our local flameworking group, the Pacific Pyros, and of the International Society of Glass Beadmakers (ISGB ). I attend monthly meetings of our group, our annual Whistler Molten Experience event, and, when time permits, the annual ISGB Gathering.
When I do sit at my torch, I find my focus with dots. It’s interesting to discover that most designs are created with simple dots. I like to create intricate designs and patterns. My beads are all shapes and sizes, and some can take upward of two hours to make.
I am a huge fan of everything glass. It is one of the most rewarding hobbies I have ever had, and I expect I will continue this journey for many years to come. I take great pleasure in the little treasures I create and the positive reaction of those who own my work. I sell my work at craft shows and online
...

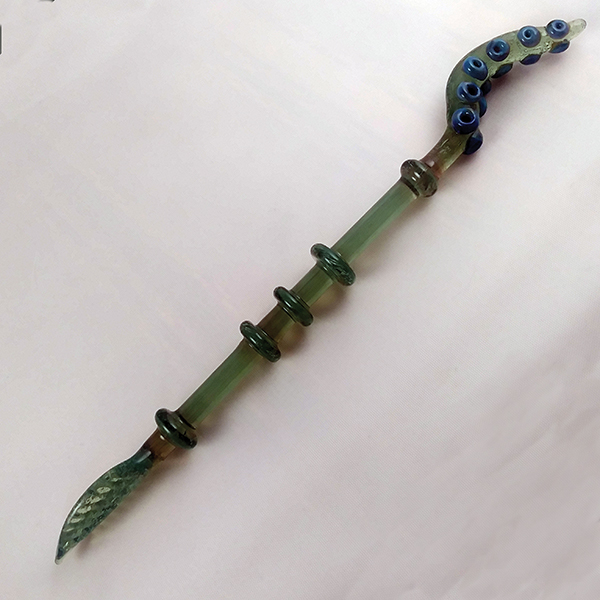
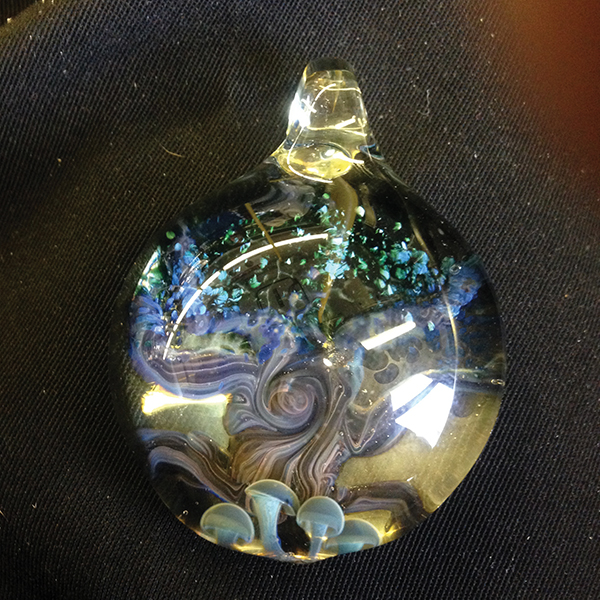
In the past, I have made many different Jellies — in hard and soft glass, pendants and marbles, but I was not really satisfied with the look. So, I did some big Jelly’s in my classes with students, in a furnace. With a furnace you can gather the tiny jelly quick in a massive clear glass, to spread out the deepness, but they are going to be very heavy for sure. Later I went back to hard glass, and back to smaller again, try to combine different prep-work with fuming, special stringers and working with different materials for the inside tentacles and for the jelly cap. At last I found a perfect match with fine copper or silver wire for the inner part of the jelly. It looks more natural, and by the way, it works well with the new colors from Molten Aura Labs.
Note: In this Tutorial I use hard glass to explain the working steps better, but you can do this in soft glass also. Other colors and glass manufacturers can be used for this technique, so, don’t hesitate to play around with your favorite colors
...

I started working glass in Portland, Oregon, in October 1994. I attended Pilchuck in 1996 and took a class with Robert Mickelson. I worked with many amazing artists in Eugene, Portland, and northeast Washington, and most recently with Kenan Tiemeyer in Floyd County, Virginia. I’m currently working at Oracle Glass in Portland with a great crew
...
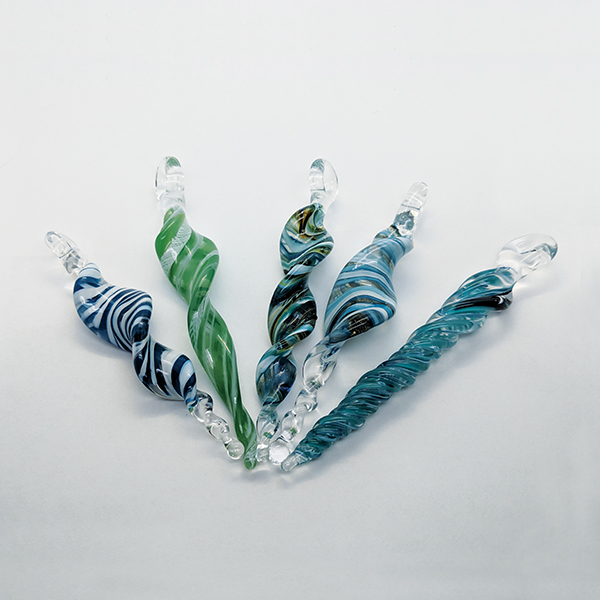
A Glass Icicle by Blake Mazzei
This tutorial shows how to make a glass icicle as a gift or a reminder that those unbearably hot days in the summer won’t last forever. This can be made with all sorts of colors and if big enough, can be hung outside as a wind spinner. It is a great technique for using up all of your scrap stringers and latticino ends. I usually make a few after a long day, just to clean up my bench
...
|
 April/May, 2019 - Vol. 32, No. 6.
|